


Our 2004 Privilege 435 Confianza (Connie for short) came equipped with traditional lead-acid batteries—5 100ah for the house bank and 2 starter batteries. We had a Northern Lights generator that we felt had roughly a million hours on it and was acting up. Our two stock alternators would give us some charge, but quite slowly. The problem with charging lead acid is that it takes forever to reach full charge because of the absorption phase.
What does that mean?
Lead Acid cannot take full advantage of your alternator or generator’s run time because of the absorption phase. The initial bulk charging phase brings the battery up to approximately 75-85% of its full charge by applying a constant high charge rate. Then, the charger enters what’s known as the absorption phase. During this stage, the charger lowers the charging current and applies a constant voltage, typically around 14.4 volts for a 12V battery, to allow the battery to absorb the remaining charge more slowly. This approach reduces the risk of overheating and overcharging, which can damage the battery. The absorption phase continues until the battery reaches near 100% of its capacity. Remember, your lead acids only have 50% usable capacity, so you’ve only gotten about 30% of amp hour capacity before you enter absorption.
Since lead-acid batteries should only be discharged to 50%, our house bank capacity for all of our electronics was only 250 amp hours. The fridge and the freezer alone could easily chew through this, and our limited solar was definitely not enough to keep up. Then, when you add 3-4 laptops, 2 iPads, 3-4 cell phones, wireless earbuds, etc, we could consume our whole bank in half a day. Before the transformation, we would be anchored out in the middle of a video call when the low battery light on the inverter would click on, and we’d be figuring out whether our callers would be amenable to starting the engine.
Additionally, many of Connie’s systems were wired straight to the generator (or shore power) and required 220v @ 50hz. That means, in the USA, we could only run the air conditioners, the water maker, the washing machine, and the hot water heater when the generator was running. We wouldn’t dare use any high loads off the batteries. Toast was made in a pan instead of a basic toaster.
Time to rethink the whole system!
I know many folks reading might already have done a decent amount of research around lithium conversion projects. If that’s you, we’ll dig right into what we’re using. And, if that’s not you, keep reading for further explanation of why we made the choices we made. We hope it sharpens your understanding of the issues.
SYSTEM MAIN COMPONENTS
Here’s an inventory of products and parts that went into Connie’s new lithium system:
4x 100ah 12v Battleborn Lithium Iron Phosphate (LiFePO4)
1x 100ah 12v Zooms Lithium Iron Phosphate (LiFePO4) (as a test)
2x Standard Marine Starter Batteries
2x Balmar XT170 Alternators
2x Wakespeed WS500 Alternator Regulators with Shunt and Temperature add-ons
2x 150amp Load Dump Protection & Stay Alive Relay Solenoids
4x Littelfuse High Amp fuses with holder
2x Sterling Alternator Protection Devices
2x Victron Smart Shunts
1x Victron Multiplus 3000
2x Victron MPPT 100/30
14x 50-watt Sunpower Flexible Solar Panels
Other Accessories of Note
6x Legrand Radiant Tamper-Resistant Ultra Fast USB C Outlets
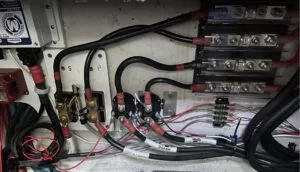
Wiring Diagram
Here is a PDF wiring diagram and a depiction of the main components for reference
FIRST, WHY LITHIUM?
The first decision was whether or not to stay with 12 volts or up our game to 24 or even 48. There are many advantages to upgrading, including more efficient charging, lower cable gauges, and reducing amperage-induced heat risk, to name a few. However, the goal was to keep the system simple as we experimented with what works and what doesn’t. We may outgrow this system at some point and switch to a combination 12/24 volt or 12/48 volt system in the future, but for now, we are very happy with the setup.
Fast charging capability. Lithium batteries take as much energy as you can give them immediately (as long as you stay below the recommended ). We charge at 0.25C to maximize the life of the batteries and minimize complexity, even though Battleborn says up to a 0.5C rate is fine. If we wanted to go up to a 0.5C rate, we would have had to go with large-frame alternators, and thus more modifications. A word on what C rating means: The “C rating” for Lithium Iron Phosphate (LiFePO4) batteries, or any other type of battery, is a measure that describes the battery’s capacity to deliver current. It represents the maximum current a battery can safely provide or be charged at, expressed as a multiple of its total capacity. For instance, a 1C rating means the battery can be charged or discharged at a current equal to its amp-hour (Ah) capacity. So, a 100 Ah LiFePO4 battery with a 0.75C rating can be charged or discharged at a rate of 75 amps.
Higher capacity. Lithium batteries can be discharged at least 80%, while lead-acid batteries should only be discharged to 50% to prevent damage. That means for the same number of batteries, we get 400 usable amp hours vs 250 usable amp hours. This allowed us to keep the same battery boxes in the same location and still provide a 60% increase in usable capacity!
Charging cycles. Working from the boat means that we are cycling these batteries a lot. And the Battleborns are rated for 3000-5000 cycles. If we drained them every single day, we should get more than 8 years out of these batteries. Lead- acid batteries, on the other hand, are usually rated for 1000 cycles, and that’s only if you treat them properly.
Voltage drop. If your traditional lead-acid batteries are not anywhere near full, a high load such as a windlass or even a toaster will sag the voltage low enough that it could affect certain electronics. I’ve had my chart plotter restart a few times with traditional batteries at very inopportune times.
WHAT ARE THE NEGATIVES?
We think upgrading to lithium is the best way to achieve the household-like power that we required for working from the boat full time. To make this happen, we had to make a number of upgrades to accommodate our LiFePO4 system so let’s examine the negatives of a lithium setup.
Cost. The batteries themselves are basically a wash because of the extra long life, but it is a higher initial investment. An individual Battleborn 100ah lithium battery ran us around $875 each (your experience may vary). I am experimenting with a MUCH cheaper alternative brand direct from China called Zooms (recently rebranded Redodo) for the 5th battery in an attempt to do a long-term comparison test. I picked it up on Amazon for $325. I chose the Zooms battery based on a good inspection of the Zoom’s interior performed by Will Prowse – https://youtu.be/74iBMHE3StM. At $325, the cost should be settled, but now we’ll have to look at the additional modifications and equipment that we will need to deal with the LiFePO4s.
Changes to the Charging Systems. Don’t be misled by the companies that advertise their batteries as “drop-in replacements.” That might simply refer to the size of the battery and the cabling, but that’s where the “drop in” part ends.
To begin with, LiFePO4s cannot use stock alternators to charge. Connie’s original 60-amp stock alternators were not set up for external regulation. Because the LiFePO4s do not have internal resistance like a lead-acid battery, the alternators run too hard and the diodes—essentially one-way switches— burn up. I’ve torched a few alternators in my experiments.
So, you could take your stock alternators to an alternator shop and have them modified for external regulation for pretty cheap. Or, if you’re so inclined, you can do this yourself. However, two 60-amp chargers that are regularly down-regulated to likely 30 amps continuous duty would not meet our needs for charging efficiently. If the bank gets depleted, I would have to run one engine for almost 17 hours to fully charge.
Let’s bring in some bigger fire power.
The Balmar XT-170. We originally tried the CMI AMP-IT 100 amp ERV alternator. Rod, who runs CMI, is an absolute legend in the space, even mentioned that these might be a little light for our needs. We decided to give them a try anyway thinking they were just augmentation for the solar.
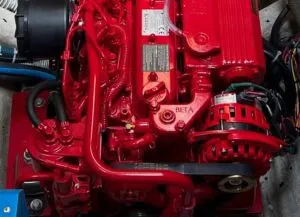
Turns out he was right. We were still running the engine too long, and under low loads (terrible for Diesel engines!). When we repowered Connie from our tired Volvo MD2040’s to new Beta 38s, we also decided to upgrade the alternators to the Balmar XT-170s. These are still a small-case alternator, so no custom brackets or dual belts required. Again, keeping it simple. The Balmars are much better for charging LiFePO4s since they have dual-fan cooling. The issue with alternators is that they are mechanically cooled based on the RPM of the engine. They also rarely produce anywhere near the rated power at full RPM. The Balmars, on the other hand, have a much higher output at lower RPM and much better cooling.
We can effectively charge our batteries now at a pretty consistent 90 amps per engine. That means 1 engine will charge an empty bank in 5.5 hours. That’s not nearly as good as the crazy 48-volt systems—with large case alternators charging 1000- amp hour banks in 45 minutes—but it’s plenty to augment our solar.
The Balmars still need a brain to keep them from burning up and maximizing their charging capability, so we’ll need an alternator regulator that can handle LiFePO4 batteries.
The Wakespeed WS500. We need the regulator to do a few things:
- Monitor the alternator temperature and pull back the charging when it gets too hot, while still maximizing the amount of amps it’s producing.
- Communicate with another regulator to maximize charging between the two engines.
When we designed this system, there was only one regulator smart enough to work with two engines, the Wakespeed WS500. Otherwise, the alternators would confuse each other into thinking the battery was full, and we would only get the output of one.
Now Balmar has come out with their own option, the MC-618. Would we have bought that one today? Maybe.
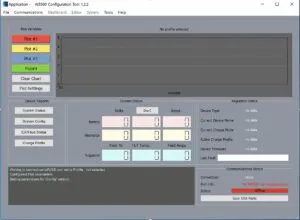
The Wakespeed WS500 is incredibly customizable, and that also means incredibly complex. There are a very limited number of installers available who will understand how to program it. So, unless you’re technically inclined, and comfortable working with the Terminal or Putty command line, it could be a challenge.
Programming the regulator will take significant learning and effort, and monitoring what it’s doing is not easy either.
Dragonfly Energy has bought Wakespeed, so we will see if they plan on bringing any more user-friendly software to the market. The provided app is neat, but it doesn’t really give the best insight into what your program is actually doing.
There is software made by Offgrid Software Solutions that we’ve had good luck with for programming and monitoring, but it is still cumbersome and now has trouble updating the regulator firmware. Also, you’ll need your computer to be plugged into the regulator via usb to do either. And that’s also a pain in the you know what on our boat.
With all this said, the Wakespeed WS500 is incredibly customizable and intelligent.
It has a pretty good algorithm that understands the speed at which the alternator temp is increasing and anticipates by lowering the field (output). This prevents a jerky on/off cycle that would put more stress on the components (like the belt).
It also connects via a controller area network (CAN) to the second WS500 and should work in tandem to maximize charging. I am still finding that I don’t have things set right to take advantage of this well, and I am still experimenting. It’s quite complicated. And I have to take the after berth apart to get into the engine compartment every time I want to play with it, so I don’t play with it that often. I am thinking about getting to install to do a side-by-side comparison. More on that in the future!
CHARGING A LiFePO4 HOUSE BANK AND AN L-A STARTER BANK
Now that we have two different battery chemistries on the boat, charging becomes a bit more complicated. Both chemistries charge in a completely different manner.
The most proper way to do it for our configuration would be to have all charging sources charge the LIFePO4 house bank and then use DC-to-DC chargers (from Victron or other manufacturer) to properly charge the two independent lead-acid starter batteries.
Keeping with our theme for simplicity, we decided against that and instead went with stay-alive relays that parallel the battery banks when the ignition switch is on. When the engines are running, the starter batteries now get on the bus (in parallel), and they are seeing the same voltage as the house bank batteries. And, since starter batteries use very little charge from each start, if they’re topped off each time, float voltage is about the same as what the rest of the bus is charging. So the theory is that the starter batteries will be topped off and then just be at float voltage.
If you surf Cruiser Forum, you can see that this theory is quite controversial. It is endorsed by Rod from CMI, and we chose this method for simplicity. Three years in, and our starter batteries are doing fine. I will update if we have any problems with this method.
Now that we’re charging, let’s do something with all that power.
ENTER THE 3000-WATT VICTRON MULTIPLUS INVERTER CHARGER
The inverter will be powering all of our household (110v) electrical needs. Being that this is a critical part of our system, we went with the top brand: Victron.
Rather than drone on about why Victron makes better inverters than the competitors that offer them for one third of the price, I can easily just refer you to this video: Inside the Victron MultiPlus & a Detailed Explanation of How It Works.
Three-thousand watts has been plenty for us to run the toaster, microwave, vacuum cleaner, an electric heater, and even a Dyson Airwrap Hairdryer (not all at the same time mind you…). We may want to expand the system some day to add capability for another 3000 watts, and Victron makes it very easy to add another 3000-watt inverter in parallel to achieve this.
Now that we’re using all that power, let’s talk solar
SOLAR POWER SETUP
Connie is a Privilege 435 Catamaran with a nice hard top over the cockpit with a good amount of room for solar. The initial design was able to run the fridge and the freezer indefinitely. And the decision to move aboard full time and work from the boat came later. So the solar setup is already inadequate, especially as we had already made the decision to remove the generator.
While we have 700 watts of solar wired in a way to help with shading, half our solar is often covered by the boom and sail bag, drastically reducing our solar harnessing ability. Side note here: it’s important to understand how wiring in parallel vs series will affect shading. Gone with the Wynns did a fantastic demonstration that is easy to understand here: https://youtu.be/1qD3mN8VotQ.
We used Sunpower flexible panels at 50 watts each. The 50 watt rather than 100 watt allowed us to pack more watts up there given the rounded shape of the hard top. However, the 50-watt panels alone would often not have a high enough voltage to give to the SmartSolar controllers to turn into charging, so 50-watt panels would be wired in pairs as series, doubling their voltage output. Those pairs would then be wired in parallel before going to the controller to overcome the effects of shading.
While Sunpower makes some of the very best solar cells on the market, their panels have not lasted. Flexible panels have the reputation of a short life, but our panels were even on the short side of that. Their panels are now discontinued. https://www.solarreviews.com/blog/sunpower-to-stop-manufacturing-solar-panels
Since the install, we also learned about the importance of the lack of airflow that flexible panels experience, and the degradation that causes. The most innovative and simple solution that I’ve seen is to put the panels on top of corrugated plastic sheets. This puts a good amount of air space (and therefore cooling!) under the panels.
Time for new panels, and more power!
WHY NOT WIND OR HYDRO POWER?
The power produced per dollar just doesn’t add up. If I was going to get one, my research points me to the for its industry-leading noise level and power output. However, even after visiting many owners of different wind generators, even the best of the bunch doesn’t seem to hold a candle to a good solar setup. Yes in the off chance we have many rainy days, we will chew through batteries, but that’s why we have two engine charging sources ready to go. I also still hate the sound of these things, even the D400.
Why not hydro power? The dollars don’t add up here either, but the bigger problem is the drag. We go through great time and expense to own and maintain maxprop feathering propellers to give us an extra 0.5 to 1 knot under sail. And we would ruin that and then some with a hydro generator.
NEXT PHASE
We are having a solar arch made to hopefully add another 1000+ watts of solar, in addition to replacing the 700 watts on the hard top. Based on our experience, 1700 watts will be plenty of solar, especially with much less shading of the panels on the solar arch.
The solar arch also has the added benefit of providing shade to the dinghy, so we won’t have to buy bespoke dinghy chaps to prolong its life.
As you can see by now, there’s a lot to consider when trying to upgrade a boat to household like power. Hope this writeup gives some useful guidance and ideas. If you have any questions, feel free to drop a comment!


Nice article.
As with other articles I have read on LIFePO4 battery systems there is a lot of enthusiasm and positive projections of the future but few dollars and cents details on what they actually cost. Whatever that is may be acceptable for a working couple full-time-live-aboard but is a questionable expense (definitely not an investment) for the rest of us.
Thanks for the comprehensive treatment of conversion from lead-acid to LiFePo!
I have a 1976 CT-54 Ketch with a 120hp Ford Lehman undergoing a total restoration, and learned much from your article. A few questions: How much did you spend on this project? A break down of all the costs would have been helpful. Your main power source is your engines, Why no Gen-Set, wouldn’t that be more efficient? West Marine pushes AGM batts pretty hard. How do they measure up by comparison to a LiFePo system? We really need to consider cost on this project. Thank you!
I found your article interesting as I am faced with having to replace my “Firefly Oasis” house bank as well. I recently crossed the Atlantic and the batteries failed (were reduced to 10% of capacity) half way across… So we have nursed them to Portugal and Spain. Apparently after newly installing them, leaving them on a foat cycle during the pandemic did them in.
I was surprised that you didn’t mention how important an internal Battery Management System (BMS) as necessary for each battery to carefully control charge limits respecting voltage and temperature in the LifPO4 batteries. Battleborn apparently has a good internal BMS. When charging with an alternator the BMS can suddenly shut down the connection and “eat” the alternator’s diodes.
Unfortunately, I’ve had considerable resistance from Insurance companies when I ask about LifPO4 installation.
Interesting article.
I wondered why you did not use a B2B charging system. You, presumably had a perfectly adequate charging ability for your engine start and original house batteries. It would have been a simple upgrade to invest in a B2B charger whereby you charge the lead acids and simply charge the lithium bank from the lead batteries. I too was surprised you did not mention the BMS – but accept that Battleborn have a good reputation. I suspect you will find that though you have invested in significant amps and a decent solar display you will find that electricity follows Parkinson’s Law – the demand for electricity always exceeds the ability to produce and store it.
Jonathan