Each manufacturer offers specific guidance for terminal assembly, and some do a better job than others. The following is a generic description of the assembly process using a Norseman fitting as an example. The other two fittings in our comparison, the Sta-Lok and the Hi-Mod, incorporate a third component, a crown that helps guide and hold the wire strands in place.
Before assembling, make sure you have the right hardware. Confirm that you have the right cone for the specific wire type (1×19, 7×7, 7×19, or Dyform); Hayn color-codes theirs and includes a chart with every terminal.

1. Slide the tapered, threaded fitting that will surround the cone or wedge onto the wire. Make sure its facing in the right direction and double check that the terminal is correctly sized for the wire. Manufacturers provide tables listing product numbers for both metric and inch wire sizes.
2. & 3. Secure the rigging wire in a vise-we recommend an aluminum or bronze-jawed vise, which will prevent corrosion-inviting scarring-or immobilize it with leather in the jaws of a large pair of vise grips. Then unravel the outer strands of the evenly cut wire, making sure that the strands are not kinked or bent in the process. Unwind just enough to be able to slip the cone (and crown ring, if using Hi-Mod) onto the inner bundle of strands.

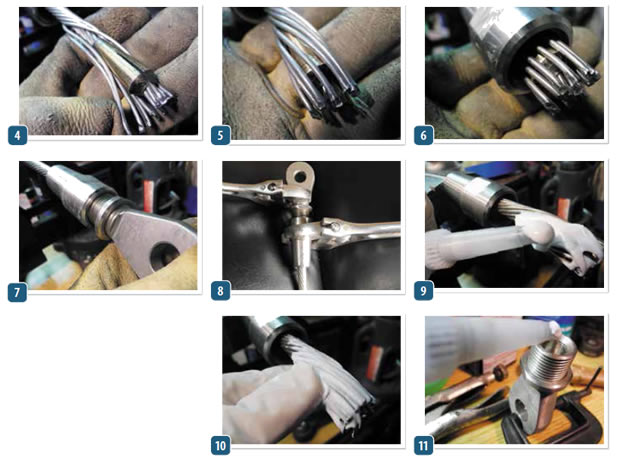
4. Slip the cone and other components onto the central bundle and rewind the outer strands evenly around the cone. Make sure that the cone or wedge has its long tapered end pointed in the correct direction.
5. & 6. With the cone inserted according to the manufacturers recommendations, coax the outer strands back into position, splaying them over the top of the cone. Each manufacturer requires a different amount of core to project above the top of the wedge. This is a critical detail.
7. At this point, it is important to do a dry fit, attaching the socket and hand tightening a turn or two to make sure that the socket is not cross threaded. Yarns can get stuck in the slot, folded over, or pushed back, or the wedge can crawl up over the end.
8. Riggers often use two crescent wrenches or appropriately sized box wrenches to screw the socket together. Most will twist the distal-end wrench while immobilizing the one at the proximal end. Be careful during this dry-seating not to fully tighten the terminal. Turning the female fitting while keeping the smaller-diameter male fitting immobilized will prevent the wires from twisting. Adding some Loctite to the threads before doing this lessens the chance of galling the threads. The next step is to disassemble the terminal and inspect the wire bundle prior to doing a final assembly.
9., 10. & 11. This last step involves applying marine sealant that will fill voids, minimize water intrusion, and help to prevent corrosion. This is complicated by the need to also add more thread-lock compound and then screw the terminal together.
Each manufacturer warns do-it-yourselfers not to over-tighten the terminal, but unfortunately, their instructions don’t offer any torque values. If you use a 10-inch crescent wrench to twist and a 12-inch to hold, you can twist away; but if you have pulled out the 12-inch for the twisting and 15-inch for the holding, a little restraint is appropriate, especially with terminals for wire under 3/8-inch diameter.


