The transom support is a simple design. It is merely a 1″ x 8 ” board of a convenient length fastened to the rudder gudgeons on the transom. What distinguishes it from most other supports is the roller incorporated in the top. One person can balance the mast on the roller and roll it back into position so that the foot can be fastened to the tabernacle or mast step.
The only parts not likely to be found in your local hardware store are the rudder pintles, but these are readily available at many local marine suppliers or through any mail order catalog. Use dinghy pintles, and bend the straps out at right angles so that they can be mounted flat on the board, as shown in the illustration. Carefully measure the distance between the gudgeons on your transom and mount the pintles the same distance apart.
The board can be of any convenient length; generally, the longer, the better. Getting the mast up higher makes it less of an obstruction when you need to get into the cockpit or cabin when the mast is stowed. It also makes raising the mast just a little easier. Of course, you do not want to make the mast support too tall or you may have trouble negotiating low overpasses when trailering.
The aluminum channels used to support the roller are available at most large hardware stores or building supply companies. The 3/4 ” width will just slip over the edge of a nominal I ” thick board. You may have to notch the board slightly for a flush fit. Fasten the channels in place with three round head screws.
The channels should be cut long enough to extend past the roller about 4 “. This will prevent the mast from sliding off the edge of the roller. All exposed edges of the channel should be filed smooth. To keep the mast from being scratched, slip a piece of 1 ” heat-shrink tubing over the channels and heat the tubing for a form fit.
The roller is commonly sold as a replacement for the rollers on powerboat trailers, and should be readily available at boat dealers or marine stores. You can use a 3/8 ” carriage bolt for an axle in most cases.
The crosspiece mounted above the pintles is merely a spacer placed so as to fit firmly against the boat’s sheerline rubrail when the mast support is in position. It keeps the whole assembly from twisting or pivoting off center. I used a short piece of 2 x 4.
A plastic cleat for tying down the mast completes this transom mast support. Slip the boards pintles into your boat’s outboard rudder gudgeons, securing the board by slipping a hairpin-type cotter pin through the hole in one of the pintles.

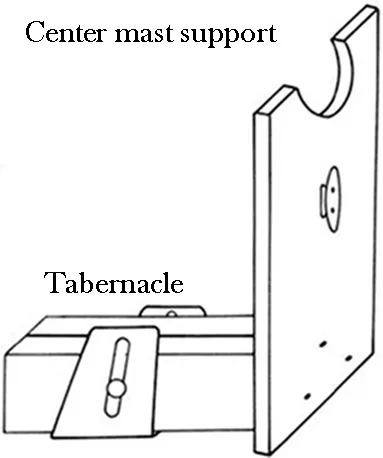
The center mast support is made to fit in the mast tabernacle. I used two 2 x 4’s nailed together to form the horizontal piece. You may have to plane them down slightly to fit in your mast step. They need not be much more than about a foot long. Adjust the length so as not to interfere with any obstructions on deck. Drill a hole through the horizontal piece the diameter of the hinge pin in the mast tabernacle.
The vertical part of this center support is a 1 x 8 board notched out to fit your mast. The notch is easily cut with a saber saw. The length of this board is critical. It should be just high enough to support the mast without bending it upwards. Measure the height needed with the mast resting on the bow pulpit forward and the transom support aft. Because the mast will probably be sagging slightly in the middle when supported this way, hold the center of the mast up to take the sag out while measuring for the height of the board. Don’t forget to allow for the depth of the notch you will cut out for the mast.
Assemble the boards using stainless steel or bronze screws. After painting, tack a piece of leather to the mast cutout to avoid scratching the spar. A small plastic open-base cleat mounted on the vertical board enables you to tie the mast down.
While both of these mast supports are easy to make, they simplify mast handling considerably, as well as providing the needed secure support for your spar when trailering.
-Henry Rodriguez
Download PDF: Mast Supports for Trailerable Boats


