Sail repairs are a fact of life for the sailor. A stray cotter pin can shred a spinnaker. Perhaps the mainsail luff could use some chafe protection, or the genoa sun cover is flapping. Often, a trip to the sailmaker isn’t justified for these repairs. The sail is too old to take stitching without further weakening the material, or you simply want to delay that repair until the end of the season. Perhaps youre on a cruise and would rather wait. A sewn repair is generally the gold standard, but some tears better-fixed with a patch.
Several sailmakers we spoke with agreed that tapes and glues play a key role in sail repair and maintenance. They shared long tales of repairs in which the cloth was too old to take stitching, where a sewn repair would require too much disassembly and reassembly for the labor to make sense, or where tapes and adhesives were used as adjuncts to sewn repairs. Weve repaired shredded chutes, patched luff tapes, replaced tell-tales, and repaired race damage, all in field conditions, but we were never sure what could have been better or just how strong a given repair really was. Time for some numbers.
What We Tested
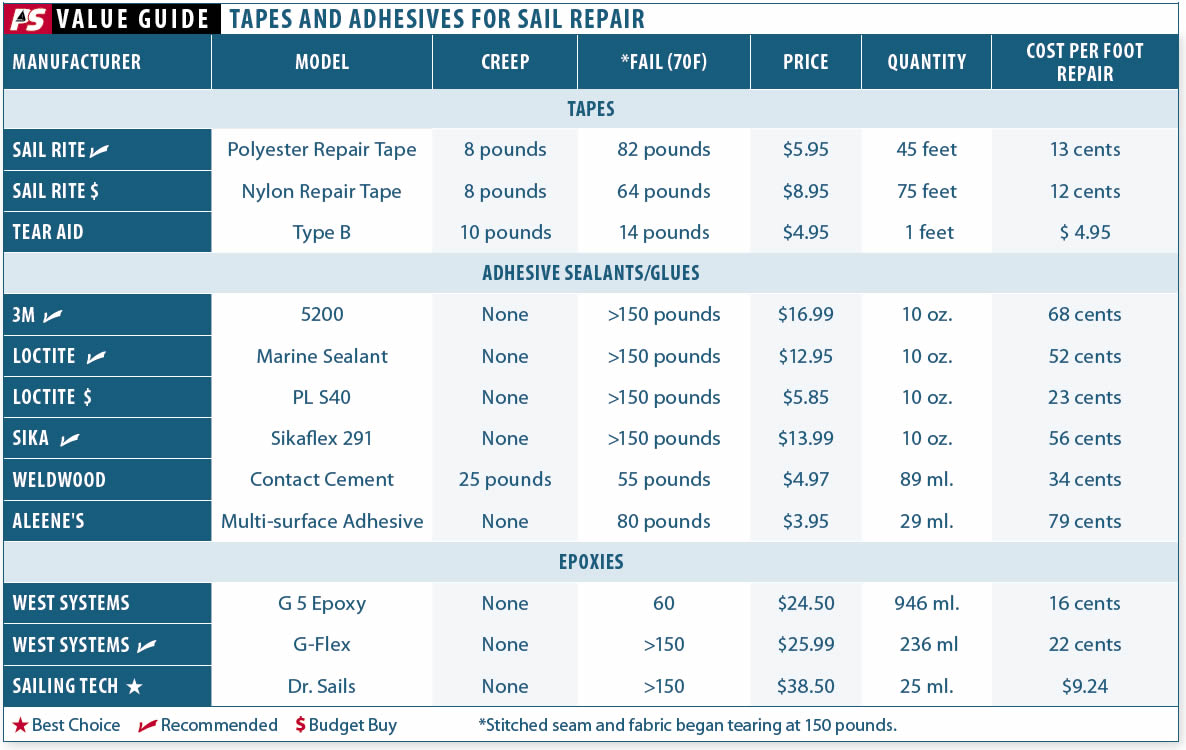
We tested tapes and adhesives, including sail repair tapes and a specialized sail repair adhesive, Dr. Sails. We tested all materials on lightly used 6-ounce weight polyester sail cloth, which we laundered and scrubbed with TSP prior to testing to remove any surface contamination or treatments.

How We Tested
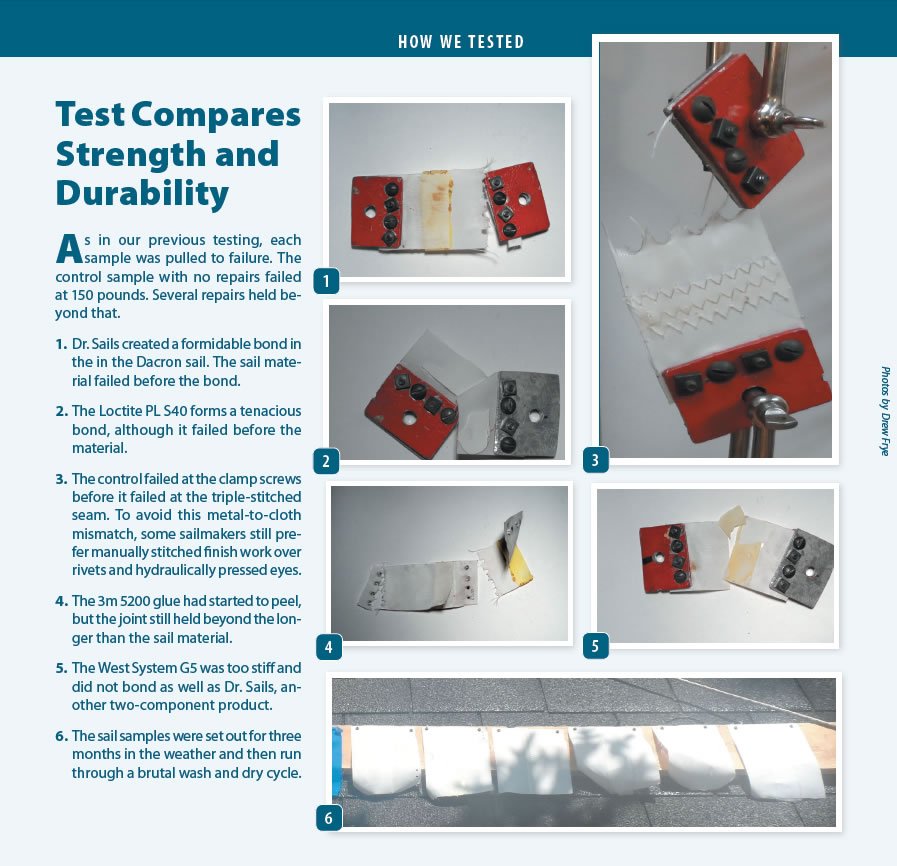
First, we tested several control samples containing sewn seams. Then we made up 2-inch wide cloth coupons cloth and created a seam for pull testing. For tapes we used a butt join with tape on both sides. The tape was firmly smoothed with a seam rubber and the samples allowed to rest overnight (some tapes take a little time to develop full strength). For adhesives we allowed a 1-inch overlap (more overlap would generally mean more strength) and allowed the adhesives to cure for 1-week in hot humid conditions (more time would be required in winter or dry conditions). These samples were slowly pulled to failure.
We then made up 6-inch x 8-inch flags from each material, with a seam running horizontally. These were aged by leaving them in the sun for three months and running them through the laundry a dozen cycles, including three hours of tumbling dry with no heat and tennis balls added to increase impact and flexing.
Observations
Because sailcloth does not wick adhesive away from the joint and because the surface is smooth, much less glue is needed to make a strong joint. We had our best result, in terms of flexibility and strength, when we went over the seam lightly with a seam rubber, removing most of the surplus adhesive (leave a little extra if crossing existing seems). We masked and used wax paper above and below to prevent a mess.
Because sail cloth is less stretchy than Sunbrella (see PS Fixing Tears in Sunbrella Boat Canvas), the slightly stiffer West Systems G-Flex did an acceptable job.
All of the adhesives, with the exception of Aileens, could be peeled from the fabric-albeit with great difficulty-should a sewn repair be desired later. This includes materials that were stronger than the cloth when used with 1-inch overlap. A clean disassembly might be impossible with old porous sailcloth, since many of these products tore old Sunbrella before releasing.
Even though we could peel the panels apart with our hands, none of them came apart in our rigorous laundering and drying test, suggesting theyd survive just fine in the field. In most cases, a sewn repair will better resist peeling, but glued patches are often preferable for areas where threads would chafe.
The details of application? Our testing was all at 1-inch overlap, but we would increase this to 1.5 inches in actual use. All patches should be rounded to about a 1-inch radius, including tape patches. This prevents the patches from peeling, and prevents it from puckering.
Sewn patches, on the other hand, generally have square edges because of difficulties hemming curves.
Secure the torn fabric in position by taping it from the backside with sail repair tape or even masking tape. Slather up the patch area and the patch (remember to mask and work over a non-stick area, like wax paper), place the patch, rub down, and wait to cure. Then repeat on the other side (remove any tape adhesive by scrubbing). It will be stronger than the fabric and probably outlast the sail.
Tapes
The tapes in our test adhered reliably if rubbed down firmly; a seam rubber is your friend. In fact, we used old sun-rotted rip-stop reachers for years with yards of tape, feeling there was little point in real repairs for such an old sail. Occasionally a corner lifted, but it took only moments to peel back to good cloth, slap a few feet on each side, and hoist away. Polyester repair tape, on the other hand, felt sturdy enough that we would be comfortable using it as a part of a permanent repair if the perimeter were stitched down.
Sailrite Nylon Rip-Stop Sail Repair Tape
Weve used rolls of sail repair tape over the years, patching chutes with minor snags from sharp bits and long rips from age. Although it is not a permanent repair, it always did better than expected, often lasting through years of sporadic use.
Weve used this tape to rebuild chafed luff tapes, where nothing thicker would fit up the luff grove and the extreme flexibility helped it conform to sharp bends. On the other hand, we would not recommend it for a repair near an edge where high loads are carried; it is very light and will creep under sustained load. If you apply it to both sides and then sewn, it can be very durable.
Bottom line: Recommended for repairs to light sails and chafe/cover repairs on working sails.
Sailrite Polyester Sail Repair Tape
Like the nylon tape, this tape readily creeps in hot weather. However, if you apply it to both sides and then sew it in place, it can be a permanent repair to working sails, rather like a strip of cloth with built-in seam tape. The adhesive will make the sewing needle drag a bit, but not too bad.
Bottom Line: Recommended for repairs to woven polyester working sails and chafe/cover repairs on working sails.
TEARepair Tear-Aid A
The problem with this Tear-Aid A is that it is so darn stretchy and soft. In hot weather it began to stretch at only one pound/inch of seam. It cannot be sewn (and it wouldnt help).
Bottom line: Not for sail repair, and too expensive anyway.
Glued Patches
Cruisers have been using 3M 5200 successfully for sail and canvas repair for many years, and the sail makers we spoke with agreed it could be a useful tool. We added several additional sealants to our testing panel that out-performed 3M 5200 when bonding plastics. We were curious if that versatility would cross over into fabric adhesion. A sail specific product, Dr. Sails, held promise, and epoxies seemed worth investigating, since we always have them around.
Dr. Sails
Dr. Sails has a lickety-split 8-minute working time. Make certain that all of the parts and tools are laid out before you begin, including paper towels and several plastic scrapers to spread the epoxy and press the layers together. The in-line mixer on the syringe does require a firm hand; large jobs can be a hand-cramper, but the rate is about right for smaller projects. The 25 milliliter kits come with two in-line mixers, allowing two repair jobs if put away carefully. The repair was considerably more flexible than the G-Flex repair, and the cure time far less. We liked that the glue did not show through the fabric, making for a neat job if we masked the work area. Because it is an epoxy, clean-up is with vinegar (stops the curing) followed by soap and water. We wonder what other uses we may find for this unique material.
Bottom Line: Pricey, but our Best Choice for sail repair.

Photos courtesy of Mahina Expeditions
G/5 Epoxy, West Systems
A 5-minute epoxy, it is easy to work with and fast. However, because the epoxy is very stiff compared to the fabric, it does not distribute force evenly as the cloth stretches, resulting in a weak bond. Add to that its stiffness, and it did not advance to fatigue testing.
Bottom Line: Not for sails or canvas.
West Systems G-Flex Epoxy
Much like Dr. Sails, but with slightly less flexibility and an overnight curing time.
Bottom Line: Recommended for working sail repair.
3M 5200
We have used 5200 for years to stiffen areas where grommets were to be installed. It has never let us down, and dependable test results support that experience. We would be comfortable using this if sewing was not a viable option. A little stiffer than other materials in the test.
Bottom Line: Our Best Choice for fixing canvas works as well on sails.
Loctite PL S40
This is useful around the boat and the house, performing right up there with marine sealants at a fraction of the price.
Bottom Line: Our Budget Buy for sail repair
Marine Sealant, Loctite
This product is a lot like Loctite PL S40, but polyether and with a quicker setting time.
Bottom Line: Recommended for sail repair.
Sika Corporation Sikaflex 291
This is another well-respected polyurethane sealant popular for marine use. It does not disappoint.
Bottom Line: Recommended for Sunbrella repair.
Weldwood Contact Cement
While this worked very well for sail repair, we found the results on canvass were extremely variable, somehow related to the condition of the cloth and whether we could rub it down hard. Easy to work with and very fast, but UV resistance is also a concern.
Bottom line: This option deserves further investigation.
Aileens
This was suggested to us by a cruiser who had used it successfully for both sail and dodger repairs. Sure enough, when applied carefully on a flat work surface in the lab, we got respectable results. However, when we tried it in the field to repair a number of holes in a dodger it was a complete failure. When used on sails we were alarmed by the sudden failure at relatively low load.
Bottom Line: Leave it in the craft department.
Conclusions
A needle and thread will always be king for canvas and conventional sail repair. However, there are times and places where adhesive and tapes can have considerable advantages in labor and even quality, if properly applied.
We like sail repair tape for speed and versatility; you can slap it on as a quick expedient (always rubbed down well), use it for chafe protection, or add a few stitches and make it permanent. We like the quick-cure of Dr. Sails, our best choice. It was a close call, however, with excellent performances by 3M 5200 and other sealants, all producing flexible repairs that were stronger than the fabric.
It comes down to practice and proper application of the tools.


Boat projects can be time-consuming but always possible. Thanks for very informative article!
It helps me choose the best glue for boat that fits my needs.
Again thanks!
I am looking for something to repair a laminate sail. Dr. Sails sounds interesting, but I can’t find any place to purchase it. They list Harken as US dealer on their web site, but nothing on Harken’s web site about this. Any ideas?
Anyone else use E 6000 on Sunbrella?