Photos by Drew Frye
Rope is the mainstay of sailboat rigging, and knot-craft and splicing are the marks of a seaman. Sewn joins are also practical-and weve explored those in depth (see PS October 2014 online)-but there are times when flat webbing serves better; for example, reefing strops, jacklines and tethers, and straps for attaching sails and tackle to spars. But how do you form the loops required to attach them to hardware and other fittings?
Knots would be a poor choice: Only overhand knots and trace overhands work well, and they are bulky and reduce strength 40 percent or more. Splicing isn’t an option. Fortunately, stitching is well supported by the dense weave of webbing and simple to learn.
While there are a few ins and outs to creating strong, predictable, and durable constructions, practically all commercial fabrication of webbing gear relies on machine stitching. And although you can achieve faster, prettier results with a commercial-grade machine, our tests found that hand-stitching-a traditional sailors art that dates back centuries-serves the sailor fine for most applications.
What We Tested
We focused our testing on 9/16-inch and 1-inch Bluewater Climb Spec nylon tubular webbing. We tested a few scraps of other webbing types, sufficient to convince us that specific brand is not critical to sewing method or efficiency. However, low-stretch webbing (polyester and Dyneema) is inherently easier to sew to good strength, as we will explain. Just follow the same guidance, substituting Dyneema twine when sewing Dyneema webbing.
Hand-stitching webbing is heavy-duty sewing. You will need strong needles and a good sailors palm. Although some use a stitching awl, we found a sailmakers needle more versatile, faster, and less damaging to the webbing. In our tests, all stitching was done with doubled 40- to 50-pound polyester whipping twine; after trying many combinations, we found this to yield the greatest strength and durability. We used Robline whipping twine for our test, but any of the highly rated twine brands from our last test (see PS December 2014 online) will do.
How We Tested
Stitched webbing samples were sewn into dog bones 6 to 8 inches long with many stitching patterns. These were pulled to failure using a simple chain fall and a load cell for measuring loads, which provided a means of pulling the samples to 5,000 pounds.
For bench testing, we broke samples of sewing materials and webbing by wrapping them around a 2-inch-diameter drum at each end to determine baseline strengths. We then sewed eyes with differing stitch counts and patterns, breaking enough samples to understand both repeatability and optimal patterns.
We have also installed some of the dogbones on our test boat rigging and have samples hanging in the sun, aging; these later sets will be pulled to failure in a few years, to judge weakening with use and UV exposure.
What We found in the Lab
The greatest lesson learned is that stitching a stretchy material is very different from stitching non-stretch line. We first noticed the effect of stretch when sewing rope eyes. At high loads, the stitching near the tail would distort more than those closer to the eye, and the tail would point sharply away from the main line (another reason we often sew the tail down), but the low stretch of the line and the thickness of the rope as compared to webbing buffered the effect. We learned that crowding the stitching a bit always resulted in stronger joins, which seemed counter-intuitive but was proven through repeated testing.
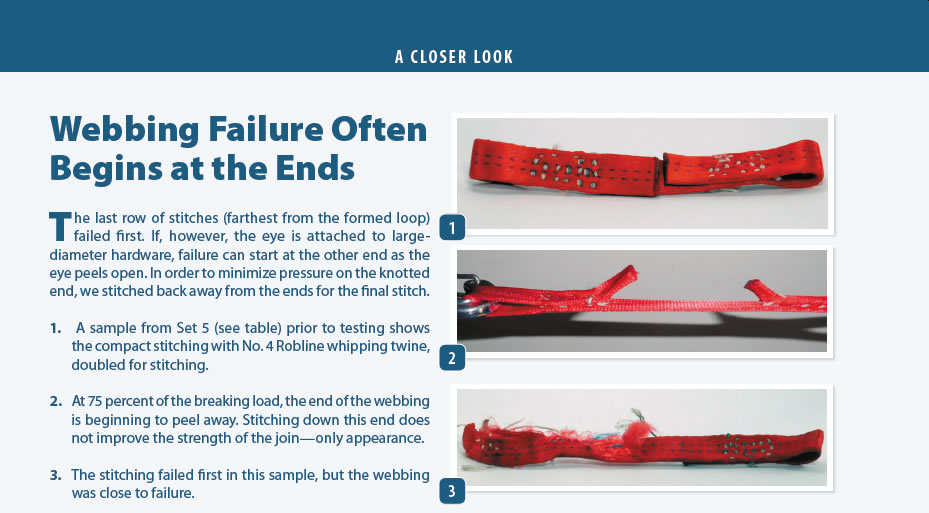
When we began testing webbing, the effect became dramatic. Each time a sample was loaded up, the stitching nearest the tail would strain in-line with the webbing and the tail would lift up. Failure was always from the tail row, and only the pattern within 1 inch of the end made any real difference in the results. If we spread the stitching over several inches lengthwise, the join was weak, and it was obvious that the more distant stitches were not contributing. Once the tail row failed, the rest of the stitching failed in a millisecond with a load crack.
It appears that the stitching pattern, except at the very ends, does not matter a great deal at all. Our testers came to the conclusion that the common arguments over which hand-stitched patterns are stronger-X, box, or Z pattern-are likely a carryover from sewing canvas, sailcloth, and polyester webbing, all of which have completely different characteristics from nylon webbing. These materials do not stretch as much as nylon but are prone to tearing, which nylon webbing is not. A rock climbers slings arent sewn in an X; they are bar-tacked, and they are load tested by falling climbers many times every day. The same goes for a sailors safety tethers, which face their own strict requirements.
Reinforcement and Chafe
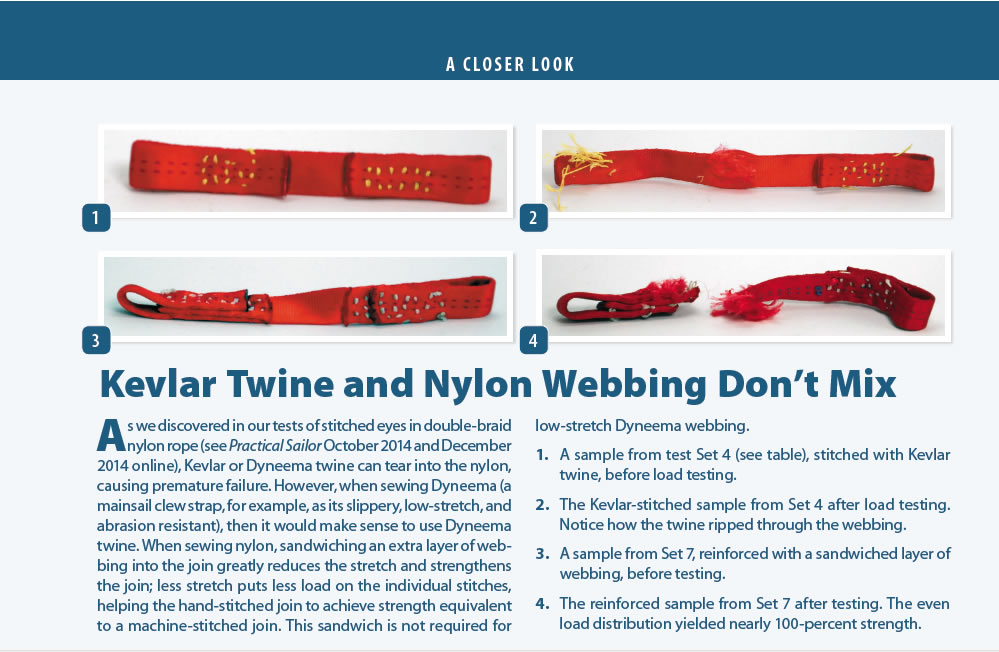
Stretch introduces problems, however, potentially weakening the stitching. The solution to the stretch problem came to us from 1950s Air Force parachute testing. By sandwiching an additional layer of webbing inside the join with a 3/4-inch overlap, it is possible to progressively decrease elasticity in the stitching area, reducing the load on the first few rows and allowing the stitching further away to share the work. In this way, we were able to attain 100 percent of rated minimum breaking strength in repeated trials and to create an easy, reliable join.
Peeling force at the Eye
As samples load up to near failure, stitching at the throat (closest to the loop) also strains to the limit, although in a different direction than the stitching at the tail. This stitching can fail sooner if the eye must be opened (to go around a shackle or some other piece of hardware, for example), creating a wide angle at the attachment point. On stitched rope eyes, this spreading force is easily restrained by two layers of whipping at the throat, but this is not an option for webbing.
In addition, all of the peeling force at the throat must be borne by a single line of stitches, placing a practical limit on the maximum acceptable angle of opening. Through calculation and testing, we determined that the eye should be no less than 2 inches long if connected to a 5/16-inch-diameter carabiner or shackle and should be proportionally longer when attached to larger objects.
Nothing else should be attached to this eye; a spreading force will cause any webbing eye-machine-stitched or hand-stitched-to peel apart at 500 to 800 pounds.
Fortunately, because webbing is thin, it does not require a thimble to preserve strength around any smooth attachment. If abrasion protection is needed, consider stitching or slipping a sacrificial layer of webbing over the wear area; this is well proven.

What we found On Board
During our six months of formal testing aboard our test boat, there have been no failures, including applications with high load factors of 20 percent of breaking strength, a typical engineering safety margin. Over many years of onboard use, the tester has only experienced sewing failures when the webbing tore through sun-rotted fabric or as a result of extensive abrasion (on dinghy tricing straps).
The Ideal Stitch Pattern
After repeated pull tests, our testers determined that an adequate stitch pattern for 1-inch webbing with a break strength of 4,000 pounds was seven 1/8-inch stitches per row, 1/8-inch row spacing, eight rows. The twine was Robline No. 8 with a breaking strength of 52 pounds. This yielded an average breaking load of 3,650 pounds.
If you use wider webbing with higher breaking strength, the same number of rows should suffice, since the wider material means more stitches. To get the same results with a closed loop (with the ends facing in opposite directions), you will want to use twice as many stitches.
Other observations:
Zippering: If sewn in the patterns we suggest, the failure of a few threads does not lead to rapid unraveling or failure. During many of our tests, we carefully cut away stitches while under 80-percent load until failure, incorporating these results when calculating the recommended stitching schedule.
UV and wear protection: We assume that all stitched constructions will be protected with some covering or coating. The wax coating of the whipping twine helps. While elaborate covering can be used on line, our on-board experience is that a simple coat of paint adds significant life to stitched webbing. We will be pull-testing samples in a few years to confirm loss in strength and effectiveness of coverings.
Tensioning: Slightly uneven stitch tension does not result in a weak splice. You don’t have to be a machine; just get them snug.
Extra stitches: An additional 30 percent in stitching, beyond the calculated figure, slightly increases efficiency. This is allowed for in our tables.
End finish: Avoid stitching over melted ends. With webbing, there is a sharp burr that will abrade the thread.
Visibility: When safety matters, sew with a contrasting-color twine, so you can see when a few stitches are gone and repair or replacement is in order.
Conclusions
Straight stitching in rows placed closely together yielded the strongest joins; this supports rock-climbers experience that bar tacking is best. Because we cannot re-create the same high efficiency of a commercial bar-tacking machine with hand sewing, reinforcement with a webbing insert is the construction of choice for high-load applications.
We tested a number of sewing materials and determined that 0.4-millimeter-diameter polyester whipping twine with a breaking strength of about 40 to 50 pounds (doubled-up for stitching) is the optimum material for hand-stitching webbing. Dyneema twine does not stretch to match the webbing, and it cuts through, resulting in a 30 percent loss in strength.
Although our own experience suggests a hand-stitched join will last as long as the webbing itself (three to five years), we are hoping to have a more accurate assessment when long-term testing is complete. The suggested stitching schedules include a 50-percent margin, beyond what was determined by testing, so it is probable that the splice will maintain the same approximate strength as the webbing strength for the three- to five-year life of the webbing. Nylon webbing has never been very good in the sun. Stay tuned for a followup.

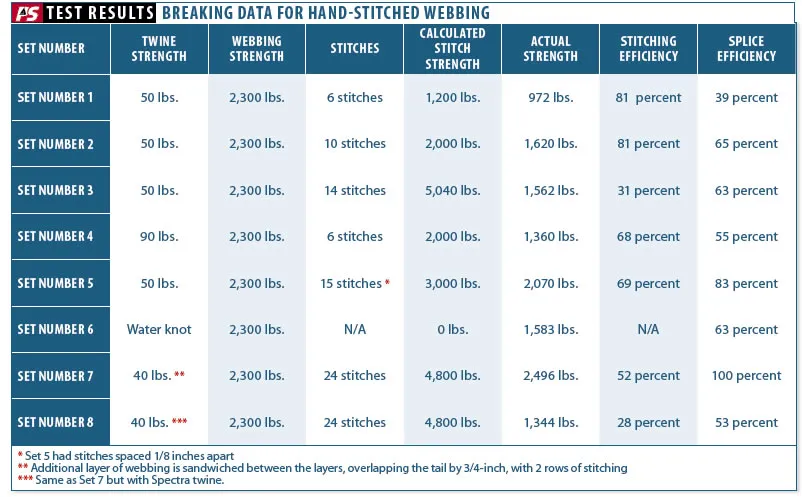
The actual breaking strengths for each set are averages of three samples. Sets 1-3 and Set 6 show that with normal stitching (not reinforced), splice strength levels off at about 69 percent of the webbings rated strength, the same as a basic water knot. Adding rows of stitching (Set 5) increased efficiency to 83 percent. Sandwiched reinforcement (Set 7) brings splice strength to 100 percent of material strength. (Commercial bar tacking is known to be about 90 percent efficient.)


