


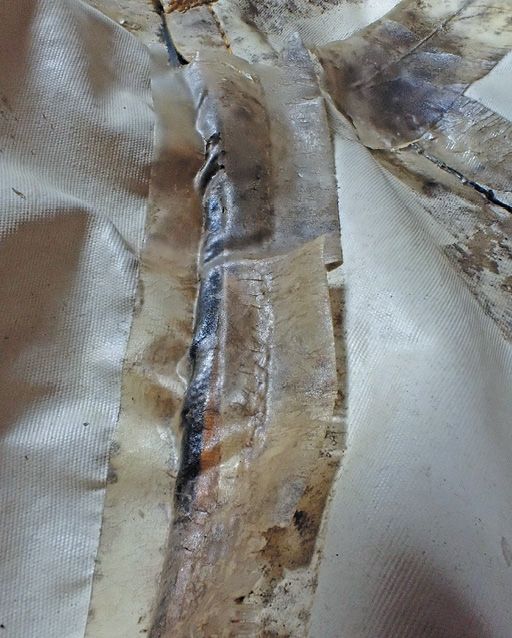
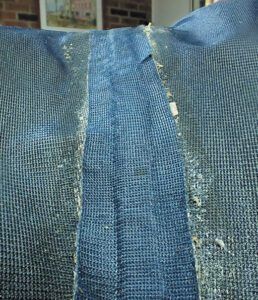
Rain gear can represent a substantial investment, and it always seems to start leaking long before the garment appears worn. Sometimes the coating wears through because of our own rough use or carelessly hanging our jacket from the hood instead of the loop provided for that purpose. Sometimes the coating flakes off due to age. There’s not much we can do about that. But one of the most common jacket failures—leaky seams—is something we can fix.
Before we describe what works and what doesn’t, we should warn against what will surely ruin your jacket—water-repellent coatings that you spray on, or paint on. As we found out the hard way, coatings like Nik Wax, which we use to keep water out of our ropes and lines, will ruin the glue holding the existing seam tape in place. The product has a mild warning that understates the potential harm, and we suspect few people read it. If you are tempted to use one of these spray-on sealers, you could check with the garment maker to see if it’s okay. We’d avoid them altogether.
WHAT WE TESTED
For testing, we used an assortment of used “weatherproof” garments (two Gore-Tex rain jackets, and one kayak spray skirt) that had failed at the seam tape. The fabrics were one of two common constructions: three-layer laminated fabrics and two-ply fabrics. Except for the leaky seams, our sample fabrics were in generally good condition.
Three-layer laminated fabrics feature a durable water repellent (DWR) fabric on the outside, a waterproof breathable membrane (Gore-Tex, etc.) in the middle, and a thin film of polyurethane or a similar material on the inside. The third layer prevents sweat and dirt from clogging in the microscopic holes in the middle layer. This construction is best suited for heavy duty rain gear and accessories, like liner-less hardshell jackets and bibs worn by commercial fishermen.
Two-ply fabrics have just an outer layer and a thin interior film. Because the film is vulnerable to wear and can feel clammy, many two-ply jackets have an interior fabric liner (mesh, fleece, etc.) that also helps protect the interior film from sweat and abrasion. If your jacket has such a liner that can’t be easily removed, repairs from the inside using tapes or glues will require the sewing equivalent of major surgery. An outside seal, however, could work.
To repair the seams on our leaky samples, we tried three methods and tested seven products: gluing with Weldwood Contact Cement and Gear Aid Seam Grip WP; taping with Bainbridge Sail Repair Tape, Gear Aid Tenacious Tape, and West Bridgeford Iron-on Seam Tape; and sealing from the outside with Gear Aid Seam Grip WP. We followed the manufacturer’s instructions for application and compared their ease of application. We tested their effectiveness by comparing permeability before and after several hours of regular use.
OBSERVATIONS
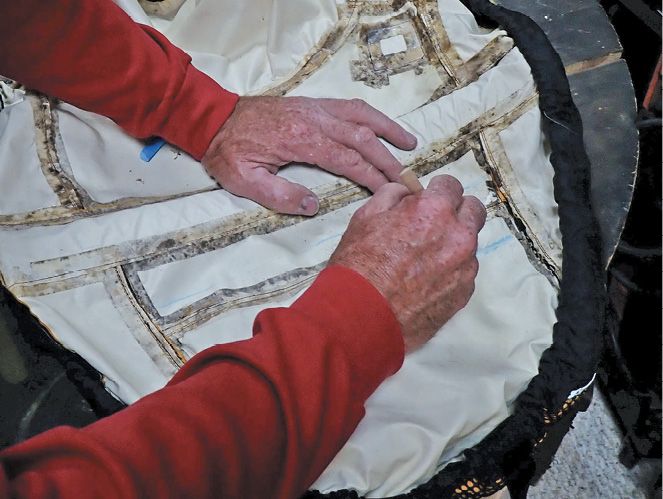
All three methods require a smooth work surface. Padding the work area with a thin towel provides a good foundation for pressing the repairs into place. It is important that the cloth lays flat, without wrinkles. To repair more complicated seams (under arms, shoulders), you must work small sections at a time.
If only a few edges of seam tape are lifting, and the garment is less than 20 years old, try to iron the tape back down. Wipe or brush away any dirt away from the bonding area and smooth the tape so it lays flat.
Use a relatively low iron temperature and rub the edge of the iron from the seam toward the tape edge. Sometimes pressing the tape into the softened adhesive helps. If the tape folds over, use your fingernail to lay it flat again. Seams down the back of a jacket, and on the arms usually respond well to re-ironing.
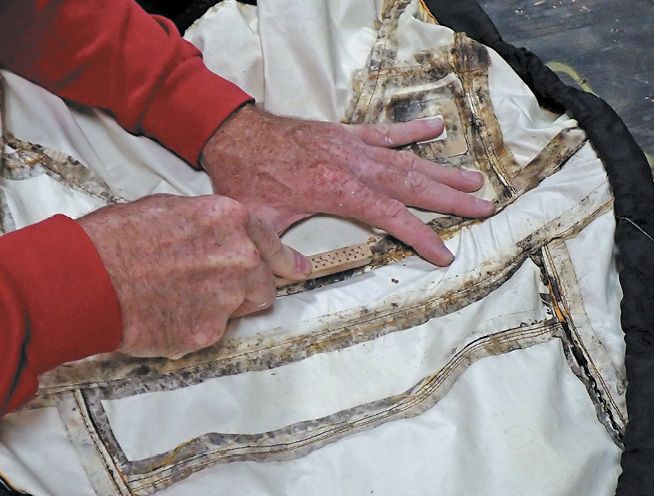
To remove damaged seam tape, use a moderate to low temperature iron. You want to soften but not melt the adhesive, so that no residue remains on the seam when you pull up the tape. You might need to gently re-warm a few spots to scrape away any residue. Use a brush to scrub away crumbly adhesives; be careful not to the harm stitching or the fabric coating. You can scrub a little harder on tougher 3-ply laminate fabrics (we used a wire brush). Before gluing, clean the surface with denatured alcohol to remove grease and DWR residue, which will inhibit bonding.
SAIL REPAIR TAPE
In previous testing 3M Primer 94 noticeably improved the adhesive strength of very-high-bond tape (VHB), so we used it again with sail repair tape to repair a kayak spray skirt. The spray skirt proved to be a challenging repair. The fabric is stiff, and water can pool on the seams—so the seams must be well sealed. The Sail Repair tape has trouble bonding to itself where it overlaps, and if there is the tiniest of wrinkles in the seam, it will leak.
Bottom line: Sail Repair Tape ($10 for a 25-foot roll) just isn’t up to the task—even when using Primer 94.
GEAR AID TENACIOUS TAPE
Tenacious tape is a translucent, flexible, slightly stretchy tape with a tenacious adhesive backing. We’ve used it over the years to seal down jackets and sleeping bags, but we never felt it lived up to the maker’s claim that it was machine washable. On our kayak spray skirt repair for this test, the corners began lifting after just two hours of paddling.
Bottom line: Tenacious Tape ($6 for a 30-foot roll) has little tenacity. Skip it.
REGLUING CLOTH SEAM TAPE
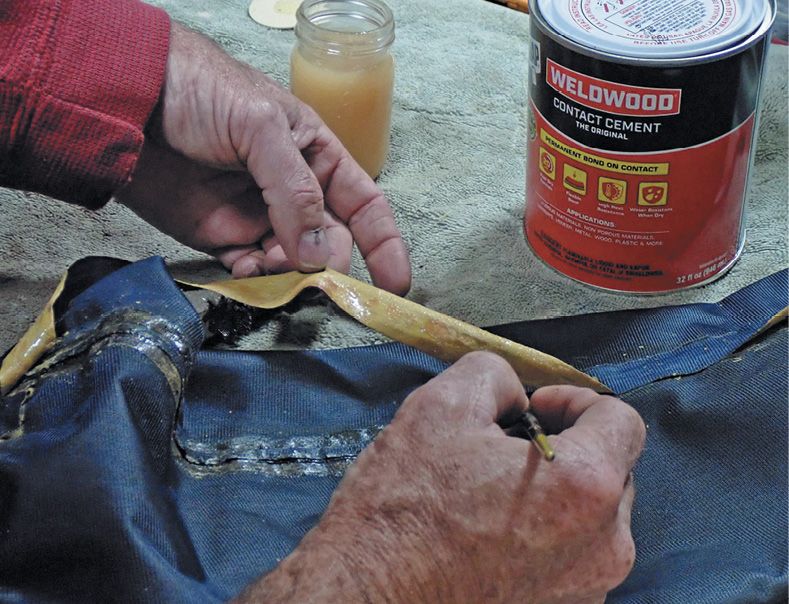
Weldwood Contact Cement develops a reliable bond with 3-ply laminates that use cloth-backed tape. We’ve used it for a variety of projects over the years. It dries relatively quickly, becoming tacky in about 25 minutes and fully cures in seven days. In our experience, Weldwood is a reliable glue for tape seams, but it eventually dries out after 10-20 years, depending on usage.
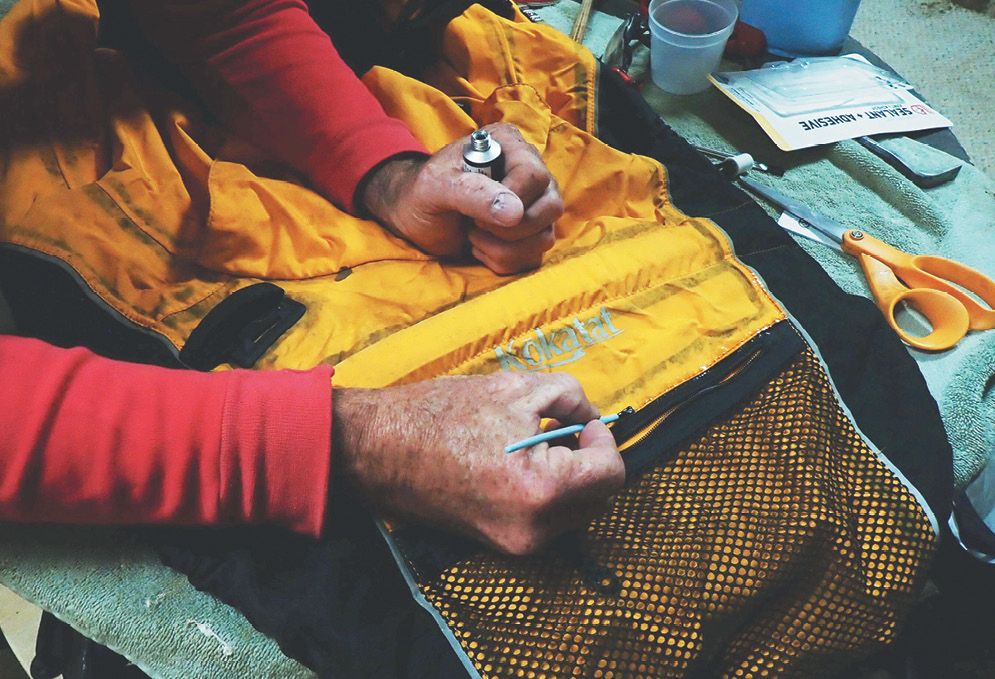
Gear Aid Seam Grip WP, a clear, strong polyurethane adhesive/sealant is a better choice if you have only a few loose areas. Originally meant to seal needle holes on outdoor gear like tents and packs that don’t have taped seams, it develops a stronger bond than Weldwood. Although it is clear, it is not invisible, so the instructions recommend applying on the inside of seams. In its cured state it is stiffer than Weldwood.
When we used Seam Grip as a contact cement, we had to wait much longer than Weldwood for it to become tacky. You must wait 1–2 hours before pressing the tape in place. Otherwise, the procedure is the same as Weldwood. Both products can remain tacky for 8–12 hours, so don’t wear or fold the garment or gear until the next day.
To ensure a good bond, carefully brush clean the seam and the tape—being careful not to damage the stitching. Coat both the seam area and the old tape generously with glue. Allow to dry for the recommended period (about 15–25 minutes for Weldwood), or until dry to touch but still tacky. If you wait too long, the glue won’t grab. If you apply the tape too early, you’ll have to keep pressing it down. Rub the edges of the seams down hard with a seam rubber or roller. Give special attention to any overlaps. A small tube (approximately 1-ounce) of either glue should be enough to seal one garment.
Bottom line: Gluing old tape back down is often the easiest option if the tape is intact. Weldwood ($7 for a ¾-ounce tube) is a good low-budget option if you have a lot of retaping to do. If it’s just one garment, the Seam Grip WP ($9 for a 1-ounce tube) is a good choice. It will seal and bond better.
SEALING FROM THE OUTSIDE
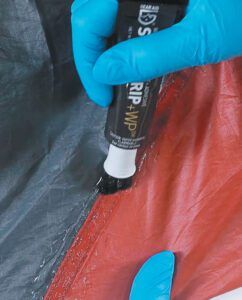
Decades ago, even expensive tents and packs didn’t have taped seams. You were supposed to set up the tent in the backyard, crawl inside, and brush on a seam-sealing glue that would make your head spin. If you really wanted to seal a seam, you could add a second coat to the inside and seal from the outside as well—if you didn’t mind the appearance. Seam Grip WP is used the same way as that old glue but works much better.
After sail repair tape came loose from our kayak skirt, we decided to apply two coats of Seam Grip WP to the outside of the seams. This was easier than cleaning up tape mess and trying again from the inside. Once the Seam Grip cured, so were the leaks.
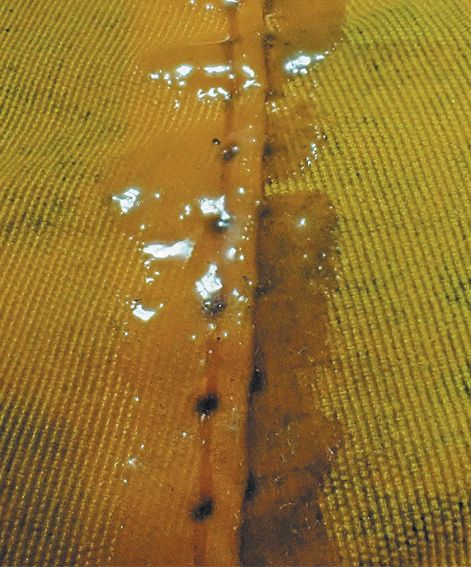
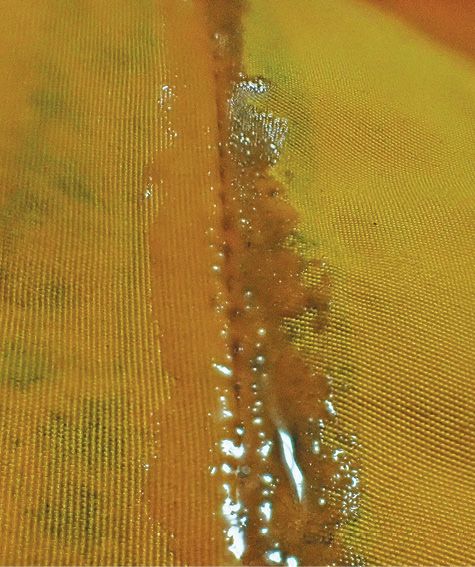
Most of the seams on the items we repaired were ether flat felled seams (doubled over) or simple seams (stitched face-to-face). Either can be sealed from the inside using tape. However, if you’re using Seam Grip alone, you’ll get better results applying it to the outside because the loose edges on the inside seam are hard to seal.
A fine artist’s brush is best for simple seams, allowing you to neatly apply the sealant to just the seam. Flat-felled seams have needle holes, so a wider brush is needed. On other types of folded-over seams (welt, lap-felled, etc.) coating on the inside and the outside adds redundancy and durability. Seam Grip also works in some situations where iron-on tape won’t bond, for example, when sealing fabric to neoprene or plastic inserts.
Bottom line: Seam Grip ($9 for a 1-ounce tube) is a good choice for sealing seams that are inaccessible on the inside. Applying it to both the inside and outside will double protection. A 1-ounce tube of Seam Grip is enough to treat 12 feet of seams, enough for a typical garment.
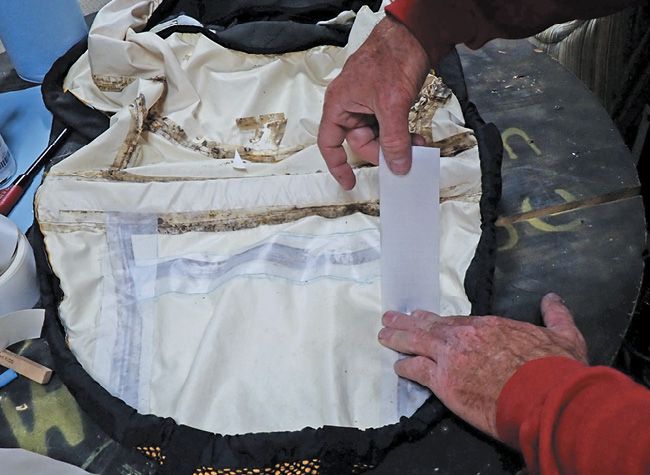
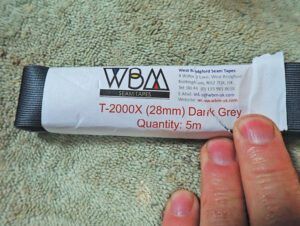
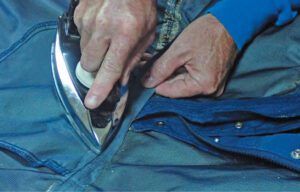
IRON-ON SEAM SEALING TAPE
After mixed results with glue and tape we turned to West Bridgeford Seam Tape T-2000X iron-on sealing tape. If you use the household iron, put a sheet of parchment paper between the tape and the iron to keep the glue off the iron. Or get a small travel iron and reserve it for shop use. The smaller size is better for armpits and neck seams.
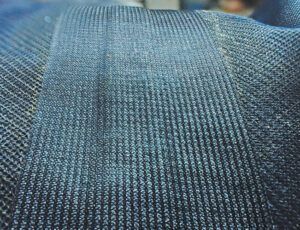
Although the tape seems stiff at first, the fabric conforms very well to curves and seam overlap bumps as soon as the adhesive warms and begins to soften. Although a cotton/linen setting is generally recommended for iron-on patches, we recommend a cooler setting. The seam tape is thin and the adhesive melts quickly. In just a few minutes your seam will be like new.
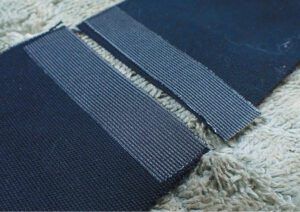
We also tested the tape on 2- and 3-layer Gore-Tex laminates, urethane coated jackets, and spinnaker cloth. It worked fine, with no distortion of the fabric. Although the original seam tape on 2-layer Gore-Tex and urethane coated fabrics is a just thin membrane, we recommend the fabric reinforced tape for repairs, because it is stronger and easier to work with.
As with the other methods, remove all crumbling and loose adhesive with a brush. You can leave on newer adhesive that is still gummy. It will just melt in with the new glue.
Bottom line: West Bridgeford Seam Tape T-2000X iron-on tape ($23 for 15-feet of seam tape) outperformed all other repairs that we tested. It is our Best Choice.
OTHER REPAIRS
If you damage the garment’s inside membrane, and your tape repair doesn’t cover that area, you have a few possible options. One is a new aftermarket coating. We’ve begun testing a few flexible coatings for spot waterproofing. For example, we used MDR Amazon Inflatable Boat Coating on a few areas of the inside of the kayak spray skirt. So far it has stopped all leaks.
For repairing tears and holes, we’ve been using patches of Sunbrella or other material glued on the inside with Sika 291, Loctite PL S40, or Seam Grip. These repairs are a little messy, and they take overnight to cure, but they will probably outlast the clothing. Gear Aid, the makers of Seam Grip WP, also make Aqua Seal Neo, a great contact cement for wet suit repair. They also make Aqua Seal SR, a shoe repair adhesive like Shoe Goo.
There is nothing wrong with ripping off all the tape and relegating the garment to windy days with only light spray, or even boat yard duty.
We wondered if iron-on fabric-backed seam tape, applied from the inside, could work as an iron-on patch for minor tears. It held about 40 pounds per inch before the tape tore cleanly at the gap. This is much weaker than a sewn patch, which can hold up to 300 pounds per inch, but it’s comparable with the best tapes and it’s less prone to peeling. It could be sufficient in many cases, particularly if applied to both sides, doubling the strength. It’s not as stiff as an iron-on patch.
CONCLUSION
Without doubt, West Bridgeford Seam Tape T-2000X was the best product we tested for repairing seams. It’s fast, permanent, and effective. Contact cement can work for limited repairs and is an acceptable field method. Seam Grip is good for small tape repairs; it is strong but slow to work with. It is also very useful for seams that are not easily sealed by tape due to unusual geometry, and as an external backup. Self-adhesive tapes are a waste of time.
The tape will work from the inside for all of them. However, if you are using Seam Grip alone, any seams with several folds (flat felled) or untrimmed, loose fabric (simple seams) are best sealed from the outside.
Apart from saving money you might spend on a new jacket that will eventually suffer the same seam failure, resealing the seams on your favorite jacket gives you the satisfaction of keeping another still useful piece of sailing gear out of the waste stream.
CONTACTS
BAINBRIDGE, www.bainbridgeint.com
GEAR AID, www.gearaid.com
WELDWOOD, www.dap.com
WEST BRIDGEFORD, www.wbm-uk.com


