One of the primary causes of ruin for many pairs of binoculars is that they have no home. Loose in the cockpit, or sharing a coaming locker with winch handles — their usual places — it’s no wonder so many pairs die of drowning or having their prisms knocked out of alignment. It’s all well and good advice to always keep binoculars in their carrying case snugly stowed in a safe place, but in practice they’re in such frequent use that the advice is unrealistic. What is needed is a snug home which is both protected and accessible. A binocular box mounted just inside the companionway answers all requirements. It keeps the glasses both protected and easy to get at.

500
The most common mounting position for right handed crews is on the inside of the port, aft cabin bulkhead. If, however, you have a bulkhead mounted compass, check for possible influence of the binoculars on the compass before choosing a permanent location. If bulkhead mounting presents insoluble problems, usually a position on the companionway ladder can be found which will work.
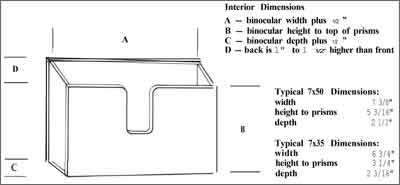
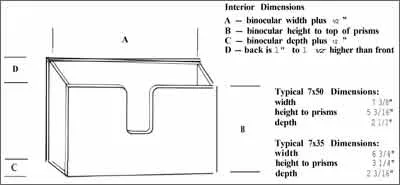
A design for a simple, serviceable binocular box is shown in the illustration. No exact dimensions are given, because they’ll vary according to the binoculars to be housed and the thickness of the stock to be used. While it’s best to custom design such boxes, dimensions of typical binoculars in the popular 7×50 and 7×35 sizes are given.
The 1/2″ increases over actual binocular dimensions which are called for in the illustration will provide a good snug fit. Expanding these increases to 3/4″ or 1″ will allow for easier insertion at the expense of a bit more banging about.
Construction can be as simple or complex as you desire. Simple butt joints as shown will do admirably, but if routing is your thing, you know all about half lap joints and can happily play.
As far as materials go, virtually any sort of wood will work. Don’t be scornful of lumber yard pine. It looks lovely, honest, and warm when varnished without any fillers or stains, and forms a nice contrast to the usual teak, mahogony, or plastic interior
As far as scan’tlings — ie, lumber sizes — go, 3/8″ is all you need, and if you’ve got some on hand, fine. But the usual lumber yard 1″ nominal dressed stock — which actually runs between 314″ and 7/8″ will also do nicely and save the expense of additional milling.
Construction is simple. Lay out and cut your stock; then fasten together using a square, glue, and screws or galvanized finishing nails.
If you choose nails, use two on each short edge, three on long edges, and use a nail set (punch) to drive them below the surface. Fill the tiny holes with a wood dough like Plastic Wood.
If you choose screws, use either brass, bronze, or stainless steel flat heads (#8×1″) countersunk and plugged, or oval heads left uncovered.
After the box is varnished or painted, a nice finishing touch is to line the inside with green felt. Cut and fit the felt, lightly sand the finish coating, and attach the felt with contact cement.
Those are the basics, but you can customize your box. A toothbrush size slot at the very bottom of one of the short sides will allow you to periodically sweep out the inevitable dust and crud without having to dig down inside.
For those who do wood carving, a simple nautical relief — dolphins are fine, traditional design — can look good. If you don’t care to take the extra time, the box itself, nicely finished, will be attractive and highly useful on any boat.
— J. Pazereskis


