With all of the logistics, specialized knowledge and costs involved, you may be asking yourself “Why would I want to go diving?” This is a good question; after all, you have gone cruising to escape some of the complications of your life.
The answer varies for different people. I love exploring the beauty that is hidden under the surface and seeing the different fish and creatures that are a part of that world. Others will tell you that it is the perfect way to cool off during the day and still others love the challenge and thrill of the hunt.
While you are on your cruise, diving equipment on your boat opens up these new worlds and lets you experience the nature surrounding you. But it can also provide you with practical solutions as well. You can swim down and check your anchor for a better night’s sleep, or you can help unfoul the anchor when it has reset too many times. Diving equipment lets you maintain the bottom of your boat or free up the props when you discover errant lines in the water.
Finding a scuba gear storage location in a boat with limited space presents challenges and requires creative thinking. However, with a little thought, you can find a location and have the tools for some fun adventures.
The following guide will help you figure out ways to store your dive gear aboard, cylinder valve specs and testing, how to dive from your boat and dinghy, gear maintenance and regulations.
STORING YOUR DIVE EQUIPMENT

You have all of this new dive equipment you purchased for your trip and you need to find a place to store it. A cockpit locker seems like a logical location to store your kit. One of them is generally large, and it seems like a convenient location for dive gear. But let me ask you a question. As you sailed your boat over the past year, have you ever tried to retrieve things from that locker? I know in my case, the things I need seem to migrate to the bottom of the locker, with lines, fenders, power cables, etc., moving to the top. This means that your equipment will be stored at the bottom of the locker and probably will be damp most of the time.
When you decide you need your gear, you will have to go on a quest to find it. I hear you saying, “It will be fine, I can unbury it when I need it.” But what if your prop gets fouled with a fish trap line or some errant fishing line? Is this the time you want to empty your locker to retrieve your mask, snorkel and fins? The same question applies when you need to clean out a through-hull fitting or scrape the growth off the bottom of your boat or the propeller.
I would encourage you to find a location with easier access. Additionally, things stored in that locker seem to mold and mildew faster so another location is better. On Reload and Charge, a Deen 400 catamaran, Andrew Trent stores his equipment in an unused bathtub in the guest hull. Carl Strange on Enchanté, an Amel 48, stores his in a hanging locker, which makes it very accessible in an emergency.
WHERE TO STORE SCUBA CYLINDERS ABOARD

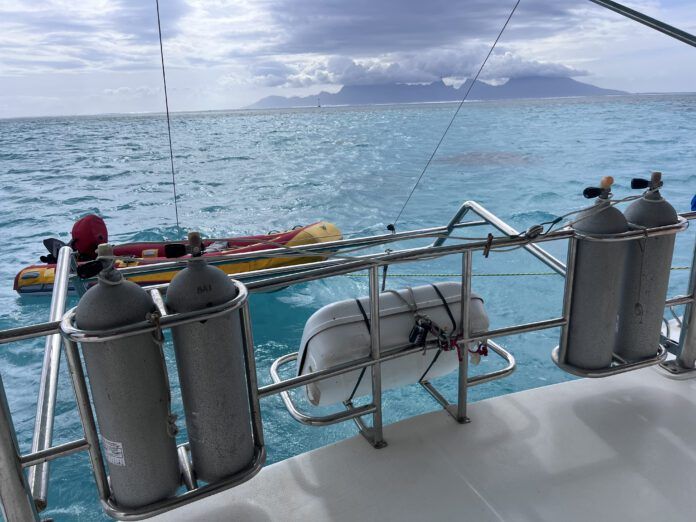
Cylinders are a slightly different matter. They are bulky and can potentially damage your boat if the break free. Brown and Eileen Council on Blown Away (@sailingblownaway) had custom racks to store their cylinders as a part of their aft lifelines on their Leopard 44. This arrangement keeps them ready for their diving adventures. Some sailors lash them to the lifelines forward of the mast. Since that is a wet location on many boats, it means your aluminum cylinders are constantly exposed to salt spray and sun. This will shorten their life.
Watching Mads on the YouTube channel Sail Life (@saillife), you will have noticed him building a custom shelf for the cylinders in his cockpit locker. The shelf is glassed into the hull for stability and contains straps for the cylinders to hold them on the shelf.
On Enchenté, Carl Strange kept the aluminum 80 cylinder secured in their aft “garage locker,” secured to the side so they did not move. For those emergencies, he had an aluminum 30 in the locker with his other diving equipment.
SCUBA CYLINDER VALVES AND TESTING

Scuba cylinders are made from either steel or aluminum. There are some carbon fiber cylinders but they are generally not used by divers because of the fragility of the material in a wet environment.
Most divers are more familiar with aluminum cylinders since most dive operations use them because they are easier to care for and they tend to last longer. Like dive operators, most sailors use aluminum cylinders for the same reasons.
International differences. Cylinders designed for use in the United States and Canada are marked with a DOT/CTC number. The most common neck size/valve thread for these cylinders is a 0.750-14 NPSM (¾ NPS). Cylinders designed for use in the EU/Great Britain are appropriately marked with the most common neck size/valve thread of G3/4 (3/4 BSPP). While these may seem similar thread sizes, they are not the same and valves must be sized for the appropriate cylinder.
Boats outfitted in the United States, Canada or the Caribbean will generally have DOT/CTC cylinders. Conversely, cylinders acquired in Europe, Great Britain or the Mediterranean will generally be the EU standard cylinders and will use the appropriate valves. It is important not to confuse the valves; doing so can result in serious injury.
Boats venturing into the Pacific may find either type of cylinder in use. Much depends on the country’s primary supply chain.
Inspection. In the United States, Canada, the Caribbean and Mexico, cylinders must be visually inspected internally and externally for damage annually and hydrostatically tested every five years. In the EU and Great Britain, they must be visually inspected internally and externally every 2.5 years and hydrostatically tested every five years.
In order for a dive facility to fill your cylinders, they must comply with local laws. While most dive operators can visually inspect cylinders, they generally cannot perform the hydrostatic test. The procedures for the hydrostatic test are similar for all cylinders, local hydrostatic test facilities may not have the appropriate fitting to test cylinders manufactured for use in countries outside of their region. This may make having your cylinders tested at the five-year mark difficult.
One additional consideration is whether you can get your non-regional cylinders filled. Dive operators in the US cannot fill non-DOT/CTC cylinders. This restriction varies from country to country.
Bottom line: buy new cylinders. For this reason, I recommend you purchase new cylinders before starting your cruise. This will give you five years before you have to find a hydrostatic test facility. When that day comes five years from now, talk to the local dive operators and find out how they get their cylinders hydrostatically tested. You may also just sell yours and purchase new ones.
FILLING YOUR CYLINDERS
You can choose to rent cylinders from a local dive shop and leave them filled and stored at a more remote location, or have your cylinders filled by a local dive operator after you have used them. Many facilities offer local residents fill cards or discounted fills. If you stay in a place for a while, like Bonaire during the hurricane season, you can probably take advantage of local rates. It never hurts to ask.
Alternatively, you can install your own high-pressure compressor on your boat. This will let you fill your own cylinders and allow you to dive at more remote locations. We will discuss these compressors more later.
DIVING FROM YOUR OWN BOAT

You will probably find yourself getting into the water from your cruising sailboat or motor sailor. Jumping in is easy but have you given much thought as to how you will get back on board? Many newer designs have sugar scoops or swim platforms. These are generally equipped with a small boarding ladder. Older vessels have boarding ladders over the transom or along the hull.
Before you leave home, make sure you can use that ladder. One of the primary questions to ask yourself is, “Does it have enough rungs or steps in the water?” I have found that a ladder with at least three rungs in the water is easier to use than a shorter one. Additionally, having wood or plastic steps mounted to the stainless-steel rungs makes them more comfortable to climb than the small rungs alone. This is especially true with bare feet.
Climbing up with scuba equipment on your back may be difficult because of the size of the ladders and the distance you have to climb. You can attach your equipment to an equipment line and then either pull it up by hand once you are on board or use a halyard to lift it up on the deck.
DIVING FROM YOUR DINGHY
Since your boat is probably moored or anchored with other boats away from the nice reefs you will probably be diving from your dinghy. Depending on the location, you may be tied to a mooring, set an anchor, or get dropped off by a friend.
Before setting off in your dinghy, consider how long you plan to be out on the reef. If you are going to make a day of it, then make sure you have sun protection, water and other beverages, and some snacks or lunch. Are you anchoring the boat while you are out? Then adding an anchor becomes important. If you are planning to tow the boat with you, then you will need a line that is long enough for you to pull from depth. Having a dive flag will also alert others to take care near your boat since you are in the water. Drew Trent, Reload and Charge, would also suggest carrying a handheld VHF radio so you can communicate with others in the anchorage if necessary.
Since most dinghies are small, you will probably find it more comfortable to be dressed in your diving attire (rash guard or dive suit) and then put on the rest of your equipment when you reach the dive site. Freedivers put on fins and just roll in. If there is no current, scuba divers may find it easier to don their equipment in the water. Before you set it in the water, add some air to the buoyancy compensator and tie it off with an equipment line. You can use this same line to attach to your equipment when you return so you can lift it out of the water once you are back in the boat.
HOW TO GET BACK IN YOUR DINGHY, POST DIVE

Speaking of getting back in the boat, there are a number of ways to get back in. Kicking up with fins and pulling yourself over the RIB tube is the most common. Some sailors have small ladders for their RIBs, but the same considerations mentioned above apply to these ladders. If you need a step up and don’t want to add a rigid ladder, try using a “Madison Ladder.” On a dive trip to Antarctica, one of my Dive Master friends, Madison Lee, came up with a portable step to help get back onto the boat. It consists of a piece of 1-in. tube webbing attached to two carabineers. When you get to the RIB, attach the carabineers to the handles and step on the webbing to give yourself a leg up.
Getting the equipment from the dinghy to the boat can be done by lifting it to the swim platform or deck. You can also use your halyard to lift it up if that is easier.
OTHER USES FOR SCUBA EQUIPMENT
As we have already touched on previously, you will find having diving gear is useful in an emergency like a line wrapping around your prop. But what about other times? Cleaning your bottom on a regular basis makes your sailing faster and safer. You can clean it using just your mask and fins but having scuba equipment makes it easier and more efficient.
Many cruising sailors use a cylinder on the boat attached to a long hose draped over the side. Others have adopted portable SNUBA or surface-supplied tankless diving systems like the Brownies Third Lung (gasoline-powered) or the Blue3 Nomad battery-operated units. These units are less cumbersome than traditional scuba systems for shallow diving, like cleaning the bottom of your boat because you can probably wear just a harness and a small amount of weight. The harness lets you clip off the hose to keep it from pulling the second stage out of your mouth. Additionally, you can also use them for shallow diving on nearby reefs.
Bottom cleaning jobs vary depending on where you are and how long it has been since your last cleaning. Because there may be a lot of free-floating debris around from your cleaning efforts, I recommend wearing at a minimum a hood and rash guard. You may even want to wear a full Lycra or thermal suit to keep you warm and make clean-up easier.
EQUIPMENT MAINTENANCE

While your diving kit is sports gear, it is also life support equipment. Since you rely on it to keep you alive underwater, it makes sense that you take care of it on the surface.
The most important thing you can do after a dive is to rinse your equipment with fresh water thoroughly. Flush the first stage of your regulator with fresh water and use your hose to flush out the second stages. You can put the water in a bucket and dip the stages in water several times to remove the salt water. Just remember to make sure the first stage dust cap is in place. Once you are done, curl the hoses and let the unit completely dry in a shady place.
Next, rinse off your buoyancy compensator vest and use a little fresh water to rinse out the inside of the air cell. You can run water through the inflator mechanism, rotate the jacket to flush the salt water and salt from all of the cells, and then dump it out through the inflator valve. Add a little air back to the jacket to keep the sides from sticking together, and set it aside to dry. Again, it is best, to place it in a shady place out of direct sunlight.
Continue the rinsing operation with your fins, mask, environmental suit (wetsuit, skin rash guard, etc.) and boots. Set everything aside to dry. If you have your own cylinders, give them a rinse too.
Taking the time and utilizing some of your precious water to rinse your equipment off will help it last longer and, more importantly, operate properly. Remember, it is more than sporting equipment; it is life support equipment.
It is a good idea to have your equipment serviced annually or according to the manufacturer’s guidelines (Atomic Aquatics and Zeagle Systems sell units with two-to-three-year service intervals). This maintenance will help ensure that your units will operate as designed. But be warned, poorly maintained units (units not rinsed properly or ones with water inside of the first stage) will cost more to service so it pays to take care of your equipment.
CERTIFICATION AND REGULATIONS

To participate in scuba diving, it goes without saying that you need a certification card. You will need, at a minimum, an Open Water Certification card. For freediving, generally, no certification card is required.
Depending on where you are cruising, you may need a permit to dive. For example, Sint Martine/Saint Martin requires that divers have a dive permit, which is about $15.00 per year. To use the moorings, they require you to have a boat permit which costs about $250 per year.
Other locations require you to use a local Dive Master. Both St. Lucia and Dominica are examples of countries requiring local dive leaders.
If your goal for scuba diving or free diving is collecting dinner, most locations require that you purchase a fishing license. In the Bahamas, this will run about $60, annually. Also, except for lionfish hunting, most countries do not permit game collection using SCUBA. You should acquaint yourself with the local laws regarding fishing and game collection. For example, in the Bahamas, you can only hunt lobster from August 1st to March 31st and you are limited to a maximum of ten on your boat at any time. Additionally, egg-bearing lobsters are protected.
Violating local laws can result in fines, jail and possibly forfeiture of your boat. So, it pays to do a little research on the country you are visiting.
CONCLUSION

Having diving equipment aboard means finding a convenient place to put it—it is one more system to maintain and one more thing to think about. But remember, seeing is better than guessing. Having some diving equipment on your boat lets you see your ground tackle on the bottom and your hull below the waterline, helping you protect your home. Beyond the safety features, however, perhaps the biggest reason to have and use scuba equipment is that it adds to the adventure of visiting new places. Eileen Council put it best when she said, “We do love the freedom of diving with our own equipment and a dive compressor.” You’ve already done the bulk of the work getting your boat cruising-ready, finding a weather window and navigating to remote, biodiverse areas. The next logical step is to go take a look at the incredible underwater world you’re sitting atop.


