Photos by Rod Collins

Eurostrips, Euroblocks, set-screw terminations-whatever you want to call them-they are here to stay. Many companies supply set-screw terminations as part of electronics installations, solar controllers, inverter/chargers, navigation lights, or even engine gauge panels. These set screws, if not protected by a pressure plate or a wire terminal, can cause damage to the wire stranding and eventually lead to failure. Attention to the details should always be top on the list when dealing with Euroblocks or any set-screw termination that bears directly onto the wire strands.
What are Eurostrips/Euroblocks?
The terms Eurostrip or Euro-block are accepted generic terms used throughout the electrical industry for screw-type terminal blocks that don’t rely on ring terminals. An Internet search for either term will yield plenty of results. The name Eurostrip is actually a registered trademark by Altech Corp., one of many companies that makes Eurostrips or Euroblocks. Each company, however, calls them something different.
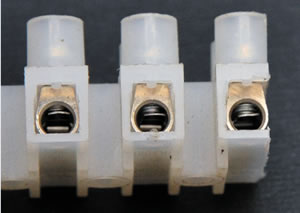
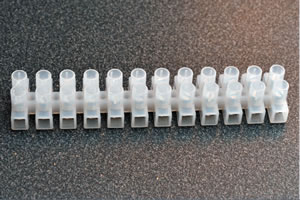
A Eurostrip/Euroblock is a white, molded plastic terminal strip with two set-screw holes on top, and opposing holes on the sides for wires to enter. They are available in many different sizes, and current and voltage ratings. Molex Corp. calls them Eurostyle two-screw barrier strips (39100 Series); Ancor calls them pin terminal blocks; and Altech calls them feed-through, flat-base Eurostrips. Terminals from all three companies are good quality; they include the all-important internal wire protector, or what the American Boat and Yacht Council (ABYC) refers to in its related standards (E-11) as pressure plates.
Quality
Not all Euroblocks are created equal, however. Low-quality versions may look the same, but they rarely are. The lower-quality products have flooded the U.S. market from overseas, and this type of terminal strip drives the set screw directly into the fragile wire strands. Driving and twisting a set screw directly into the wire stranding can cause fracturing of the individual wire strands. Some set screws cause more damage than others.
In the marine environment, we use finely stranded wire to minimize and reduce the chances of vibration-induced fatigue. Tightening a set screw directly onto finely stranded wire can create fractured strands that may then result in a high resistance point or enough voltage drop for equipment such as navigation lights to no longer meet the International Regulations for Preventing Collisions at Sea (COLREGS) specifications.
How can you avoid this? Its simple: Use your eyes, and locate the pressure plate inside each terminal, or buy products from the three companies mentioned above, although there are other good ones, too. A pressure plate or wire protector sits between the wire and the set screw, so that the set screw cannot directly damage the wire. If there is no pressure plate, it is up to you, the installer, to install terminals so that the set screw does not impinge directly onto the wire strands.
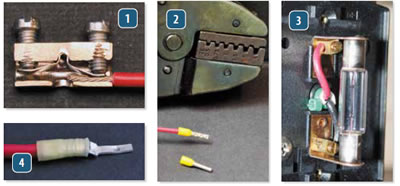
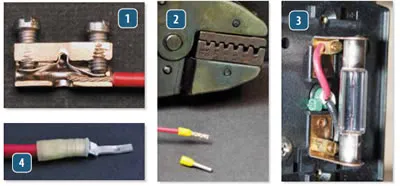
In one of the accompanying photos, the plastic has been cut away from a Euroblock in order to illustrate what the actual terminal looks like. In reality, a Euroblock is nothing more than a screw-terminated butt splice.
The critical part you will be looking for is called the pressure plate or wire protector. It can be seen in the accompanying photos as the thin piece of metal up against the set screws.
For a better view, see the photo showing where the side of this Euroblock terminal was ground away to expose the hidden secrets within. This is how the pressure plate works (photo 1).
As you can see in the photos, the set screw is not directly pinching the wire, and instead, the pressure plate provides even pressure without damaging the strands. Better quality Euroblocks will be nickel-plated brass, including the set screws. Lesser-quality products made for the marine environment can often be identified by the use of a zinc coating on the terminal and sometimes even mild steel screws. With better quality Euroblocks, the sides will be dimpled to retain the pressure plate. Although you can see these dimples in the accompanying photos, you cannot see them on an assembled Euroblock.

Industry Standards
The technical standards established by the ABYC for boatbuilders are a good benchmark for do-it-yourself refits, not only from a safety standpoint, but also because marine surveyors routinely use them to establish a boats resale value.
The ABYC has set very clear guidelines with respect to set-screw terminations in the section addressing wiring terminals (E-11). According to the ABYC, wiring connections shall be designed and installed to make mechanical and electrical joints without damage to the conductors. The ABYC also states that connection may be made using a set-screw, pressure-type connector providing a means is used to prevent the set-screw from bearing directly on the conductor strands.
This issue is not limited to just Euroblocks-not at all. Sadly, there are dozens, if not hundreds, of electronic accessories that we rely on that use cheap set-screw terminations. Like the failed 50-cent anti-siphon valve that can spell doom for a marine engine, Euroblocks are another example of a how a tiny component can make or break a critical piece of equipment.
Take some time to poke through your boat, and you’ll find many of these set-screw terminations just waiting for the right time to fail. While a V-berth fan failure is not life-threatening, a cabin-light extinguishing when you need it most can cause some real stress-and what about a nav light?
The most common example of bad set-screw terminations is found in the Aquasignal Series 25 and 40 navigation lights (photo 3). These very popular navigation lights use a set-screw termination that doesn’t have a pressure plate installed; the screw bears directly on the wire-a clear violation of ABYC E-11 safety standards. No big deal, right? Just don’t overtighten, inspect regularly, etc. However, should your masthead nav light fail on a cold-wet night in congested waters, the consequences can be more dire.
Even if the connection is not severed, the poor connection might result in an excessive voltage drop beyond the 3-percent allowed by ABYC standards. As a result, your once-bright starboard light is no longer visible at the prescribed distance, giving little warning go a crossing vessel. Several of our testers have encountered boats claiming to be ABYC-approved label that have overlooked the proscription against set-screw terminations. In some cases, the running lights were installed by the owner; in other cases, the detail slipped through the cracks. (ABYC standards are limited and voluntary; so there are no real penalties or enforcement.) In many cases, it is up to you, the owner, to correct these shortcomings.
An Easy Fix
One of the easiest remedies to a poor set-screw termination is to use wire ferrules and a wire-ferrule crimp tool (photos 2 and 4). Fortunately, neither the crimps nor crimper are too expensive. Given the sheer number of terminals of this type found on a larger sailboat, a box of spare crimps and a crimper would be wise investment.
The accompanying photos show a wire-ferrule crimp tool and a crimped wire ferrule. Once you have installed a wire ferrule, this prevents the set screw from directly impinging upon the wire, and it will prevent and minimize damage to the individual conductors.
Wire ferrule assortment kits are relatively inexpensive. The German-made Eclipse set (part 701-998) is tin-plated copper and is a decent quality terminal. For a wire ferrule crimp tool, the Pros Kit ratcheting crimp frame (CP-336FM, $29), paired with the wire ferrule die set (9CP-236DE, $16) makes for a decent, inexpensive ferrule-crimping tool. Pros Kit offers many others that are interchangeable with this crimp frame. These terminals and crimper are widely available through online retailers, marine chandleries, hardware stores, and most electronics shops.
Another terminal option, beyond wire ferrules, is often called the rectangular tab, blade, or tongue terminal. The tongue terminals in the accompanying are made by AMP/TE Connectivity and were crimped with an AMP ratcheting crimping tool, although a Pros Kit crimp die would work with these as well. As with butt-splice connectors or ring-eye terminals, you want to make sure to match the terminal with the wire gauge. The terminals are color-coded: red, 22-16 gauge; blue 16-14 gauge; yellow, 12-10 gauge.
After going through our own boat, we discovered the set-screw termination on our solar panel controller did not have a pressure plate. The fix was easy with some AMP terminals; with a quick, snip, strip, and crimp, we brought the installation up to standard, and bought ourselves some peace of mind.
-Rod RC Collins is an ABYC electrical systems specialist and owner of Compass Marine Inc. in Cumberland, Maine. He owns a CS-36T out of Casco Bay, Maine.


Serious advices. Thank you!