


In the quest for speed, sailors endlessly debate sail trim, the best cloth, the hottest cut, and which folding prop will do everything. In reality, nothing slows you down more than a dirty bottom, the primary motivation behind Practical Sailor’s trademark bottom paint trials.
A clean bottom is not just about speed for racers or saving fuel. Lower drag means that at any given speed, a boat can set smaller sails and heel less. She will make less leeway because the boat will heel less, and even more importantly, because the flow over the keel is smoother. Rudder control is improved, critical when things get bumpy.
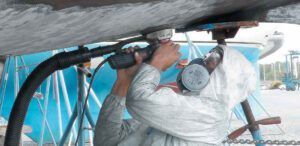
September 2017). Do not use disposable fabric masks—they do not provide the same level of protection. Goggles and a hood further
increases protection, but they can be hard to bear if it is hot.
The first step to having smooth, efficient foils (rudder and keel) and bottom is to have a smooth surface to paint over. The second step is to apply paint that will maximize protection. While racing sailors will burnish their hull for added speed, for the cruising sailor keeping micro-organisms off the bottom is more important than a burnished surface.
Bottom jobs are expensive, laborious, and take away from sailing time. We’ve published dozens of tests of bottom paint to help sailors choose the best protection. We’ve also published a number of how-to articles. In this report, we’ll take another look at two of the unsung heroes of the bottom paint project—sand paper and rollers. While the potential cost savings on such low-priced items is relatively small, the amount of time you can save by picking the right product can be significant.
Drywall screen, Cubitron II, Diablo, Gator, 3M general
purpose
Preparing fine interior wood for finishing or sanding between coats of varnish calls for fine grit and a light touch. Sanding bottom paint is about bulk removal, avoiding paper clogging, and capturing as much dust as possible. We’ve tested many different kinds of sand paper over the years (see “Hand Abrasives Roundup,” July 2006, and “Carborundum’s Premier Red Shines for the Price,” April 15, 2001). Since then, we’ve settled on a favorite, but there are many quality products out there, just crying out for quantitative comparison
What We Tested
We chose 80-grit because it is the common recommendation for bottom prep. If you are stripping the paint down to the hull, move down to 60 or even 36 grit, but beware that such coarse abrasive can cut through gelcoat and barrier coat quick as a wish. The 80-grit paper is slower and far more forgiving. We focused on popular abrasive papers, available through chandleries and home improvement centers, including products by 3M, Diablo, and Gator. We also tested a sanding sponge and two grades of Scotch Brite pads by 3M.
How We Tested
We tested removal rate and loading by sanding roughly 2- by 5-foot sections for exactly two minutes using a ¼-sheet DeWalt orbital sander attached via a short smooth-bore hose to a vacuum cleaner with a high efficiency filter. The amount of dust recovered was weighed on a precision digital laboratory scale and the speed of removal was visually observed. Fouling of the sand paper was visually graded and wear rate was judged by tactile change in roughness. We also used several of the more effective papers for sanding larger areas.
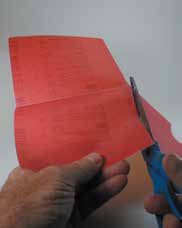
inch sheet of sandpaper by folding as follows. First, fold
it into quarters and crease to create straight lines for
cutting. Unfold and cut a slit along one of the creases.
The slit should end at the center of the sheet.
We also tested hand sanding using sponges and scouring pads. Although we were not able to quantitatively measure removal rates, we made visual observations. Our feeling is these products will only be used for a few tight spots and for scuffing, so ease-of-use is probably more important than pure speed.
Observations
Don’t fall into a tired funk, pressing harder and harder on worn-out sandpaper. Work will slow and your arms will turn to lead. Pressing harder also fouls the paper more quickly. Contractors have long known it is more cost-effective to buy a little more paper than to pay even low-wage workers to push dull paper around in circles. Use fresh paper, light pressure, and let the paper and the vacuum do the work.
Some DIYers swear by drywall grid for superior dust recovery and clogging resistance. We’ve prepped a whole bottoms with it in the past. It is slower and faster wearing than sand paper, but it does improve dust recovery if your vacuum is somewhat inefficient
Better papers have a non-slip backing; less slipping against the pad means more sanding action. We think this accounts for some of the higher removal rate of 3M’s Cubitron II paper. Cubitron II adheres lightly to the pad, something like a Post-it Note (also a 3M product). Hook-and-loop attachment methods, found on round sanders, provide the same benefit.
Inexpensive garnet sandpaper is poor economy. It doesn’t cut as fast and doesn’t last as long, making it more expensive and slower over the course of the project. You’re wasting time and materials for very little savings.
Conclusions
Although you wouldn’t think something as pedestrian is sandpaper could vary so much in quality, it does. The more premium products developed for machine sanding wear so much longer and cut so much faster, it is false economy to use inexpensive garnet paper. Our favorite is the purple 3M Cubitron II, which is available everywhere, cuts fast, and is inexpensive enough to replace regularly.
The 3M sanding sponge is handy for finish sanding on wood and between coats or varnish or enamel. It performs much like the Cubitron II sandpaper and is exceptionally long lasting. If it loads up, it can often be rinsed clean. However, we didn’t find it very useful for bottom paint.
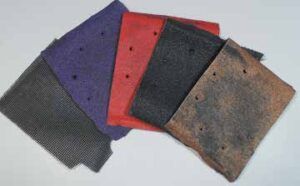
The Scotch Brite pads are much like steel wool, but with better handling and far less shedding. The green pads (the color identifies the grit) are perfect for reactivating a hard paint that has been dried out for too long, without removing too much paint.
Do not use a green Scotch Brite for in-water cleaning of antifouling paint—the paint softens in the water and the pad will take the paint right off, diminishing paint life and putting excessive biocide (usually copper) into the environment (see “Cleaning Your Hull,” April 2018). The maroon pads are suitable for a quick scratch sanding, but they won’t remove bulk paint or level out chipped spots. They aren’t a sandpaper replacement.
PAINTING
Rolling antifouling paint on the bottom is nothing like varnishing or applying a mirror gloss finish to the top sides. The paint is thick and spreads poorly. Soft paints erode and wear, developing a few mils of surface texture no matter how smoothly they are applied.
Self-polishing paints minimize this increase in texture. Hard paints can be burnished or sanded (typically wet-sanded using 400-800 mesh) to a fine finish for racers, at the cost of labor and some of the paint you just applied. This is a good option for racers in search of seconds per mile, but we’re focused on cruisers.
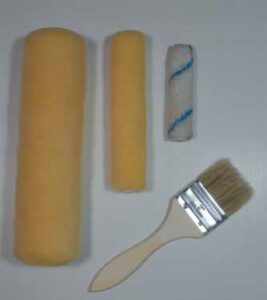
Readers have suggested that mini-rollers (4- or 6-inch by ½-inch core) waste less paint and help them get around in tight spots. Standard size rollers (9-inch by 1 ¼-inch core) rollers, widely used to paint home interior walls, are faster and lay the paint on more evenly, or so we believed. This seemed a good opportunity for some side-by-side testing.
What We Tested
We focused on quarter-inch nap rollers. Very short nap, such as mohair, does not conform well to the curve of the hull, reducing efficiency, and short-nap rollers don’t hold much paint without dripping. If the roller is loaded sufficiently to provide decent coverage and sufficient film thickness, the finish might actually turn out worse. Thicker nap rollers hold more paint,
which might be considered slightly wasteful. However, because they carry so much paint, they make application quick. The downside? A rougher finish. Foam rollers produce a smooth finish, but they don’t match the flow characteristics of the thick paint, and application tends to be very uneven.
How We Tested
We painted our 24-foot trimaran with a collection of mini rollers, standard rollers, and chip brushes. We worked our way around tight curves, cruised over long flat sections, touched up around stand pads, painted the centerboard, and even rolled the inside of the centerboard case. Rollers were weighed before and after use, and we observed finish, ease of use, and durability.
Observations
Watch out for rollers with fat edges. These tend to leave beads of thick paint at each edge, causing you to waste time trying to smooth them over. Spend a few moments trimming the edges of the roller cover to a nice taper with a pair of scissors.
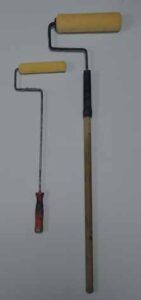
We used the mini-roller frames without extensions, because they require a light touch. With standard size rollers we used 30- to 36-inch extensions; these provide huge gains in ergonomics, speed, and control. Being able to use two hands and stand up straight decreases fatigue, keeps your head clear, and increases accuracy.
The first time you load a full-size roller, the amount of paint it sucks from the tray feels like a vacuum cleaner found your wallet. Visually, it’s tough. However, most of that paint ends up back on the boat when you roll out the last bit. We weighed rollers both before and after use, and calculated that the difference in paint wasted was about $2.33 based on $175/gallon paint, assuming you change the roller after each gallon. That represents only 1.3 percent of the total paint cost. Since mini- rollers do not apply the paint as evenly as a standard size roller, this is false economy. The mini-rollers are a few dollars cheaper, but this hardly makes up for uneven paint application and inefficient use of labor.
Any roller eventually wears out. With latex house paint, standard rollers are usually good for about three gallons as long as they are kept wet. With bottom paint, we found standard size roller efficiency starts to fade at about 1 to 1 ½ gallons; coverage starts to become a little less even, and given the high cost of bottom paint, we switch to a new roller in the name of efficiency.

Mini-rollers, having only 25-40 percent of the surface area of standard rollers, last proportionately less time. Our mini- roller was struggling at the ¾-gallon mark, and past experience tells us a full gallon is very optimistic. More importantly, if we had to paint an entire boat with a mini-roller, our arms would fall off. A standard size 9-inch long, 1 1/4-inch diameter roller with a 30-inch extension is several times faster and much easier on the hands and wrists.
Mini-rollers are a little easier to control in tight spaces, but we’ve never had a problem painting virtually all of any boat with standard size rollers. Tape the waterline with two-inch tape (see “3M Masking Tape Matchup,” PS October 2013.) Keep a rag handy for cleaning up mistakes. We did not find the mini-rollers to be a substitute for chip brushes in the really tight areas. Because of the smaller core, mini-rollers don’t roll quite as easily or evenly as standard size rollers.
A 22-inch frame 6-inch mini-roller was just the thing for inside the centerboard case. It knocked it out in a few minutes with minimal fuss. In our experience, centerboard case interiors experience very little growth, as does the centerboard stowed in the case, because oxygen is limited and there’s a lot of antifouling paint in a small area with minimal water flow. In truth, painting the inside of the case isn’t necessary and paint build-up could eventually become a serious problem. Paint it only every third time or so, and never more than a single coat.
Conclusions
Economy and smooth application of paint make standard size rollers the tool of choice. You will need a few chip brushes, and if a mini-roller makes painting tight spots in complex curves easier, then by all means use one. But forget any concern that full-size rollers are gobbling up your expensive paint; they are actually more efficient over the course of the job.


