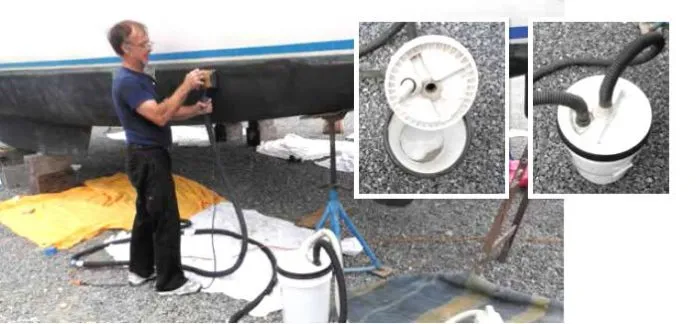
Responsible boatyard work requires dust collection. Whether its toxic bottom paint or ordinary sanding dust, it still makes a mess and can ruin a neighbors paint job-in-progress. Dustless sanders have hose connections leading to vacuum cleaners, but unless it is a sophisticated vacuum with multi-stage dust separation, those filters clog and dust flies.
Even with a multi-stage, dust-filtering vacuum, there are drawbacks. All work stops when the shop vacuum is full. Cleaning or replacing dust filters becomes just one more expense, interruption, and irritation in the boat yard. And if youre sucking up bottom-paint dust or horrible bilge filth, there is the matter of transporting that heavily loaded, bulky shop vacuum to a disposal site in the back of your car; will it tip?
The solution? Create a homemade dust-collection system using a five-gallon bucket with hoses attached to its lid. With a few common tools, $48 in parts, and 10 minutes of shop time, you can cobble together a simple dust-collection bucket that will get you through the longest day of sanding without interruption and that allows easy transportation of the waste to a disposal site.
Weve used this easy, do-it-yourself tool for bottom sanding, bilge cleaning, shower sumps, blackwater cleanups, cold fireplace ash, and even pumping muck from a home sump pit. When the five-gallon bucket fills, just move the retrofitted lid to a fresh bucket and continue. Work speeds along, and the full buckets are much easier to carry and safer to transport, pour, or empty into bags than a full shop vac.
What You Need
5-gallon bucket $2.98
Screw-top lid $7.25
(2) 1-in. thru-hulls 2 x $7.99 = $15.98
1-in. PVC 45 elbow 48 cents
(2) 24-foot 1-in. sump hoses 2 x $10.98 = 21.96
Total $48.68
How to build it
The DIY dust bucket is essentially a five-gallon bucket with two through-hulls (inlet and outlet) attached to the lid and sump-pump hoses fitted to the through-hulls. One hose is attached to your sander (inlet), and the other is attached to a shop vac (outlet).
1. To create the buckets outlet fitting, mark a circle thats the diameter of the through-hulls threads in the center of the lid. Cut a hole for the through-hull using a hole saw (best) or saber saw. Trim the through-hull flange to fit around the molded ridges on the lid (hole saw also works well for this). Repeat these steps for the buckets inlet (from sander), placing the through-hull as close to the lids rim as is practical.
2. To finish the inlet from the sander, caulk or glue (polyurethane caulk works well) the PVC 45-degree elbow inside the through-hulls rim fitting, on the underside of the lid, roughly parallel to the buckets wall; this will create swirl.
3. To complete the sanding kit, add one or two 24-foot sections of 1-inch sump pump hose, creating a super-light kit that will easily reach your boats entire bottom without having to move the vacuum as you work. (This hose generates an horrendous whistle when used as an open vacuum line, but when restricted for use with a sander it is quiet.)
Adjust the fitting sizes to suit your vacuum hose. We also recommend buying an extra screw-top bucket lid for transporting the waste to disposal, and buy as many spare buckets and lids as the work may require.
To test the effectiveness of the dustless sanding bucket, we used it with a cheap, thrift-store vacuum designed for small jobs the last time that we sanded the bottom of our 34-foot catamaran. The vac had a tiny paper filter, which clogged quickly when used alone. With it attached to the bucket trap, we finished the entire bottom-sanding job-many hours later-with no reduction in flow, and the mess was entirely contained in a single bucket.
The Bottom line
The total tally for the DIY dustless sanding bucket rang in just under $50 and took about 10 to 15 minutes to make. Testers have found that compared to using a shop vac alone, it made sanding easier (no vac to lug around) and it was effective, plus it makes cleanup and disposal a breeze.
A commercial version, the Oneida Air Systems Dust Deputy (www.oneida-air.com), is available for about $100 for the full kit (including hose and bucket). In our opinion, its better suited for the serious home woodshop than the boat yard. While it does work well, the extra complexity and expense do not seem justified at the lower airflow rates required for sander-dust collection, in our opinion.


Dustless is optimistic. I use the Dust Deputy and a modest size Ridgid shop vac connected to a decent quality sander that takes 5 hole disks. Some bottom paint dust still escapes. Makes me glad for my 3M half-face mask with N95 filters and a 3M face guard.
The Dust Deputy, and possibly this DIY alternative, pays for itself by saving the shop vac filters. My yard requires HEPA filters which cost $30 each. I have not seen a marked dust collection efficiency with the Dust Deputy, just an extension of filter life. Maybe the DIY version works better. Using my setup, some dust does make it into the shop vac.
The Dust Deputy cyclone is $50 if you supply your own bucket. I needed to reinforce a Home Depot bucket with interior wood bracing to prevent vacuum induced buckling. The cheapest plastic thru-hull at Defender is $12 (2020 pricing). So you pay about $25 extra for the manufactured unit that takes full size shop vac hoses which fit the sander’s hose adapter.