Photo courtesy of Ed Weber
388
The dinghy dollies item in the June 2011 Mailport caught my attention. Some years ago, I gave up on commercial dinghy wheels and made my own. Most wheels are too small, don’t lift the boat high enough, and sink into soft ground.
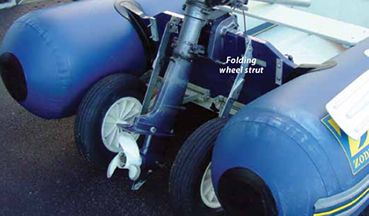
Some have large wheels, like the ones shown in the February 2003 issue, and they solve the clearance and sink problems. I had such a set called “Happy’s Wheel-a-Weigh,” which appear to be similar to those shown in the 2003 issue. The problem with this arrangement is that when deployed, they extend more than 1 foot below the dinghy bottom. So one can’t get close to shore because the wheels hit bottom, and they must get out in knee-deep water and drag the dinghy the rest of the way. Waiting to deploy the wheels isn’t practical because then, the dinghy has to be lifted high enough that the wheels clear the ground so the strut locking pins can be put in place.
My solution was to move the large wheels, about 16-inch diameter, back and up so they only lift the dinghy 6 inches. This is adequate clearance and makes the dinghy more stable on land. The wheels don’t hit bottom till the bow is close enough to shore that one can jump and not get their feet wet. My DIY structure is made from “DIY” aluminum stock.
When traveling any distance, it is undesirable to have the wheels in the water. The original system required removing the pins and inverting the struts, so the wheels were above the transom. Jiggling the pins wasn’t easy, and the wheels, well above the transom, acted as sails, making control on windy days difficult.
My design put a “knee” in the diagonal brace. The wheel bottom is above the dinghy bottom and creates negligible drag. To keep the “knee” from bending would require excessive tightness of the clamp knob, so there is also a pin (the screw head above the knob in the photos) that engages holes in the other half of the diagonal brace when properly aligned.
Ed Weber
Sea Serpent, Freedom 38
Port Ewen, N.Y.
I read your recent article on inflatable dinghy refurbishment (August 2011) with curiosity to see if what we had done to our dinghy was mentioned. Our Caribe (model L9) had given us good service for four years in the Caribbean and four years in the Mediterranean, but it was requiring pumping up every two to three days. New inflatables were quite expensive and not great quality, so we looked into “re-Hypaloning” the Caribe.
Friends had done it the year before to their dinghy and were very happy, and we knew of a shop in Marmaris, Turkey, that “re-Hypaloned” inflatables. We had not heard of the process before or since. The shop basically took off all glued-on equipment and glued a new layer of Hypalon on the top part of the tubes, where the inflatable was most exposed to UV.
Weight did not seem much, if any, greater after the repair, and the dinghy cloth all looked like new. Cost was around $700 and done by PAM Inflatables (www.pammarine.com). It was more expensive than we wished, but we are very pleased with it, and we were amazed that the process is not more widely done as it has added years to the life of our dinghy.
Dick Stevenson,
Alchemy, Valiant 42
Golfe de Morbihan, France
Hailport, Larchmont, N.Y.

Photo courtesy of Ed Weber
388
Based on PS reader recommendations, we splurged and bought the Salus Bijoux infant life jacket (PS, September 2010). Our 6-month-old daughter, Sally, enjoyed the vest all summer.
We tried it out in a pool first, and found that the adjustment straps allow for a snug fit that holds Sally well. She is only 14 pounds, but taking the time to adjust the straps makes for a secure fit that keeps her calm and happy when she is in the water. The grab strap works (we tested it) and is also great for pulling her along for a swim.
Sally is likely to grow out of her life jacket by next summer, but if you want to take an infant out on the water, the Salus Bijoux does the job well.
Linda and Dan Steinberg
Rubaiyat, Soverel 36
City Island, N.Y.
We field-trialed our test model this summer as well and found that it continues to offer a secure fit for our 20-pound, 8-month-old tester, Dylan. Dylan wasn’t as thrilled about wearing it at first as Sally, but he eventually got used to it and was able to crawl around the boat or float comfortably with his head well above the water. The straps were easy to adjust, even while Dylan was wearing it. As a side note: The Bijoux still does not have USCG approval.

Photo courtesy of Ed Weber
388
While reading your August 2011 issue, I noticed a mention of poly bags for cell phones (Chandlery, August 2011). The cost was listed as $10 for five bags. They looked rather flimsy, and the price was outrageous.
I have enclosed the poly bags I use to protect my cell phone. They are 4 mil, 3-by-6 inches and fit most smart phones. They are totally waterproof and very heavy duty, and the phone can be used while its in the bag. I have used these bags for a while now and have even jumped in the water with it in my pocket. The best thing is the price: $53 / 1,000 bags. They come packed in sets of 100.
There are many other sizes available at www.uline.com (800/958-5463), a packing-supplies distributor in Waukegan, Ill. The part number is S3118. If I had an iPad, I wouldn’t think twice about buying bags for it.
Fred Schenker
Harbor Isle, N.Y.
I recently upgraded to a Tides Marine Strong Track (PS, August 2011) on my Hood 38, and added slides to the fully battened main (had plastic slugs on the existing, but newer main), and it has made raising the main a piece of cake. The problem, however, is that now the reefing ear rings do not reach the boom hooks. Have any good ideas on how to address this?
Joseph D
Via www.practical-sailor.com
The Strong Track we installed for the August 2011 evaluation was for a new mainsail, so we did not have any of the problems sometimes associated with retrofitting a new main to the Strong Track. However, we got this a useful tip from reader and Island Planet Sails owner Dave Benjamin (www.islandplanetsails.com): “The fix is easy and well within reach of most DIY-minded sailors. Simply obtain some webbing, reuse the rings, and create new dogbones (reefing ear rings) of an appropriate length. Pay attention to how the existing ones are made. Chances are that you can roughly copy the same technique. Although your stitching will not be as pretty as a professional sailmaker, it can be just as sturdy.” Any other readers have a different suggestion or DIY fix for retrofitting an existing main to a new Strong Track?

Photo courtesy of Ed Weber
388
In response to the Boat Shoes letter in the July 2011 Mailport: I recently found what I believe to be the ultimate boat shoe, but I have not seen it sold in marine stores! It is the Keen Newport H2O. The sole is non-marking with tiny sipes for grip on wet surfaces, and my favorite part is the incredibly smart reinforced protective toe. Apparently, the founder of Keen is a competitive sailor, and this is his design from years of trial and error. I’m not sure if that is true or is a rumor, but regardless, you have to look for them in a regular shoe store.
Phil Earle
Mystere, a Beneteau 31
Blaine, Wash.
We’ve actually reviewed several different styles of Keen hybrid sandal-shoes since they first hit the market back in 2004 (PS, September 2004), and have found them to offer great traction, excellent toe protection, a comfortable fit, and good odor protection. Most recently, in the July 2010 issue, we tested three women’s models—the Whisper, Hydro Guide, and the Venice H2—but the same or similar models are available in unisex and men’s sizes. The Venice earned our Best Choice. You can find Keens at most department stores and outdoor stores. For a list of U.S. retailers, visit www.keenfootwear.com.

Photo courtesy of Ed Weber
388
In regards to your article on chafe protection (PS, July 2011): I have used orthopedic grade leather (Boat Leather, Seattle, www.boatleather.com) for chafe protection. The chafe gear is semi-permanent, cosmetic, and custom-fitted using standard leather stitching. Under our benign weather in Southern California, this chafe gear has lasted 10 years. The quality of the leather is key.
William Solberg
Wind Dancer, Tartan 3800 sloop
Marina del Rey, Calif.
I came up with another “old salt” chafe solution for lines around pilings that your DIY readers may want to consider. Using Shelter Rite “fabric” (heavy, abrasion-resistant vinyl polyester) from Sailrite (www.sailrite.com), I made my own chafe covers. Cut a strip about 24 inches long by about 6 inches wide (depending on line and piling circumference), sew marine-grade Velcro on each of the long sides using UV-resistant thread on a heavy-duty sewing machine—and presto! Chafe guards!
Annette Baker
Magnolia, 1990 Morgan 44-foot sloop
Galesville, Md.


