Are the tapered plug seacocks on your boat difficult or impossible to close? If you tighten the adjustment nut enough for them to stop weeping all over the inside of your boat, does it take two hands and a hammer to operate them? If so, it’s time for an overhaul.
Even if they worked well last season, a little care while the boat is hauled can save you a lot of grief in the future.
288
As part of your boat’s routine maintenance, tapered plug seacocks should be disassembled, cleaned, lubricated, and reassembled on a regular basis. Even if maintenance has been neglected and the seacock is completely seized, open or shut, it can probably be recovered to workable condition, and can usually be made as good as new.
Although bronze plug seacocks by different manufacturers will vary slightly in construction details, the general principles are the same, and maintenance procedures are for all practical purposes identical.
The first disassembly step is to remove the outer retaining nut on the side of the seacock opposite the handle. Most seacocks also have an inner nut, which is frequently a casting which also incorporates a washer. These nuts should only be backed off until they are flush with the end of the threaded stem on which they are screwed.
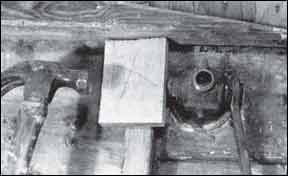
Next, tap straight in on the nut and stem, using a hardwood block as a cushion between the hammer and the soft bronze parts of the seacock. If you fail to use a cushioning block, or if you hit the stem directly with a hammer, you can damage the threads or even bend the stem.
Once the tapered plug starts to slide out of the seacock body, the retaining nuts and washer can be removed completely from the stem, and the plug pulled out.
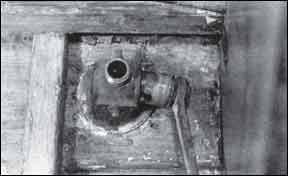
You say the seacock is seized, and you can’t even open or shut it, much less get the tapered plug out? First, loosen the retaining nuts. Heat the body of the seacock thoroughly using a propane torch — the type using throwaway 14 ounce cylinders.
If the seacock handle simply fits over a square stud on the big end of the tapered plug, take the handle off and use a big adjustable end wrench or pipe wrench in place of the bronze handle. A pipe wrench will scar or even ruin the square stud, so only use it as a last resort.
288
It may be necessary to even add an extender to the wrench — called a breaker bar-in the form of a piece of steel pipe slipped over the wrench handle to give more leverage. Before using an extender try hitting the handle of the wrench with a hammer, in the direction that would open or close the seacock. A sharp blow from a hammer usually is more effective than a lot of steady pressure on a long handle.
If you’re forced to resort to a breaker bar, you run a real risk of damaging your boat. With enough leverage, you can easily tear the hull laminate, or even tear the seacock out of the hull. Use leverage judiciously. If the hull starts to deform around the seacock when you lean on the handle, you’re going to break something -like your boat — if you put any more pressure on it!
Still no luck? It’s time to remove the seacock completely from the boat. If the seacock is glassed to the hull — a poor practice — you’ll have to chip away the glass on the inside with a chisel. Wear safety glasses, and use a junk chisel, because you’ll destroy the edge.
If the seacock is screwed or bolted to the hull, remove the fastenings. If it is throughbolted from the outside, with the nuts on the inside, you may be able to get away with only removing the nuts on the inside, leaving the bolts in place.
There are two ways to remove a seacock. You can either unscrew the body of the seacock from the threaded stem of the through hull fitting, or you can unscrew the through hull fitting from the seacock. Usually, it’s easier to unscrew the seacock from the through hull fitting, but the bolts have to be completely removed from a through bolted fitting in order to do this.
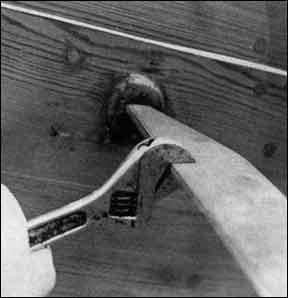
If inside clearances prevent unscrewing the sea-cock, you’ll have to remove the through hull fitting. Most through hull fittings have two ridges inside the pipe that allow you to insert a piece of flat bar into the fitting, turning it out using a wrench on the flat bar for leverage.
A through hull without these inside ridges can be a real problem, and may be so damaged during removal that it has to be replaced. Fortunately, this is the cheapest part of the seacock assembly.
288
You can try to remove this type of through hull by driving a piece of oak into it firmly, then trying to turn it out with a wrench on the piece of oak -in exactly the same fashion that you’d unscrew a through hull with the internal ridges. Unless the through hull is glassed in, the friction of a well-driven piece of oak in the fitting is enough to allow you to turn it out.
For large through hull fittings, you can use a plumber’s inside pipe wrench, which uses cams to lock into the inside of the pipe. That’s a pretty esoteric tool for most people.
As a last resort on a through hull that isn’t recessed flush, you can sometimes grab the flange with a pipe wrench laid flat on the surface of the hull. You can also damage the hull surface this way.
If this sounds like a lot of trouble to go to for a seized seacock, remember that a 1%” seacock -the size on the head discharge-costs about $100. You can’t leave a seized seacock in place. If it doesn’t work, it might as well not be there.
Now that you’ve got the recalcitrant piece of hardware out, you can assault it in earnest. Nothing is more effective in loosening seized metal to metal parts than heat. Lots of heat. Put the seacock in a bench vise and fire up your propane torch. Make the mother sizzle, and pound on the small end of the tapered plug-don’t forget to leave a nut in place on the threaded stem of the tapered plug, and don’t forget to use a wood block for a cushion between your hammer and the relatively soft bronze stem.
The reason tapered plug seacocks seize so badly is that they consist of lots of closely machined, tight fitting surface that depends both on the smoothness of the surfaces and a good layer of lubrication for easy operation and watertightness. If you don’t keep it cleaned and greased, it won’t work.
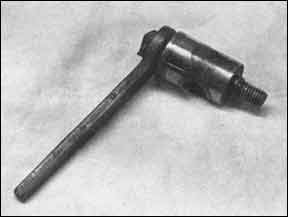
Now that you’ve got it apart, clean the seacock thoroughly, inside and out. Use a mild solvent such as kerosene to remove dried and caked grease. On a salt water boat, clean the salt out of the inside of the plug, as well as all passages in the seacock and tailpiece.
288
After all old grease is removed, use fine wet or dry sandpaper, used wet, to brighten both the bearing surface of the tapered plug and the bearing surface of the inside of the seacock body. Silicon carbide paper cuts bronze amazingly fast. Don’t sand one spot on the plug hard, or you’ll quickly create a hollow.
On a seacock that is left closed most of the time, there is likely to be pitting and corrosion on the part of the plug that serves as the barrier to water coming in through the through hull. Don’t try to sand out this damaged section, which appears on the plug as a discolored and perhaps pitted circle the diameter of the seacock opening. If the rest of the plug is smooth and tight fitting, the seacock should still be watertight.
If the machined surface of the tapered plug is badly grooved, you can renew the surface by using a thin paste of valve grinding compound. Spread the compound on the plug, reassemble the seacock, and rotate the plug in place -grinding the tapered plug into its seat in the seacock body-using the seacock handle or a wrench.
Valve grinding compound cuts the soft bronze very rapidly, so don’t overdo it.
The surface will not be smooth enough even after using grinding compound. You still must use successively finer grits of wet sandpaper to get a really smooth surface. Start with 220 grit, finish with 600.
When both the tapered plug and the bearing surface on the inside of the seacock body are smooth and bright, clean the surfaces thoroughly to remove any remaining sanding or grinding grit. First clean with a solvent, then finish off with soap and water. The bearing surfaces must be clean, clean, clean. Wrap the tapered plug in a clean rag until you’re ready to reassemble.
If you’ve had to remove the seacock from the boat, you should reassemble it before reinstalling it in order to keep the bearing surfaces free of foreign matter.
Reassembly is straightforward. Grease the surface of the tapered plug thoroughly with a light waterproof grease, such as Lubriplate. Slip the plug into the sea-cock body, and reinstall nuts and washer.
Final adjustment of the seacock takes a little common sense. Tightening the nuts on the small end of the tapered plug draws the plug more tightly into the seacock. The nuts should be tightened only enough so that the seacock doesn’t leak at either end of the tapered plug, not so tight that it takes two hands on the handle to operate the seacock.
Most seacocks have two small plugs on opposite sides of the outside of the seacock body. Although they are usually referred to as drain plugs, they are also useful for lubricating the seacock during the season. Remove one of these small plugs -they are usually l/8” pipe thread -and fit a grease fitting with the same thread on it. (An auto parts store will probably have what you need.) Be sure the business end of the grease fitting will accept the fitting on the end of your grease gun. You don’t have a grease gun? Get one now.
288
With the seacock in the open position, screw the grease fitting into the seacock body, and pump heavy waterproof grease through the fitting until it squeezes out around both ends of the plug. If you don’t have the seacock in the open position when you do this, you’ll just be pumping all the grease into the flow opening in the tapered plug.
Once the grease has begun to squeeze out, tighten down the tapered plug adjustment nuts until the sea-cock operates smoothly, but requires a little force on the handle. Operating a seacock should not be a one-finger operation, but it shouldn’t require you to put all your weight on the handle, either.
Remove the grease fitting from the seacock and reinstall the small bronze plug. Keep the grease fitting handy, and give the seacock a good shot of grease any time it gets hard to operate, or starts to leak.
If you’ve had to remove the seacock from the boat to free it up, wait until you’ve got it back in place before doing the final greasing and adjusting. Remember to use a bedding compound under the seacock flange when reinstalling. It is better, whenever possible, to screw the seacock onto the through hull fitting, rather than the through hull fitting into the seacock. Turning the through hull into the boat and the seacock tends to turn out all the bedding compound under the through hull flange, with leaking the inevitable result. The best bedding to use for through hulls and seacocks is a moderately adhesive compound, such as LifeCaulk or another polysulfide, rather than a powerful adhesive such as 3M-5200.
If you are faithful in keeping seacocks greased throughout the course of the year, a complete disassembly and cleaning may only be necessary every three years or so, and the real hassle -freeing a totally seized seacock -may never be necessary.
It is absolutely necessary that all seacocks operate freely, even those such as the cockpit scuppers or the raw water intake for the inboard engine, which you rarely close.
A little grease – elbow and waterpump – goes a long way.


