For those of you unfamiliar with Baja fuel filters, they are multi-layer strainers, purchased or handmade, used to filter diesel fuel of dubious pedigree before loading. Water, whether from a dockside hose or rainwater, presents a similar challenge. We’ve been exploring freshwater filtration possibilities for a series of articles to come, and while there are great pre-filtration products out there, none offer the versatility of our own home-grown solution, which we call the Baja water filter.
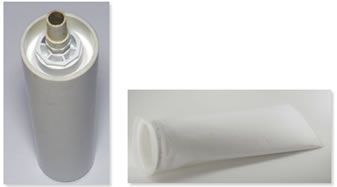
Cartridge filters are bulky, and while they are good for inline filtration at-the-dock systems, they also are susceptible to contamination since the greatest source of contamination is the junk growing in the hose itself. Hose-end filters are convenient, but the filtration is often coarse (10 to 40 microns), and they plug up easily, reducing flow to 2 to 3 gallons per minute after only a few fillups. With a few scraps of PVC pipe, simple tools, and common skills, a 4-inch by 14-inch, 1-micron bag filter becomes a multipurpose Baja filter serving all cruiser pre-filtration needs.
What You’ll Need
The total cost for all parts is approximately $25. Here’s what you’ll need:
1-micron polyester bag filter, seamless, trade size 4 (McMaster/Carr, 9316T211, specify 1-micron)
2 feet of 4-inch diameter PVC DWV pipe
2-inch by 3-inch reducer
2-inch by -inch NPT bushing
-inch by -inch NPT nylon barb fitting
Silicone caulk
PVC cement
Construction
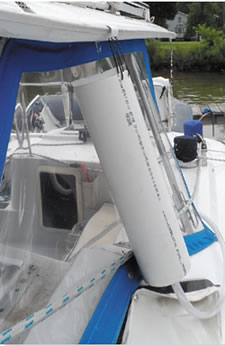
The 4-inch PVC pipe is small enough to support the top ring of the bag filter, yet large enough to give the bag an easy fit and good flow. To form an internal funnel and a bottom that can sit flat over a deck fill plate, slide the 2-by-3-inch concentric reducer about 5 inches inside the funnel (grind off small tabs that interfere). Seal the reducer in place with silicone caulk.
Next, glue a 2- by-3/4-inch NPT bushing into the reducer with PVC cement. The end of the bushing should be recessed about a half-inch from the end, so the funnel can sit on the deck plate without wobbling. Cut the 4-inch pipe long enough for the bag to hang free plus about 1-inch for stretch-about 15 inches inside the pipe. Insert a 3/4-inch PVC threaded nipple when used over the deck plate, or a 3/4-inch barb adapter for collecting rainwater. Smooth all edges, and add small holes near the mouth to hang from the gutter to collect rainwater.
In Use
Hose water: Drop it in the freshwater deck plate and watch the junk shed from the hose accumulate.
Rainwater: 1-micron filtration produces tank-quality water; rinse the salt and major bird bombs off your collector first.
Jerry cans: Upgrade water pulled from a grimy tap.
Clean: The bag can be laundered several times.
Sanitize: The bag can be dried and sanitized in the sun.
There are many bag filter materials and sizes available; we’ve tried them all and find polyester felt to offer the best economy and best removal efficiency of the particles of interest; it has something to do with surface charge and texture. While coarser bags promise more flow, the difference is small and the 1-micron filtration removes more silt and colloidal dust, ensuring a clean tank. There are also lighter versions using garden drain pipe instead of PVC for the main body; nipples and reducers can be adjusted for better flow rates or to tap into existing plumbing.













Is there a video?
Can’t believe this is from 2015 ! A diagram would be MUCH appreciated especially if someone has created this for themselves and/or updated-tweaked the original design.
Agreed. Would be good to see more pics/plans/video
Yes, as a senior, I’d also like to know the process of how to get a detailed video and all necessary components for bag filter. With Thanks.
Need a drawing please! Or at least somebody who can do more clear technical writing.
Agree with all five previous posts. Better writing, more pictures and a diagram, PLEASE
As much as I appreciate these articles, I do agree with the above comments. In addition, photos and illustrations would enhance the sometimes ambiguous text.
Drinking water is too important to be guessing at. I’m not sure about what is proposed here, though I keenly appreciate the low cost DIY thinking on it. Once the water is filtered with what I have available, I and all on my boat use a steripen just before drinking. This is a proven Uv device that doesn’t cost much. The company was acquired by Katadyn international some years back, the top name in water filtration worldwide. I never drink water from any tank until I use the Steripen as a final step. It’s a time consuming hassle, but so is the hospital. Cost: about $50. I insist that all who come aboard overnight have one in their pocket.
I think I get it, but as others comment above, a diagram would be helpful. Steripens are also a good idea. Does a proper amount of chlorine bleach (or the other similar -but not the same- stuff more commonly available in grocery markets) have any adverse effects on the baja water filter components you describe -(or the reverse)?
I did a section of the device but unfortunately the blog doesn’t allow anything other than text.
Likewise, love the idea, want to put into practise, will be using metric not imperial components and need one or more illustrations. European sources for the polyester filter material or its equivalent alternatives would also be great.
I assume that the size #2 filter bag was a mistake I belive what you are using is a size #4. Nice idea, I will make one.
Video please
I agree. Provide photos with captions, PLEASE!
I just built one. Used 4 inch PVC sewer pipe (thinner walls, therefore much lighter, and easier
to cut the ends evenly flat (with hacksaw) 16 inches long. The polyester filter bag was a #4 (I saw no mention of a #2); plus the rest as listed (the bushing and the barb should have read “3/4 inch” at the three spots with a ‘dash’ before the word inch. Parts in 2023 totaled $58 at Home Depot (prices increased since the original 2015 publication !) not including the silicone caulk I already had. Filter was $9.25 but shipping and tax brought it to $!9 ! Home Depot may
require buying a 10 foot piece of the sewer pipe for $24, but a 3 foot piece of PVC DWV pipe goes for $15, and you’re going to cut in in half !; so get some friends and make half a dozen Baja filters with the sewer pipe !
A diagram would be nice, but once you start to put things together in a mockup phase, you
will understand the process easily. Be sure to place the reducer, with the bushing and barb in place ‘mocked up’, recessed high enough inside the bottom of the 4 inch tube so that the 4 inch tubing provides the resting ‘foot’ surface over the boat’s deck plate. Don’t let the barb
project ! Good Luck !