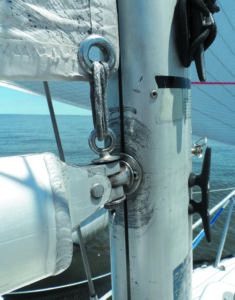
Soft shackles became the cool thing nearly as soon as they appeared on race boats. Any savvy DIYer could make them using Dyneema single braid. They are light, strong, flexible, and reliable. Because they are metalfree, a flogging genoa clew is less likely to gouge the mast or result in forehead stitches.
No tools are needed to make a soft shackle. They won’t scratch an aluminum toe rail. Not surprisingly, they’ve sprouted everywhere on sport boats, and even old-school cruisers have jumped on the bandwagon. We keep a variety of sizes in our tool box because they can solve a wide range of emergency problems and they weigh almost nothing.
They can also be made with a toggle (aka dog bone), a style that goes back hundreds of years. We’re seeing a wide variety of Dyneema versions of these dog bone shackles on high-end race boats, who are attracted to the many advantages over the original knotted style.
Easier to grab and loosen with cold hands or while wearing gloves, the dog bone makes the shackles easier to secure. They are also easier to manipulate when the sail is flogging. And the dog bone design is also slightly stronger than the original. In addition, the toggle styles are simpler to make since the dog bone is substituted for the stopper knot, which requires more practice to make quickly.
The cons? Well, you must buy or make the dog bone, although this is really very simple. Also, the “soft” shackles are no longer completely metal-free. However, the toggle is typically made of aluminum, so it is extremely light and far less damaging than stainless steel when flogged about.
HOW WE TESTED
The dog bone can be aluminum or composite. Either is more than strong enough for the job. Grade 6101 Aluminum has a tensile strength of 35,000 PSI. Structural fiberglass and Garolite rod are 30,000-35,000 PSI. Carbon fiber rods are around 120,000 PSI.
We ran the numbers on a number of designs and tested toggles made from a variety of materials. Assuming the most slender section of the toggle is at least 100 percent of the line diameter, any material with a tensile strength of over about 10,000 PSI will be stronger than the line. The only material we were able to break was hardwood, and the results were an impressive 880 pounds for a ¼-inch maple dowel. Maple has a tensile strength of 600 psi, so we can expect whatever material you choose to make your dog bone, it should hold at loads very close to its PSI.
For an added safety factor, we recommend that toggles be 125-150 percent of the line diameter to reduce strength lost to sharp bends and ease of handling. We made shackles with fiberglass and carbon dog bones, and they worked fine, but we’re concerned about possible cracking, so we recommend aluminum, which is more shock-resistant.
DOG BONE DETAILS
Clearly, if these are to be used for running rigging, the toggle must be secure in place or it may slip out of position. There are several ways to accomplish this.
• Adhesives. Coat the dog bone with polyurethane sealant, such as 3M 5200, before sliding it into place. Wipe off the excess, or coat the entire eye and toggle for additional security if you feel the need. We found the rubberized coating made them harder to handle.
• Hourglass shape. Slightly tapering the center of the toggle under the eye prevents slippage. This is easily accomplished with a drill press, or even with a handheld electric drill (see photos page 23).
Cut the toggle about ¾-inch longer than needed. The extra length will be used to secure the toggle in the drill chuck. Secure the toggle in the drill, mark the area to be tapered while spinning, and then rub a rattail file over the area until a pair of very slight depressions are formed. A mere 1/32- inch groove is enough to give the rope a secure seat. Polish the dog bone with sandpaper up to a minimum of 200 grit. This is adequate to prevent chafe, but still retain some desirable friction. Cut to length and smooth the ends.
The toggle’s minimum diameter should be about 1.25 to 1.5 times the rope diameter and the length should be about 6-8 times the rope diameter. The ones we made had diameters that were 1.5 times the rope diameter; their length was eight times the rope diameter.
The toggle should also be secured by seizing the eye tightly with whipping twine. A Brummel lock is acceptable, but it is much easier to form the correct eye size using a bury splice and lock stitch.
SOFT SHACKLE EYE
On the end opposite the dog bone, the soft shackle has an open eye. This end can be either fixed or noosing, like a soft shackle (see PS April 2015, “Going soft on Shackles”). It is important to recognize that whatever eye you choose, a simple bury splice is not going to provide the security you’ll need (see PS December 2018, “Failed Splice Linked to Fatality”). A Brummel lock or a bury splice that is lock stitched in place is required.
FIXED EYE
Pinch the eye to the absolute minimum size you can reasonably press the toggle through. Place a pin through the rope to hold and then mark with a Sharpie. Remove the pin, create a bury splice at that location and lock stitch the bury splice to secure it. Then place a fivewrap whipping around the throat of the eye to fine tune and fix the opening size. Note: We do not recommend this style for applications with active flogging. If the toggle rotates into alignment with the rope it can slip out, and the two measures to prevent this will introduce new issues. Lengthening the toggle presents a snagging risk, and narrowing the eye makes fastening difficult. We prefer noosing eyes.
This blog post shows the method of forming a fixed eye using a Brummel lock (www.roostersailing. com/blogs/ boat-maintenancetips/how-to-make-asoft- shackle-with-adog- bone).
NOOSING EYE
To create a noosing eye, form the eye first, in the same manner as for a soft shackle (pass one tail through the other rope about ½-inch to one side of the mid-point). Leave a fid or other toggle-size object in the eye to hold the size. Form small eyes in both tails, splicing them around the toggle. It’s a little tricky making the two legs equal in length, so the load is equally divided, and making an eye that is just large enough to fit snuggly around the pair of eye splices holding the toggle.
How secure is the dog bone shackle? We’ve never had a textile or noose-style soft shackle shake open. Over the years, we have had spinnaker shackles come open; one because of a failed springs, several when the lanyards snagged in the rigging during a hoist, and a few that might not have been properly closed (who can say). We’ve had a few nonmoused D-shackles unscrew, two failing spectacularly under way and several we noticed during inspections. On the other hand, the soft shackle sample size has been much smaller, the t ime of use is far less, and we inspect our soft shackles for cha fe at least once a year (none noticed yet). A soft shackle can also be whipped closed for security, much as one can mouse a pin shackle.
MINIMUM LENGTH
One possible concern is short length of the tail bury when forming a fixed splice. The conventional wisdom is that the tail must be buried at least 40-50 rope diameters for the splice to be full strength. Testing suggests as little as 35 times diameter works for loops, because the pressure where they wrap around whatever they are connecting increases friction (grip) on the buried tail. This results in a 6-inch tail bury for a 5 mm rope used with most of the toggle eyes we tested. After adding an allowance for the eyes and the noosing eye, the overall length is about 8 inches, or a minimum closed shackle length of about 4 inches (100 mm). You can go as short as 3 inches with some additional lock stitching.
ESTIMATING REQUIRED STRENGTH
How strong a shackle do you need? First, estimate the working load of the sheet or halyard. You can assume the original engineering was right— often a good bet—and look up the working load of the other components, using the load limit of the weakest part. Line is often sized for handling (hand), and that can drive up the size of other components on smaller boats.
Or you can use one of many on-line calculators. Harken has a good one (www.harken.com/en/calculators/).
Enter the maximum gust you would expect before you reef, assuming you delayed reefing to the practical limit. Or you can use a load cell.
Once you know the load, consider these factors:
• Line size: The minimum line size we use is 3/16-inch (5 mm) Amsteel, and the minimum closed length is about 4 inches (100 mm). Anything smaller is too difficult for our clumsy fingers to splice or handle. Larger sizes are easier to handle.
• Chafe. If the mating surfaces are rough, polish them and add chafe covers. Check frequently for wear.
• Construction. There is a theoretical number for each design. But if the load is carried unequally by the legs (splicing error), the strength can be less. Unless you are prepared for a learning curve and are meticulous in your splicing, we like a conservative safety factor. When estimating strength, we assume 55 percent of the number of loops times the strength of the line for all designs. For example, a toggled shackle made from 3/16-inch (5 mm) Amsteel has a breaking strength of about 11,500 pounds (5,400 pounds x 4 passes x 55 percent). Although we use two loops, we use the single loop breaking strength for any calculations.
CONCLUSIONS
Which are better, all textile soft shackles, or dog bone soft shackles? All-textile soft shackles are better where metal can scratch, anywhere flogging metal can hurt, and generally for smaller shackles attaching blocks. They are better for attaching snubbers to chain, since there is less to snag on the rollers. On the other hand, toggled shackles are easier to work with when hands are wet or cold, or when wearing gloves. They are easier to work if the line is moving at all, such as a headsail sheet. Toggled shackles are easier to make predictably strong in larger sizes.
How secure? About the same as a non-moused D-shackle, and suitable for most uses without sharp edges. Metal shackles still outnumber soft shackles 3:1 on our test boat because they don’t chafe and fit more places. We don’t use soft shackles where there are sharp edges and we wouldn’t use them for standing rigging or an anchor shackle. We like them for applications where a flogging or sliding shackle could damage spars or crew. It’s about choosing the right tool for the job, not about saving a few ounces.
What about the fixed-eye style? They have proponents. They are certainly easier to work with if the line is tugging, or the deck is pitching, but we prefer the security of noose-eyes.
We’re going to test a few in the field, but for now, we are recommending the noosing type for running rigging, since these function more like the well-tested textile soft shackles.
And sometimes it is just personal preference. If you’re finding all-textile soft shackles hard to handle, try toggled shackles.
VALUE GUIDE: DYNEEMA TOGGLE OR ‘DOG BONE’ SHACKLES
| MANUFACTURER | MODEL | SIZE (ROPE) | TOGGLE DIAMETER | BREAKING STRENGTH* | WORKING LOAD | PRICE |
|---|---|---|---|---|---|---|
| TOGGLE SOFT SHACKLE | ||||||
| RONSTAN | RTF 7008-09 | 1/4" (6 mm) | 0.325 in. (8.2 mm) | 8,800 lbs. (4,000 kg) | 4,400 lbs. (1,800 kg) | $16 |
| ANTAL | LS2070 | 3/16" ( 5 mm) | 0.31 in. (7.8 mm) | 6,400-8,000 lbs. (2,900 - 3,600 kg) | 1,700 lbs. (770 kg) | $42 |
| DIY $ | Aluminum toggle, 5mm Amsteel | 3/16" (5 mm) | 0.375 in. (9.5 mm) | 11,500 lbs. (5,200 kg) | 3,800 lbs. (1,700 kg.) | $2.05 |
| DOG BONE ONLY* | ||||||
| TYLASKA | DB10 | 1/4" (6 mm) | 0.28 in./ (7.1 mm) | 8,000 lbs. (3,600 kg) | 4,000 lbs. (1,800 kg.) | $15.26 |
| ANTAL | LS2072 | 3/16” (5 mm) | 0.31 in./ (7.8 mm) | 11,500 lbs. (5,200 kg) | 3,750 lbs. (1,700 kg) | $17 |
| PREMIUM ROPES | PRH 7701 | 1/4” (6 mm) | 0.23 in./ (5.8 mm) | 8,800 lbs. (4,000 kg) | Not given | $9.70 |
| HOLT ALLEN | A8612 | 3/16” (5 mm) | 0.28 in./ 7.1 mm | 2,425 lbs. (1,100 kg) | 1,322 lbs. (600 kg) | $9.81 |
| DIY $ | Aluminum | 3/16” (5 mm) | 0.375 in. (9.5mm) | 11,500 lbs. (5,200 kg) | 6,000 lbs. (2700 kg) | 35 cents |
If you’ve already learned how to make a soft shackle from reading previous Practical Sailor reports (see PS April 2015, “Going Soft on Shackles,”) or by watching one of the many YouTube videos online, than making a dog bone soft shackle will be easy for you. If this is your first time, you will be surprised how easy it is to work with Dyneema which, because of the constrictor like grip of the strands, and the hollow core, is very easy to splice. The only other skill you need is the ability to whip a line using whipping twine. Our favorite is Robline, but almost any brand will do (see PS December 2014, Top Whipping Twines).
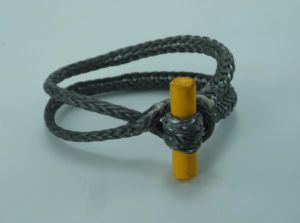
1. The noosing eye chokes down on the toggle. The trick is making sure that both legs of the shackle are equal, so that the load is evenly distributed between both.
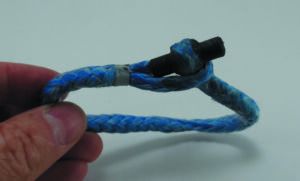
2. A fixed eye is secure if it is under continuous load, but intermittent loads, like a flogging sail, could cause the toggle to rotate and possibly slip through the eye to open.
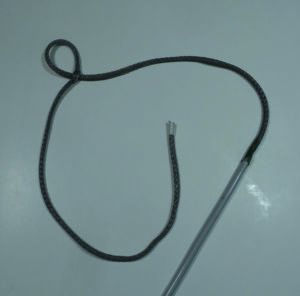
3. Forming the noosing eye is straightforward. Use a fid to form a loop by passing the toggle-end of the shackle through the strands where you want the loop to form.
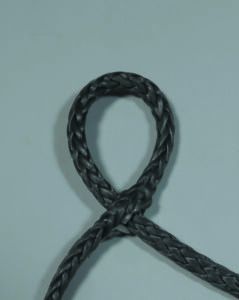
4. A close up photo shows the adjustable eye for the noose.
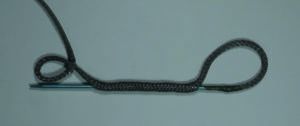
5. The noose eyes are formed using a bury splice that is stitched in place.
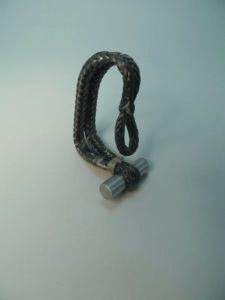
6. Whipping twine is used to secure the dog bone and splices in place. When the shackle is under load, the loop will tighten its grip.

When making your own modified soft shackle, shaping your own dog bone is part of the fun. A wooden dowel did surprisingly well as a dog bone, and no doubt a hardwood dowel would be up to the task, but 6061 aluminium is a better choice for the do-it-yourselfer. You don’t have to worry about rot or other deterioration, and corrosion won’t be a major issue since the aluminum is not in contact with other metals that might set up a galvanic cell that leads to corrosion.
One manufacturer has gone so far to offer titanium dog bones, but the added tenslle strength is superfluous, since the Dyneema line that forms the shackle will part before the dog bone itself. Aluminum is also easier to machine.
You can use a lathe, drill press, or even a handheld drill with a file to create sufficient taper. The groove should reduce the diameter by about 15 to 20 percent.
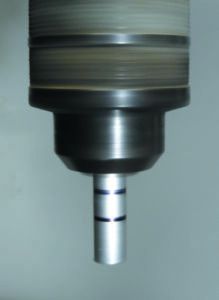
1. Lines on the dog bone mounted in a drill press define where to file.
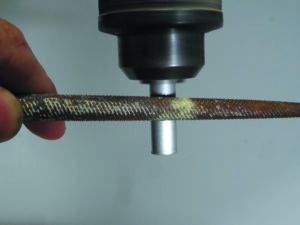
2. A vice or your hand can be used to hold the file as the rotating aluminum dowel is run back and forth across it.
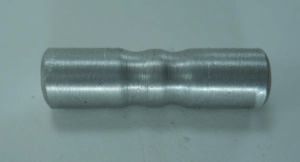
3. To prevent abrasion, polish the dog bone with a minimum 200-grit abrasive. You can make it smoother for a more “professional” look, but 200-grit is adequate to prevent abrasion.

ANTAL, www.antal.com
PREMIUM ROPES, www.premiumropes.com
SAMSON, www.samsonrope.com
TYLASKA, www.tylaska.com
HOLT ALLEN, www.holteu.com








Made a lanyard for a new outboard, in case the clamps work loose. Since I had about a 6′ length of Dyneema and carbon rod and tube, why not experiment? If I stitched and buried correctly, it should hold ten times the weight of the motor. I took carbon tube, ID close to rod OD and used two pieces epoxied to the rod to form the recess in the toggle to better capture the loop. And I used a really sloppy Brummel splice (kind of an expert at that) for a loop, spaced 6″ in from the toggle end. So one end can be luggage tagged to the motor and the toggle end looped around a stanchion, the toggle fit through an inter-line loop (the sloppy Brummel) and connected.
Good project!
A follow-up article is coming, comparing toggled and knotted soft shackles in use.
Rooster link is broken…
Scotchbrite can polish aluminum or brass to a mirror finish in a lathe or drill press.
Good point on the Scotchbrite. Great stuff. But is a mirror finish better, in this application, if the compromise is between reduced chafe and reduced friction for either the center splices or the choking eye? I do not know, so I compromised with medium/fine grit. Yes, a mirror finish is probably better in terms of life expectancy. I’ll try that next time, (I just finished a new batch, so it may be a while!)
I enjoy the simplicity and safety of a tied Soft Shackle. The BrianToss soft shackle design has proven to be optimal. Breaking strength test of 1/4″ SK75 dyneema soft shackle showed failure at 10,880 lbs (1.4 times reported breaking strength of line). Failure occurred at non tapered buried end of line. Constriction of the line around the bury became angular as the shackle was stretched. The square cut edge of the buried line on the fibers induced the failure. Tapered buried ends should result in a higher breaking strength of the soft shackle. Not that it is needed on the rigging of a 35ft sailboat.
At a material cost of $4.13 it is my go to shackle rigging system.