The most common error with poured sockets is insufficient cleaning of the wire, and/or using the wrong solvent to clean it. Even dry, stainless wire, when new, can have a residue of lubricant left over from the extrusion process. If this lubricant is not removed, it can compromise the adhesion of the wire yarns to the filler material in the socket.
It is extremely important that the solvent itself does not leave any residues. Purpose-made solvents are available commercially, but they tend to be seriously toxic and to come in large buckets. For recreational sailboat-size jobs, lighter fluid is a good choice, as is brake cleaner.
Be obsessive about wire cleaning. We like to broom the cover and core open well beyond the part that will be in the socket; then clean the yarns and let them dry; then re-lay the yarns to slide on the socket (which has also been cleaned); then broom open the wires once more.
Next, avoid over- or under-brooming. You want to have both the cover and the core yarns unlaid for nearly the full length of the socket cavity. Open things too far, and you will get distortions in the standing part of the wire rope beyond the socket. But open things too little, and you will limit how much the filler material can infiltrate the yarns to form the necessary plug.
Tip: With 1×19 wire, unlay the cover yarns to the desired extension, get the end of the wire partially seated in the terminal, and then use the tip-end of a pair of pliers to unlay the core. That way, you have a chance to get the core adequately broomed without tangling cover and core yarns together.
Seal the bottom of the terminal. We use multiple tight wraps of 3Ms 130C tape. This prevents the filler material from leaking out before it can set up.
Mix well, starting by mixing just the resin for at least a minute. Stir gently, to avoid creating bubbles. Add the very small amount of catalyst that comes with the product, and mix that in well.
Take great care to see to it that the wire goes straight into the terminal. If the terminal is even slightly cocked, relative to the wire, there will be disproportionate strain on some of the yarns.
Clamp the terminals upright. They should be truly vertical, so the filler wont spill out on one side.
Pour carefully. Some riggers use an epoxy syringe to slowly inject the filler material into the cavity.
Give the filler ample time to set up completely before even moving the terminals, let alone using them. Note that temperature can affect curing time.
Note that filler manufacturers, in their product descriptions, typically will either say that it has not been tested with stainless wire, or that it should not be used with stainless wire. This is due to crevice corrosion that they have seen in wires, right at the exit of the terminal, where water can accumulate. But experience shows that this is true for all terminals, not just sockets. Crevice corrosion inside unsealed swages, for example, is a major cause of swage failure. Monitor for crevice corrosion, as you would for other forms of corrosion, fatigue, and damage.
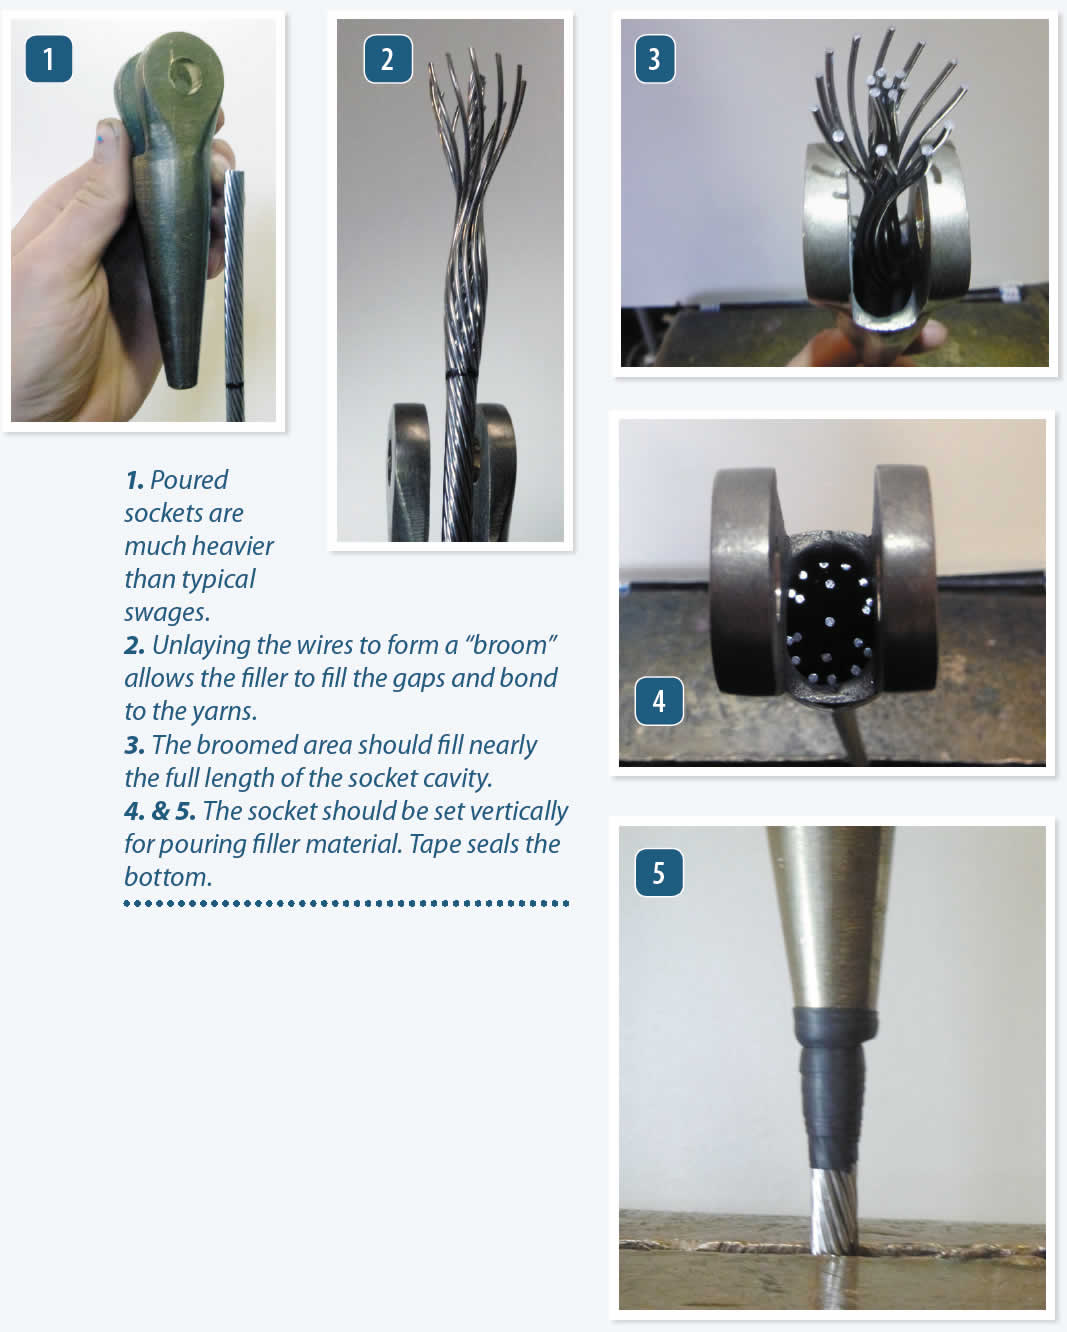
1. Poured sockets are much heavier than typical swages.
2. Unlaying the wires to form a “broom” allows the filler to fill the gaps and bond to the yarns.
3. The broomed area should fill nearly the full length of the socket cavity.
4. & 5. The socket should be set vertically for pouring filler material. Tape seals the bottom.


