There are no industry standards for how thick a galvanized coating should be on an anchor chain or mooring chain, and manufacturers don’t publish this information. Fortunately, with a bit of sleuthwork, you can determine just how good the galvanized coating is on your chain by carrying out a couple of tests on some sample links you can obtain from your local chandler.
Adhesion
One of the oldest ways to test adhesion is a simple twist test, in which the galvanized material is bent and checked for coating failure.
Heres a quick-and-dirty twist test for galvanized chain. Put a link in a rugged bench vice-ours was 4 inches-and hold the link with the weld down so that you are clamping the semi-circular crown of the link. Cut right through the top of the link (one side only) with a hacksaw or angle grinder. The cut should be through the wire opposite the weld.
Take a decent-sized, adjustable wrench or vice-grip to the other end of the link and twist the link so that it is turned through 180 degrees. Examine the twisted section. If there is any flaking of the galvanized coating, the adhesion is poor. If the weld (or wire) looks cracked or weak, the chain is not fit for use.

Thickness check
To measure thickness, you need some basic math, a micrometer, and a digital camera.
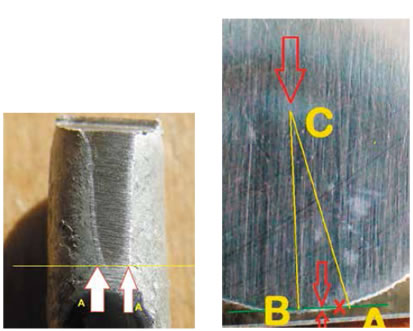
Method A: If we grind off the galvanizing so that raw steel shows through at point B, then the line AB, the tangent, is half the width of the material that would be exposed when grinding on a flat plane to reach bare metal (the total width is represented by AA in Method B, below). The radius of the uncoated chain is CB (C being the center of the chain wire). The radius of the chain including the galvanizing is CA, or CB + x (x being the thickness of the galvanizing). The line AB is at 90 degrees to CB, the radius.
Using the Pythagorean formula for right triangles, we can see how:
CA2 = (CB + x)2 = AB2 + CB2
This equation can be expressed using either the radius of the base wire (BC), which the manufacturer might specify, or by using CA, the wire radius including galvanizing. You can easily determine the radius CA by using a micrometer to measure the total diameter and dividing by 2.
Once the radius is known, you can solve for x, the thickness of galvanizing, using the following formula, in which CB is the wire radius, x is the coating thickness, and AB is half the length of the tangent: x = CA – √(CA2 – AB2)
Method B: Take one whole link, cut it in half, so you are cutting through the long section of the link. At the point of the cut, grind off the galvanizing at a very shallow angle. (An orbital sander with 80-grit sandpaper is enough.) You need to be very careful to grind flat. With a decent magnifying glass, or better, a close-up image from a digital camera, you will be able to see the base steel and the halo of the galvanizing coating. Using a finely marked ruler, vernier caliper, or similar form of measurement, measure the width, AA (half of AB in Method A), of the galvanized coating at the interface of coating and the base steel.
For a typical 5/16-inch short link chain with an average 8.6-millimeter diameter wire, coating thickness in microns corresponds to the following measurements (in millimeters) for AA:
50 microns = 1.3 millimeters
100 microns = 1.9 millimeters
150 microns = 2.3 millimeters
Based on our findings, 100 microns is adequate, 150 microns better, and 50 microns is unacceptable. Ideally, you want to make at least four measurements from as many links as the chandler will give you, and then average your findings. You should be able to measure fairly easily to 0.5 millimeters and interpolate for something smaller. (We used metric units as we have a metric steel rule, metric calipers, and a metric micrometer.)


