One of the most used and easily made items of safety gear on boats is the handrail. Rare is the boat which shouldn’t have handrails along the major portion of either side of the cabin top, and also down the centerline of the deck.
Belowdecks, handrails are also important for safety. They are usually mounted on the cabin overhead, parallel to and on either side of the boat’s centerline. To simplify mounting, the most desirable position is under the rails on deck. That way a single set of bolts can serve to fasten both rails.
Also in the belowdeck area, a good place for short handrails is on the aft cabin bulkhead either side of the companionway. These should be mounted vertically, to give you something to grab when climbing in or out of the cabin when the boat is bouncing.
450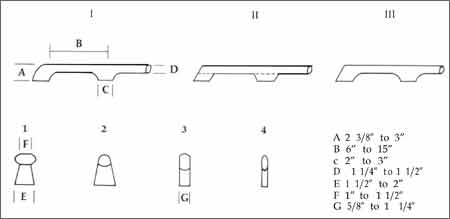
There are, of course, a number of commercially available, stock handrails. The drawback to these is that, boats being as various as they are, seldom will ready-made rails be exactly the right length, and they’re quite expensive. Since constructing handrails is one of the simplest wood working projects a sailor can tackle, there’s every reason to design and fabricate your own. You save money and end up with rails exactly suited to your boat.
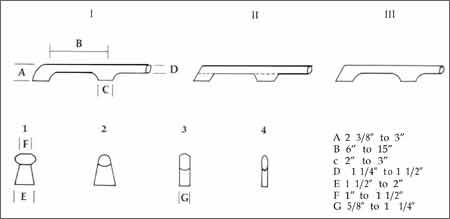
The illustration shows the profile of three common styles of handrail. I is a traditionally rounded rail. II is a modern, somewhat angular style. And III is a combination style.
The illustration also shows a variety of possible cross sections. Section 1 is very traditional. The rail and legs must be made separately and joined. 2 is neither traditional nor modern. It can be made in one piece, but if so you’ll have to do a lot of planning. 3 is the form most commonly found on stock boats today. And 4 is a delicate appearing — though strong — style well suited to slender racers and trailer sailers.
The first step in designing your own handrails is to measure the necessary lengths on the boat and decide on the number and spacing of the legs or base blocks. Leg spacing can vary anywhere from 6″ to 15″. A good starting point would be at the 12″ mark. Then, depending on the overall length of the rail, move up or down in your spacing. As an example, let’s assume you need a 6′ 6″ rail on either side of the cabin top. You could make a seven leg rail with legs at l’ 1″ spacing or an eight leg rail with 11″ spacing to the legs. Other things being equal, we’d suggest the shorter spacing, which would be slightly stronger. But part of the problem is an aesthetic one, and only you can decide whether you think widely or closely spaced legs are more handsome. If you are planning to use a less than 1″ width (say Sg‘ or 3/g), 9″ would be a more appropriate starting point for the leg spacing.
Next you must decide on profile and cross section shapes. This is largely an aesthetic choice based on personal taste, but you should note that profile II, with its angular meeting of rail and legs is-best made by gluing short, separate leg sections to the rail. This saves lumber. but slightly increases construction time. Because of its look and the material savings, it’s our favorite in spite of the increased labor.
288
Once you‘ve decided on length, leg spacing, profile and section, you need to decide on height. Height can range between 2%” and 3”. Again this is somewhat open to choice, as long as leg depth is at least 1%“. Less than this can catch and break fingers. As a guide here, if your rail is 1” or more thick, a 1” depth of rail is sufficient. If your rail is to be 3/4” or 5/8” thick, increase the rail depth to 1%“. You need about one square inch total in the rail cross section.
The area of the bases of the legs should be between 11/4 and 3 square inches. This dimension will be achieved with any of the suggested base and cross section combinations. In most applications a 2% to 3 square inch leg base looks right.
Finally, you need to decide whether to cut your rails out of one piece or make them up out of separate pieces. This decision to some extent is controlled by the cross section chosen. If you’ve chosen cross section 1 or 2, you’re pretty well forced into built up rails. But if you’re planning on cross section 3 or 4 you have a choice. One piece construction is a little quicker, but wastes a bit of lumber. Built up construction takes more time but uses less lumber.
The easiest form to make is profile II. Cut the long rails, then cut the angular legs out of another long strip of the proper height. Next glue the legs to the rails using epoxy, plastic resin, or resorcinol glue. Epoxy is perhaps the best for beginners as it has excellent gap filling properties. It’s the only glue to use on teak, and even then you’ll have to carefully follow the glue manufacturer’s directions on surface preparation -usually wiping with acetone. A better solution is not to use teak if you have to glue. However, the wood used in the rails should be the same as the other exterior wood on the boat.
288
While the glue sets you can either clamp the pieces or fasten them with screws or ringed boat nails driven into holes drilled well out toward the fore and aft edges of the legs. Remember, you’re eventually going to have to run a bolt down through the center of the leg and through the deck to attach the rails to the boat.
If you’re using any of the rounded profiles, you’ll have to make a cardboard template of the transition curves between rail and base so that every one is the same. Whether you’re going the one piece or built up route, use the template carefully, and blend curves into straight lines as smoothly as possible.
Once you’ve gotten your rails cut or built up, it’s time to start shaping the sections. Use a plane, Surform, rasp and sandpaper to achieve the shape you want. This is all pretty straightforward. The only problem area is when an ellipsoidal or heavily rounded rail section, such as number 4, meets a leg. Since you want to retain as much leg base area as possible, you’ll need to feather the heavily curved rail section into the leg top, so that the leg remains essentially rectangular in horizontal cross section; the leg base should not itself become an ellipsoid.
All that remains is final installation and finishing. The rails should be attached to the boat with a bolt through each of the legs and the deck, perpendicular to the deck. Use stainless steel, flathead bolts. A diameter of 1/4″ is the minimum size. Counter for the bolt head, and use wood plugs in the rails. Use plywood backing blocks about 2” square under the decks.
Varnish, paint, or oil finish the rails.
-John Pazereskis


