As I inch along in our restoration of the S&S designed 1971 Yankee 30, I was reminded this week why I chose a boat with a bolted on lead keel. It seems like every keel material design has its pitfalls, but after owning two previous boats with iron keels, I was looking forward to not worrying about keel corrosion — especially the invisible kind. Meanwhile, my neighbor in the boatyard at Salt Creek Marina was in week two of a centerboard extrication, fairing, and finishing project that was reminiscent of our adventures fairing the centerboard of our previous Catalina 22 Jelly.
If your boat has an encapsulated iron keel, don’t get lulled into believing that you are completely free of keel worries. Although you are generally better off than sailors with exposed iron keels, you still have to carry out routine maintenance and inspection, and be aware of the warning signs of water intrusion, which could lead to bigger problems.
We’ve written a lot about keels recently, and over the years, we’ve offered tips on repairs to common problems like the C&C smile, when a lead keel pulls away from the keel stub, or how to deal with voids in lead keels. I’ve also written here about the effectiveness of rust converters such as Ospho when reviving an iron keel. And more recently we’ve looked at the spate of keel-ectomies among older cruising boats boats with high-aspect-ratio fin keel designs.
A mystery rust streak near the keel we noticed during a recent haulout of Lost Boys, an Endeavour 42 that has served has a platform for a number of Practical Sailor tests, got me thinking about encapsulated keels again. A lot of people like the idea of having lead (preferably) or other ballast material encapsulated. Island Packet is probably the most familiar builder today that uses an encapsulated-ballast keel. One big advantage of having an encapsulated keel is that so long as the fiberglass and waterproof coatings remain intact, they don’t require any special seasonal maintenance.
However, fiberglass is permeable, and on some older boats, water tends to find its way into the ballast. If the ballast is iron, the results can be ugly as the metal oxidizes and expands. Having a two-part epoxy barrier coat like the Interlux Interprotect system goes a long way toward preventing this kind of problem.
The chief maintenance concern with an encapsulated keel, though, is damage from a grounding. Sometimes this damage is so minor you might not even notice it, or might mistake it for chipped paint.
Fortunately, its not too hard to fix this sort of damage. For those who own or are thinking of buying a boat with an encapsulated keel, below Im re-running an excerpt from the archives about spotting and repairing minor damage to encapsulated keels.
Skin-deep Beauty
Truth is, an encapsulated ballast keel frequently requires more complicated care than an external ballast keel.
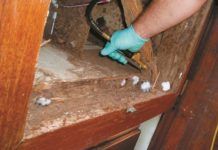
The danger is damage to the fiberglass shell surrounding the keel. If this is left untended the deterioration begins, often without notice. One reader sent us horrifying images of what he discovered when he cut into a very neglected late 1970s era boat that he’d picked up for a song. It appeared that less than half of the original keel still retained the structural properties of the original. The rest of the keel was, literally, buckets of rust.
Even if you haven’t run aground this year, there’s a good chance that somewhere along the way, you have acquired at least some superficial gouges in the lower part of the keel shell. These should be treated before they become problems. Even superficial damage to the gelcoat can allow water penetration into the laminate.
Treatment of superficial gouges in gelcoat or the first layers of the laminate is straightforward. First, wash the damaged area thoroughly with high-pressure fresh water. Dry the gouged area with a handheld hair dryer. Roughen the edges of the gouge with very course sandpaper-50 grit or 36 grit.
Wash the area again thoroughly with acetone. Use a small, stiff-bristle brush to clean the gouge completely. Dry again with the hair dryer, after most of the acetone has flashed off. Don’t breathe the stuff.
With the area thoroughly clean and dry, brush on a clear coat of epoxy resin, followed by epoxy resin thickened with microspheres or micro-balloons. In January 2016 we compared two-part paste fairing compounds from Jamestown Distributors, West Systems, Interlux, Systems 3, and MAS, and in the August 2017 issue we test several mix-it-yourself options using micro-balloons and epoxy resins. You can form and tape waxed paper (backed with cardboard or thin veneer if needed) over the epoxy patch to keep the epoxy from sagging out.
When it’s dry, sand smooth and touch up any voids or hollows with more filled epoxy.
When everything is filled, prime the patch and the surrounding area with a two-part epoxy primer. Most marine coatings manufacturers offer two-part primers, such as Interlux Interprotect 2000E or Pettit Protect 4700. Apply several coats-most makers recommend at least four. The barrier coat is important, because the gelcoat that you have sanded is now fairly porous, and is more likely to develop blisters than polished gelcoat.
Once the primer is cured, you are ready to paint. Some primers can be hot-coated while curing, but most manufacturers recommend allowing the epoxy to cure and sanding lightly before painting.















Hi Darrell,
Apart from iron keels, those that are ballasted with steel punchings may also have rust-water drip leaks after a grounding. Taiwanese-built sailing yachts often use this method of keel ballast. I understand that the punchings are dispersed into the keel space in layers of a few inches deep and followed with epoxy, poured on top of each layer and permeating into the small spaces between the punchings. From talking with boat yard workers and the owners of boats with this type of ballasted keel, it seems that water intrusion from groundings is often times of a benign nature, being limited from within by the surrounding epoxy. This alternatively leads me to wonder if the encapsulated iron keel is not adequately coated with epoxy immediately before being lowered into the keel space?
And apparently, sometimes an area of ballast from steel punchings may also not receive an adequate coating of epoxy, and requires a haul-out for a timely repair after a grounding that might open up that same area to water intrusion. In such a case, if the owner continues to neglect the need for an adequate repair, it risks the possibility of producing an outward bulge from the rust-expansion and requires a more extensive repair to a wider area of the keel.
As an anecdote with a much better ending, I know of an owner of a steel-punched ballasted keel who sustained a rust-water leak some weeks after running aground in bad weather. He had limited success year-after-year with the one-patch approach and used the sleuth method of drilling a sequence of holes, looking for the origin of the leak without success, as it was not in the immediate vicinity where the keel had been damaged. Their being no evidence of leaks in the bilge compartment, he decided to further open the point where the rust-water dripped out with a 1″ diameter hole saw and epoxied in a flush silicon bronze bolt hole. Now, each time he hauls out for the winter, the bolt is removed and replaced with a threaded hose bib to measure the quantity of the leak in a bucket each day for a couple of days until it stops. He has been doing this for about the last twenty five years or so without further incident or sign of damage.
Hi Darrell!
Thank you for writing this excellent explanation and contrast! My 1978 O’day 28 has an encapsulated keel. When we pulled it for winter a couple days ago the marina discovered that my keel can deflect laterally about 4 inches. We don’t have any bilge leaks and there are no signs of water entering the keel (yet). Do you have any information about how to properly stiffen an encapsulated keel?