Fresh air and a dry berth are two “rare,” commodities in the belowdecks caverns of most boats. On deck you may be surrounded by endless quantities of fresh air. Below, fresh air frequently comes mingled with similar quantities of fresh or salt water, sometimes in the form of an emulsion that is difficult to breathe at best.
Most boats are well ventilated at the dock or at anchor, or even under way in fair weather. But let the wind blow, the spray fly, and the rain fall, and the interior can quickly become a dank swamp if you leave an opening for ventilation, or an airless dungeon if you don’t.
Fortunately, ventilation can be improved in almost any boat, new or old. In the grand scheme of things, improving ventilation is relatively cheap; far less expensive, for example, than installing refrigeration or a sophisticated propane system. And like those other two conveniences, improved ventilation will pay big dividends in the battle for more civilized time on the water.
Ventilation can be provided by ports, hatches, variations on the cowl vent, and patent ventilators. Almost all of these can be used either as an extractor, — providing an outlet to allow a draft to move through the boat — or as an air scoop or inlet to force more air into the boat. The combination you use will depend on the deck layout, interior layout, and the way the boat is used.
The ventilation will be different when your boat is under way than when at rest. With rare exceptions, there is no insurmountable barrier to having ventilation that’s just as effective when a boat is rail down going to weather in a driving rain as it is when at anchor.
Opening Ports
Opening ports can admit a lot of air below, but they are most useful when a boat is not under way. In many production boats, opening ports in place of fixed ports are an option. They are well worth considering.
Even if your boat was built without opening ports, chances are good that you can replace existing fixed ports without too much difficulty.
The variety of opening ports is almost endless. You can get them round, rectangular, oval, elliptical — almost any shape. You have a similar choice of materials: plastic, aluminum, bronze, even stainless steel.
When replacing fixed ports with opening ports, be consistent with the other hardware on the boat. Don’t for example, install bronze-framed opening ports on a boat with plastic fixed ports and aluminum deck hardware. They will stick out like a sore thumb.
Likewise, you must be very conscious of the shape of the ports. If at all possible, replace existing fixed ports with opening ports of the same shape, and preferably the same size. It will not always be possible to find drop-in replacements, but you can usually get surprisingly close.
A lot of people are afraid to replace fixed ports with opening ports for fear of-causing leaks. This is a valid concern. An opening port can leak around the outside of the port, or at the interface between the frame and the opening part of the port. The gaskets in opening ports must be replaceable: they don’t last forever. The port should also dog down cleanly, with no distortion of the frame. Distortion can be a user problem. If you insist on dogging down one side of a port all the way before tightening down the other side (on ports with multiple dogs), sooner or later you’ll bend the frame, crack it, or distort the gasket so severely that it won’t seal.

When the gasket gets old and the port starts to leak, replace the gasket rather than attempting to dog the port tighter.
Bedding the port properly in the boat is also important. So-called “rubber” sealants vary a lot in their properties. Likewise, oil-base compounds will dry out eventually, requiring removal of the port for rebedding.
Match the sealant to the job. Polysulfides are good for plastic and bronze ports, but some experts say they should not be used with aluminum. Acrylic, latex and silicone sealants have relatively poor resistance to water. In addition, since paint and varnish will not adhere to silicone, it should never be used to seal ports in a varnished or painted cabin trunk.
Silicone/acrylic sealants are far superior to their single component counterparts, and make good general-purpose bedding compounds for ports. Polyurethanes are excellent as sealants, but their tenacity is such that a port bedded with polyurethane will be extremely difficult to remove in the future. In addition, polyurethanes may be attacked by teak cleaners, so they should not be used in laid wooden decks. The surface of polyurethanes tends to chalk over time, so they are not a good choice to be left exposed without a coat of paint. Polyurethanes are also not suitable for use with polyethylene or polypropylene plastics.
Opening ports are most effective in two locations on most boats: at the forward end of the cabin trunk, and at its after end. They are also very good for ventilating quarter berths when mounted in the sides of the cockpit well. They will be least effective in the side of the cabin, but will still help.
Under way, the only ports than can really safely be left open are those mounted in the cockpit well to ventilate the quarterberths. Under reasonably calm conditions they can be left open on the leeward side of the cabin trunk, but a single wave out of sequence can ruin your whole day.
Hatches
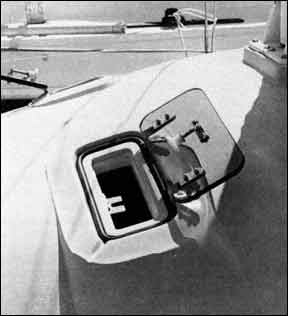
Without a doubt, one of the great modern inventions for the boat owner is the aluminum-framed hatch. You can argue about their esthetics all you want, but they work.
A wood-framed hatch may look good, but it is extremely difficult to make one that doesn’t leak. In addition, hatches take a fair amount of wear and tear, and if varnished, will have to be tended to at frequent intervals. While a good craftsman can make a hatch that will be beautiful and last forever, the cost of such a job is likely to be high enough to send most boat owners into convulsions.
In the early years of fiberglass boatbuilding, many boats were built with fiberglass hatches, sometimes rather elaborate ones that fit into the heavy curve of the top of a cabin trunk. Unless they are inordinately heavy, these hatches are usually too flexible, and consequently very difficult to dog down securely. We’ve rarely seen one that doesn’t leak after a few years.
The aluminum-framed hatch market is extremely competitive, so much so that prices are reasonable and sizes have become somewhat standardized. A cast-frame aluminum hatch designed for a deck opening about 19” square has a retail price of about $300. They are readily available through mail order discount firms, with discounts of about 25 %.
While heavy, cast-frame hatches are best for offshore use, lighter weight cast or extruded hatches are also available, and cost about a third less. They were developed specifically for the OEM (production boatbuilding) market, where saving a few dollars on each input is critical in a highly competitive market. The price benefits of these lower priced hatches are also there for those retrofitting an existing boat.
Because of the different uses to which boats are put, it is impossible to generalize about what hatch is best. For most boats, the rugged, more expensive offshore-type hatches are overkill. For a boat to be used to cross oceans, they are a necessity.
Hatches of design similar to that of aluminum hatches are available in molded plastic. In our opinion these are for protected waters only, and should not be considered for offshore use.
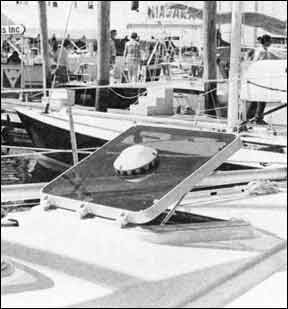
At least as important as the hatch itself is the way it is mounted. Hatches are frequently mounted over the center of the main cabin. This is an excellent location both in terms of light and ventilation. But a great deal of the effectiveness of the hatch as a ventilatior will be lost if you choose a hatch whose top cannot be reversed to face forward or aft as the circumstances require. At anchor, a partially open forward-facing hatch acts as a giant cowl ventilator, moving tremendous amounts of air below.

To get a rough idea of the ventilation potential of hatches and cowls, compared to one another, consider that the amount of air that a hatch or cowl vent will force below is directly proportional to the area of the opening.
A 4” cowl vent has an area of about 12 112 square inches. A 19” square hatch has an area of 367 square inches. This doesn’t mean that the hatch will definitely force 30 times as much air below as the cowl vent, since the efficiency of the cowl vent is greater. However, if the hatch is equipped with side curtains to help funnel the air below, it will provide a powerful amount of ventilation.
All this volume of air has to displace the air already in the boat. A hatch over the main cabin, with the open top facing forward, will be more efficient if there is another hatch opened in such a way that air is drawn out of the other hatch, such as the main companionway hatch. An aft-facing hatch over the forward cabin works equally well as an extractor; however, most hatches over the forward cabin face forward, and rightfully so if the door between the forward cabin and the main cabin is shut. The answer to this problem is to use a hatch with a reversible top. This will allow you to orient the hatch top properly for the desired effect. Be sure to check just how difficult reversing the hatch top is before buying, since if it takes a half hour to do the job every time, you aren’t likely to often take advantage of the feature.
In addition, check how difficult it is to remove the hinge pins from the outside of the hatch. You don’t want ease of reversal to come at the price of a hatch that provides easy entry into the boat.
For most boats with the typical main cabin forward cabin head between and to one side arrangement, the typical arrangement of hatch over main cabin hatch over forward cabin and small hatch over head is hard to beat. Remember, however, that a hatch located on the foredeck, rather than on top of the cabin at its forward end, is far more vulnerable to spray, and probably less efficient in funneling air below because of its lower location.
It is not reasonable to expect airflow through your boat to always be the same, even with the wind blowing from the same direction at the same velocity. Airflow patterns are determined by open and closed doors, amount and position of stowage, and the amount the interior of the boat is broken up by bulkheads, just as much as by the position and direction of the hatch openings.
When sailing, a forward opening hatch is an invitation to a wet interior. Even on a relatively benign day, there’s a good chance that one wave in a hundred or so will drench the top of the cabin with spray, and that the insidious water will find its way below – usually right into the middle of your berth.
While an aft facing hatch is less vulnerable to spray, it is not immune. You can greatly increase protection without reducing airflow by equipping the hatch with a dodger: a simple dacron hood that protects the open sides of the hatch. With a dodger in place, we’ve left the cabintop hatch open a third of the way in truly terrible conditions with minimal spray inside.
A dodger over the main companionway – either a full width dodger that protects the cockpit, or a small one that just protects the companionway hatch – will allow you to leave this hatch open in most conditions.
Cowl Vents and Dorades
At some point, the weather gets so bad that all hatches have to be closed and battened down. The precise conditions comprising this point vary dramatically, depending on how well designed, positioned and protected the hatches are on your boat. On a lot of boats, the first drop of water sends you scurrying to shut everything. On others, it seems like it can blow half a gale and rain cats and dogs before water gets in through the openings. With a little planning, you should be able to make some progress from the former situation toward the latter.
When buying a boat, make a real effort to be aboard in a rainstorm, not only to see what leaks, but to see how much air you can get into the boat when everything is shut down tight.
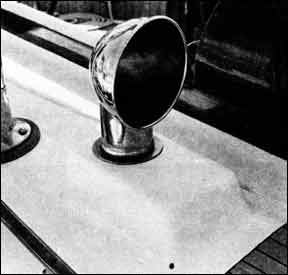
One of the best ways to get air below when the hatches must be shut is the cowl vent. But like the forward facing hatch, the cowl vent will let water below in bad conditions. The preferable alternative is familiar to anyone who spends time on the water and hasn’t had his head buried in the sand for the last 50 years: the dorade vent, developed by Olin and Rod Stephens in 1930 for use on their ocean racing yawl, Dar&. Basically, a dorade vent consists of a cowl vent set atop a box on deck, rather than feeding directly to the cabin. Inside the box is a pipe, offset from the bottom of the cowl vent neck, so that air entering through the cowl travels a maze-like, uphill route before being funneled below. The pipe which allows the air to get below projects above deck level inside the box to keep water at bay. Small drain holes at the low point in the side of the ventilator box allow water to escape. These drains must be kept small to minimize the amount of air lost along with the water.

Like most good inventions, the dorade box has been upgraded, downgraded, molested, inspected, injected and rejected. Everything, it seems, except perfected. The variations on the theme are endless, and all, to some extent, work. Whether it’s called a dorade or a water-trap, the principle is the same: only the details vary.
The accompanying photographs show a good cross section of the almost endless variations on the theme. You can buy readymade boxes of teak, fiberglass, or molded plastic, with opaque tops, translucent tops, transparent tops; with multiple mounting positions for the cowl; with multiple pipes through the deck to feed several cabins from one vent. You want it? We got it!
Like hatches, the placement as well as the size of cowl vents determines their effectiveness. Remember that cross-sectional area is a major determinant of airflow. A 4” diameter cowl vent has almost twice the area of a similar 3” vent. The rule of thumb is simple: use as big a vent as you can, given the limits of space and esthetics. A 6” cowl vent on the foredeck of a M-footer may move a lot of air; it will also look pretty ridiculous.
Esthetics play an important role in mounting, as well as in size. If you buy a readymade dorade box, chances are that it will be flat on the bottom, as if it were to be mounted on the flat deck. If you mount such a box on top of a cabin with a lot of crown, your cowl vents will stick out at an angle like the antennae of some rather large insect.
Cowl vents should stand perpendicular to the plane of flotation, both athwartships and fore and aft. This may require beveling the box in two planes, for example atop a cabin with both a strong sheer and a strong camber. Determining and cutting these bevels will be the subject of a future article in Better Boat.
Frequently, the most practical location for dorade boxes is at the after end of the cabin trunk atop the cabin. If there is a cockpit dodger, it may be necessary to move them forward, to retain their effectiveness. Air circulation will be improved if another vent is located forward in the boat, Unlike a hatch, this can be located on the deck without compromising watertight integrity, but make sure that it won’t interfere with sail or anchor handling.
One advantage of cowl vents is that they are easily turned to face into or away from the breeze, depending on whether you wish to use them as extractors or air intakes to force air below. For a boat in a slip this is extremely important, since the breeze rarely fetches straight down the length of the boat.
Because their area is relatively small, it is usually best to pair dorade boxes if possible, particularly when they must ventilate a large area like the main cabin. Over a forward cabin or head a single vent will do.
In our experience, the so-called “low profile” cowl vents are far less effective than taller vents. As a rule, a cowl that is taller and placed higher on the boat will move noticeably more air than a lower vent.
The positioning of cowl vents and dorade boxes relative to hatches must also be considered. They are more effective when placed side by side than if one is placed in front of the other. The worst possible positioning is to place a cowl vent in front of a hatch, since the dorade box and cowl vent will block a lot of air. Obviously, a hatch placed in front of a cowl vent will block air flow to the vent when the hatch is open. But while underway, when the hatch is likely to be closed, free air will reach the cowl.
Patent Ventilators
There is a number of patented ventilators on the market. These are all extractors, designed to remove air from the boat. Despite variations, most work on the Venturi principle, so that airflow over an opening in the vent creates an area of low pressure which draws air out of the boat through the vent.
They are, in our experience, reasonably effective as exhausts, but not dramatically effective overall. An interesting variation on the theme is the Nicro Solar Lo-Vent exhaust ventilator. This vent incorporates a solar cell into the top of the ventilator, which powers a small exhaust fan housed in the ventilator. In bright sunlight, the manufacturer states that the vent will exhaust 700 cubic feet per hour – the amount of air in a 10 foot square room with a seven foot ceiling.
Another interesting Nicro product is an interior air circulating system consisting of a small fan mounted in a circular deck plate – the same innards found in the Solar Lo-Vent. The interior circulator is designed to be mounted in a bulkhead – the side of a hanging locker, for example -to draw air through the space. The fan is powered by a small solar cell mounted on deck, just like the Solar Lo-Vent.
There are also a number of variations on the cowl vent theme which are used for special applications other than the ventilation of living space. Clam shell vents used to ventilate engine spaces, for example, are merely highly simplified cowl vents.
Conclusions
The varieties of ventilation are seemingly endless and confusing. But careful placement of a few ventilators -primarily hatches and cowl ventilators – can go a long way toward making a boat more livable.
Beware of generalizations about the airflow through a boat. You can control it almost completely by the opening or closing of interior doors, the positioning of ventilators, and the opening or closing of hatches.
Particularly for those in warm climates, or those who sail offshore, ventilation is a key issue, one which is frequently inadequately dealt with in the original construction of the boat. Fortunately, a little ingenuity on your part can go a long way toward making your boat more livable by improving airflow below.


It’s good to know that even in the living spaces, the ventilation of a yacht can be improved. I’m thinking about getting a yacht refurbishment service soon because I haven’t use mine in about a year now. Getting regular maintenance for it would be quite important to do once in a while.