274
The cruising boat, like an army, travels on its stomach. If you can’t eat well while sailing — whether day racing or cruising the Pacific — much of the pleasure of sailing will be lost. If you can’t eat at all due to deteriorated food stores, more than simple pleasure can be lost.
Galleys on American production sailboats have come a long way in the last 20 years. We particularly remember one 40′ cruiser-racer by one of the country’s most famous designers, whose galley consisted of a two burner counter-top alcohol stove, a miniature sink, a few lockers, and an icebox: if you put 100 pounds of ice in it, it managed to keep small quantities of food at slightly below outside temperature for a few days at a time. Today, thank God, you’d probably find a better galley on any 30-footer.
With the exception of the icebox.
Despite the wonders of fiberglass hulls, aluminum masts, and plastic sails, the lowly icebox, as a rule, has been only marginally improved by the average boat-builder. Unfortunately, the laws of thermodynamics have not changed, and a lousy icebox can still destroy the pleasure of cruising almost as effectively as a mast which drops over the side in a squall.
In the course of examining literally hundreds of boats from manufacturers all over the world, from the most humble to the near-almighty, we are forced to a conclu-sion: many yacht designers, after going through the hun-dreds of hours required to design a medium-sized sailboat, arrive at last at the galley. There, they draw on the accom-modation plan a counter with a hatch in it — in whatever space is left — and letter in “icebox to suit.”
“Icebox to suit” covers a multitude of sins. The most common ones are: inadequate insulation of the box, poor-ly sealed and inadequately insulated lids, inaccessible and uncleanable interiors, poorly designed or nonexistent shelves, and clog-prone drains that lead directly to the bilge.
Unfortunately, if you’ve been living with a lousy icebox for a long time, you may not know what you’re missing. And if your first mate is the stoic type, he or she may never have bothered to tell you just how primitive the situation really is. While you may never be able to make an existing box “perfect”, chances are very good that the existing box of any boat can be significantly upgraded in performance. If you want it any better than that, you may have to rip the old box out and start from scratch. And that is invariably a major job.
Insulation
The best insulating material that is readily available for boat iceboxes is polyurethane foam. It has extremely low thermal conductivity, is easy to handle, relatively inexpen-sive, and is not attacked by styrene.
Boatbuilders commonly use spray-on polyurethane foam for icebox insulation. Usually, the boatbuilder molds an icebox liner — the inner box that you see when you open the lid — from fiberglass over a male mold. Then, the outside of the liner is sprayed with foam, building up insulation to the desired thickness. The maximum thickness is determined by the space between the liner and the cabinet within which the box is housed — the face of the galley, the side of the hull, or whatever.
Unfortunately, it is not possible to accurately control the thickness of the insulation in spray application. It is likely to be thin in the corners and thick in the middle of any panel. In addition, the cellular structure of spray-on foam tends to be uneven, resulting in irregular heat transfer between the inside and outside of the box.
Because spray application of foam is fairly haphazard, the quality of insulation of the box can vary even from boat to boat within the same model line.
Frequently, the foamed icebox liner is then dropped in-to the galley counter and sealed up, leaving you in the dark about both the quantity and quality of insulation provided.
It is fairly easy to determine the potential maximum amount of insulation in any box. Measure the inside dimension of the liner and the outside of the counter, then subtract about a quarter inch for the thickness of the two laminates. That leaves the actual amount of space that could be filled with insulation. Unfortunately, chances are nine out of ten that the total amount of space isn’t filled with insulation if the box is of the standard construction, with the foam applied to the liner. If the foamer puts too much on, time must be spent grinding off the excess to fit the liner into the counter. Time is money, and in the con-struction of a production boat, every hour of construction time saved is $25 off the finished price of the boat.
The efficiency of the icebox will be improved if you can fill whatever voids exist between the insulated liner and the cabinet that forms the outside of the icebox. In some cases, it may be possible to get to these gaps through other lockers in the galley or through cockpit lockers. In other situations, you may be faced with a blank wall of fiberglass wherever you look, and it may be impossible to determine exactly how much of the available space is fil-led with foam.
It is possible to buy two-part spray foam, similar to that used by boatbuilders, in small quantities. One such pro-duct is Froth-Pak. For many applications, the .75 cubic foot version of Froth-Pak will be enough to do a reasonable job of finishing off the gaps in an otherwise well-insulated in-stallation. Cost is about $19 from Defender Industries, Box 820, New Rochelle, NY 10802, (914) 632-3001.
If the gaps between the insulation and the surrounding cabintery are 3/4″wide or more, it will be far more effi-cient to use polyurethane board to fill the spaces. This can be purchased at almost any lumber yard, as it is regularly used for exterior sheathing beneath clapboard or shingles, particularly in cooler climates.
Polyurethane board is usually available in thicknesses from 3/4″ to 2″; cost ranges from about $10 for a 4′ by 8′ sheet of 3/4″ stock to about $26 for 2″ material.
Not all insulation board is polyurethane. Polyurethane is recognized by its somewhat powdery, brittle surface, and uniform cellular structure. It is usually tan or light green in color. Do not use expanded polystyrene foam (Styrofoam), as it has significantly higher thermal conduc-tivity.
The more insulation you get between the interior and the outside of the box, the better it will work. A minimum of 2″ of polyurethane is required for a good icebox, and the more, the merrier. Frequently, you will be severely constrained on one or more surfaces by the surrounding joinerwork — usually on the front of the box, and perhaps at one end — but have relatively few limitations on other surfaces. Pad them out; every little bit helps.
Icebox Lids
Even if the box is adequately insulated, there is a good chance that the top will not be. Usually, much of the top of the icebox is a lifting lid giving access to the interior.
Frequently, the top of the box, other than this lifting lid, is merely the countertop, either a fiberglass molding or laminate-covered plywood, with no insulation on the underside. Unfortunately, insulation of the underside of the counter on the inside of the box is likely to be a major chore, and may not be practical.
You can almost always, however, improve the lifting lid itself. The underside of the lid should have 2″ of polyurethane foam insulation, just like the rest of the box. This is usually a fairly simple job.
Sheet polyurethane foam can be cut to fit the underside of the lid, and can be glued on with contact cement. You should then lightly fiberglass the foam to keep it from be-ing bashed to bits.
Few production icebox lids are gasketed, but a simple gasket on the underside of the lid will go a long way toward improving the efficiency of the box. If the lid is the flush type which rests on a cleat on the underside of the counter, use simple close-celled foam insulation tape, available at any hardware store, around the bottom edge of the lid. This tape is self-adhesive, and should last several years before becoming compressed and abraded, at which time it can simply be torn off and replaced.
The same technique can be used on an overlapping lid.
Icebox Interiors
A smooth fiberglass molding makes an excellent icebox liner, far better than the stainless steel liners used in the past. Rigid polyethylene is less satisfactory, as the surface is harder to clean.
It is unfortunate that the standard for judging iceboxes has become volume, rather than quality. For most boats, an icebox volume of about seven cubic feet is more than adequate, provided the interior is divided in a reasonable fashion.
If it is necessary to stand on your head to reach the bot-tom of the box, it is too deep, and the bottom is never like-ly to get properly cleaned.
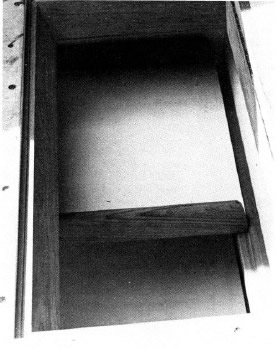
For maximum efficiency, the ice should be at the top of the box, rather than the bottom. This is not practical in most cases, and the ice ends up dumped in the bottom, sliding around in a swamp of cold water. Instead, raise the ice slightly off the bottom by adding an ice shelf.
This is easily done by adding cleats to the inside of the box, about 2″ above the bottom. The cleats should be teak strips, about 1″ square, which can be secured to the sides of the box with stainless steel self tapping screws. Bed the cleats thoroughly with silicone sealer, and use screws no longer than necessary to go through the cleats and the fiberglass liner.
273
The ice shelf itself can be teak grating, available through mail order catalogs, or can be made up from plywood — sealed with epoxy resin after large drain holes are drilled through it — or sheet acrylic. Sheet acrylic (Plexiglass) is superb for icebox shelves, since you can see through the shelf to the layer below.
A small lip on the top of the ice shelf will keep the ice from sliding off when the boat is under way. Once again, a strip of teak can be used to make this lip (fiddle), and it serves the additional function of stiffening the shelf — particularly important when thin sheet acrylic is used.
Do not drain the melted ice from the icebox. A mass of cold water is a good heat sink, and will aid a lot in keeping the box cool. Drain the water only when all the ice has melted, or when it is necessary because you are going sail-ing and don’t want water sloshing over the contents of the box.
The next set of shelves should be just high enough above the ice shelf to clear the block of ice. About 10″ should be right. Once again, attach a pair of teak cleats to the inside of the box and fabricate a shelf.
The shelf should not be the full length of the box. It should be short enough to allow ice to be loaded past it on-to the ice shelf. If you want, you can make a short shelf to drop into position at this level after ice is loaded.
This first level above the ice should be used for items that must be kept very cool to keep from spoiling, such as meat (which should be kept in sealed plastic containers so it won’t leak), and milk.
If there is room above this level, add another set of cleats and another shelf. If the shelves are not made full length, taller items can be stored on lower shelves without interferring with the shelf above. The more shelves you can put in, the more you can get into the box without it becoming a swamp.
It is important that all shelves be provided with holes to allow air to circulate through the box, and never store highly perishable items at the top of the box, where it will be warmest.
Drains
Sooner or later, the icebox has to be drained. A common mistake is to install a drain that is too small in diameter, so that small food particles — which inevitably end up in the bottom of the box — can clog the hose. The drain should not be less than 1/2″ inside diameter.
Nylon through hull fittings can be used as drain fittings for iceboxes. They can be recessed flush, much like through hull fittings in the hull (see BB February 1984), or they can be allowed to stand proud on the inside of the box. The only disadvantage to not recessing the fitting is that it will be necessary to sponge out the last bit of water — hardly a major problem.
Now that you have a way to get the water out of the box, what are you going to do with it? Almost invariably, the bottom of the box is below the waterline, so the drain cannot be led directly overboard.
A common practice is to merely allow the icebox to drain into the bilge. This is just about as desirable as allow-ing the galley sink to drain into the bilge, for food particles in the icebox water will soon turn the bilge into a large, open holding tank.
The simplest solution is to fit the drain with a tight stop-per inside the box, and fit a piece of hose over the drain tailpiece. When the time comes to drain the box, the hose can be placed in a bucket and the stopper removed from the drain. Since we’ve already decided not to drain the box every time a little water appears in the bottom, this type of drain system isn’t too inconvenient.
If the galley sink is below the waterline — common on older, deep boats with relatively low freeboard the icebox drain can be teed into the sink drain, which either goes to a sump, in more complex boats, or to a simple overboard pump in boats without room for sump tanks. This “tee” should really be a Y-valve, so that the sink drain can be kept from backing up into the icebox in certain conditions.
No matter how you decide to drain the box, a tight-fitting stopper is a must to keep cold water in the box, and warm air out.
Icebox Usage
The whole point of improving any icebox is to make the ice last longer, and to keep the things inside the box cooler. Even the best icebox will do a poor job of that if it receives massive, frequent infusions or warm air. That happens every time you open the lid.
Aboard the typical boat, whether racing or cruising, large quantities of canned and bottled beverages are con-sumed. Usually, these are stored in the bottom of the icebox, where they can be kept coldest. Whenever some-one needs a drink, everything in the top of the box must be moved to get to the bottom.
Sliding shelves that give quick access to all levels of the box are a partial solution, but the best solution of all is to simply not open the box as frequently.
Instead, keep a separate cooler full of ice and beverages, which the crew can get into at will. The cooler can be lash-ed to the mast, stowed behind the companionway ladder, or chocked down on the cabin sole, and it need not be par-ticularly large. A simple 48 quart Igloo cooler, costing about $50 and occupying a little over two cubic feet of space, will be adequate as an auxiliary icebox for a boat with a crew of six or less. You’ll be amazed at how much longer ice lasts if the box is opened less frequently.
Other tricks to prolong ice life without icebox modifica-tion include:
• pre-cooling food at home before loading the icebox;
• freezing precooked food or cans of beverage, using them as partial substitutes for ice;
• keeping the icebox relatively full of food to minimize air circulation when the top is opened.
Conclusions
There is a good chance you can significantly improve the efficiency of your boat’s icebox without major modifica-tions. Most boatbuilders do a poor job of building iceboxes because building a good one is relatively expen-sive. A good box could easily add hundreds of dollars to the cost of a 30′ production sailboat.
Unfortunately, a good seven cubic foot box costs the same on a $45,000 production 30-footer as it does on a custom 40-footer costing $150,000. Guess which one gets a good icebox.
With the simple suggestions here — improving insula-tion by filling existing voids, improving the seal of the lid, sealing the drain, and adding an auxiliary icebox for beverages you can probably double the life of ice in the main box.
Unless you’re the cook, this may seem pretty insignifi-can’t. But if the cook has to plan meals out of cans because the food in the icebox has gone off, spend time looking for more ice when he or she should be enjoying a vacation, and don a gasmask in order to clean out the box, the lives of the rest of the crew can be made miserable, too.
It’s an old cliche that the cook has the hardest job on the boat, whether you’re a cruising couple or a crew of 10 on an ocean race. But like most cliches, there’s more than a grain of truth in the saying. You probably wouldn’t tolerate a deck layout that made sail handling impossible. Don’t expect the cook to work with an impossibly primitive galley, either.