Improperly mounted stanchion and pulpit bases are a major cause of gelcoat cracks in the deck radiating from the attached hardware. The cracks are usually the result of unequally stressed mounting fastenings or inadequate underdeck distribution of hardware loads. Frequently, a boat is received from the builder with local cracks already developed. Once the deck gets dirty enough, these minute cracks start to show up as tiny spider webs slightly darker than the surrounding deck gelcoat While repairing these cracks is a fairly difficult cosmetic fix, the underlying problem — poor mounting — is fairly easy to correct in most cases.
288
For better or worse, production keep the cost of their boats competitive. Unfortunately, cutting corners is the rule rather than the exception in production boatbuilding. While you can’t change that situation, you can do a lot to correct the shortcomings that are a function of corner- cutting, including poorly mounted stanchions and pulpits.
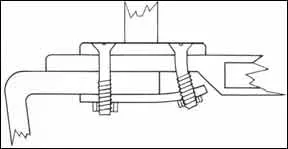
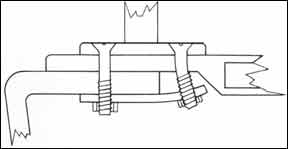
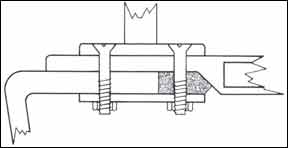
The most typical problem in stanchion mounting is the base which straddles the inward-turning flange of the hull-to-deck joint. Frequently, the outboard bolts will go through both the hull and deck, while the inboard fastenings merely go through the deck. When a backing plate is installed that straddles the edge of the inward-turning hull flange under the deck, it is frequently distorted as the bolts fastening the stanchion bases are tightened. Tightening down the bolts when the backing plate doesn’t lie flush to the underside of the deck inevitably causes local stresses in the deck, frequently resulting in the characteristic spider web of gelcoat cracks.
In order to avoid the problem, some builders simply use oversize washers under the nuts of through- deck bolts. These are not adequate to resist strong local loads, such as leaning hard against a lifeline stanchion. A backing plate of rigid material, at least the size of the base of the hardware to be attached, is the proper solution.
It is fairly common for builders to use fiberglass backing plates, cut from discarded sections of moldings such as cutouts for hatches. While a fiberglass backing plate is better than nothing, it can easily split or distort when bolts are tightened, reducing its effectiveness.
With stainless steel or aluminum hardware, fastened with stainless steel bolts, the best material to use for backing plates is aluminum, between 1/8″ and 1/4″ thick.
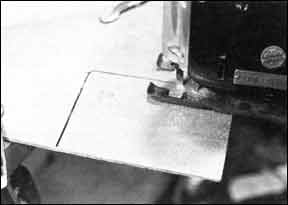
Aluminum has the advantage that it can be worked with ordinary woodworking tools with little difficulty. It can be easily cut with a sabre saw, is easily drilled, and sham corners can be quickly rounded with aluminum oxide sandpaper. It is also extremely light in weight.
You can usually buy scrap aluminum from a scrap metal dealer. Although the price may vary, you should be able to buy a lifetime supp ly of backing plate material for $10 or less.
If you’re making your own backing plates using a sabre saw, invest in a good supply of the correct type of metal cutting blade. About 12 teeth per inch is correct for clean cuts in aluminum up to 3/8” thick. Don’t try to use old blades, or blades designed for other uses. You’ll be amazed at the difference a sharp blade of the right type makes.
288
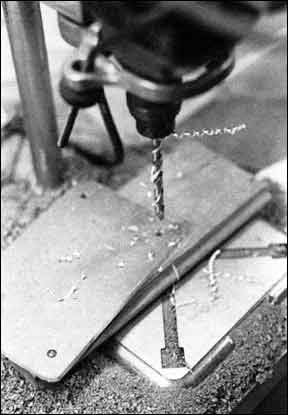
When drilling holes in backing plates, be sure to drill slightly oversize to allow for the bolts that are not perfectly perpendicular to the plate. To drill for a l/4” bolt, use a 9/32 drill for the backing plate holes. The easiest way to insure proper alignment for the holes is to clamp the backing plate to the stanchion base before drilling pilot holes in the backing plate by using the hardware fastening holes as a template. Don’t drill these pilot holes oversize, as you would enlarge the fastening holes in the hardware, making them more likely to leak.
Alternatively, you can drill the pilot holes, if you have an assistant, by simply holding the backing plate under the deck and removing the bolts from the already-attached hardware, one at a time. In the case of stanchions, this method may prove to be more effort than simply removing the stanchion base, but it may be less work than removing a bow pulpit or stern rail.
Whether you’re installing new backing plates, or simply correcting an improper installation, the installation method is the same. Once again, you’re going to take advantage of that wonderful mixture, epoxy and microballoons, that makes so much possible in modifying boats of all types of construction. If there’s any such thing as a panacea for the modern boatowner, epoxy resin filled with microballoons is it.
The epoxy and microballoon mixture is used to create a firm pad under the backing plate, straddling and smoothing out any irregularities in the underside of the deck surface, even irregularities as pronounced as the inside lap of the hull-to-deck joint.
First, make sure that the hardware fastening bolts do in fact line up with the holes in the backing plate. Next, thoroughly wax the surface of the backing plate that will lie against the underside of the deck; also wax the hardware bolts. Waxing allows you to remove the bolts and backing plate in the future. If you don’t wax them, your installation will be permanent, and few things on a boat should be that permanent.
288
Make a dry run to be sure that you haven’t overlooked anything. Then, mix only enough epoxy resin and microballoons to do one piece of hardware. The epoxy mixture must be fairly dry to keep it from running out of the gap between the backing plate and the underside of the deck. You’ll have about the right consistency when the mixture can be troweled onto the backing plate without sagging off.
Trowel the mixture onto the backing plate at least as thick as the largest irregularity to be bridged. Any excess will be squeezed out when the nuts are tightened. Be sure that you put bedding compound under the heads of the bolts, and under the base of the hardware if that has been removed.
With the plate, bolts, and nuts in place, evenly tighten the nuts using a socket and ratchet wrench, box end, or open end wrench. Do not tighten by turning the bolts. You’ll most likely turn out all the bedding compound under the heads, ending up with a nice leak.
It is not necessary to really torque down on the nuts. Tighten only enough to bring the plate evenly in position. When bridging the inside of the hull-to-deck joint, you may well end up with an epoxy pad that is l/2” thick at one end, and only thick enough to fill slight irregularities at the other.
Using a putty knife, clean up the epoxy that squeezed out when the plate pulled up to the deck. Most epoxy is water soluble before it kicks, so warm water and a sponge can be used around the edges for a perfectly neat cleanup. The neater you are, the better it looks.
If the epoxy is too thin, and wants to sag out of the gap between plate and deck, use masking tape to hold it in place. Pull the tape off as soon as the epoxy kicks off, and clean up any runs or dribbles with sandpaper.
When the epoxy is hard -this will vary with the type used and the temperature the nuts can be tightened a little more. Lock washers used under the nuts, rather than flat washers, will keep the nuts from backing off without excessively tightening the fastenings. If the fastenings protrude more than l/4” below the nuts, cut them off flush with a hacksaw blade. Do not use end nippers for this, as many boatbuilders do, because you may break the seal between the fastening and bedding compound while working the nippers back and forth to break off the end of the bolt.
288
This method can be used almost anywhere above and below decks to fill in major surface irregularities. When used above deck, the hardware and fastenings must be removed and bedded after the epoxy has cured, and the exposed edges of the epoxy “pad” should be painted to match the surrounding area.
A Word about Epoxy Resin
An amazing selection of epoxy resins is available to the boatowner: Chem Tech, Gougeon Brothers West System, Industrial Formulators, System Three, Travaco, Allied Resins, Tugon, and dozens more. Formulations are available in a bewildering variety, suited to different purposes. The simplest to use is Gougeon Brothers West System Epoxy, and the reason has nothing to do with the quality of the resin or any of its characteristics.
The reason is a simple device known as the Mini Pump, which mounts on the cans of epoxy resin and hardener, dispensing the proper amount of material with one depression of the pump. This is even simpler than 1:1 resin/hardner mixes, because absolutely no measuring is required.
Gougeon Brothers also market a variety of fillers to modify the characteristics of the resin, and even has a technical manual to help you solve most problems. Independent of product quality, the company’s marketing and packaging of epoxy resin and other products is superb.
For about $25, you can get a 21/2 pint kit of resin and hardener, plus a set of pumps. This may well be enough to see you through dozens of boat improvement projects.


